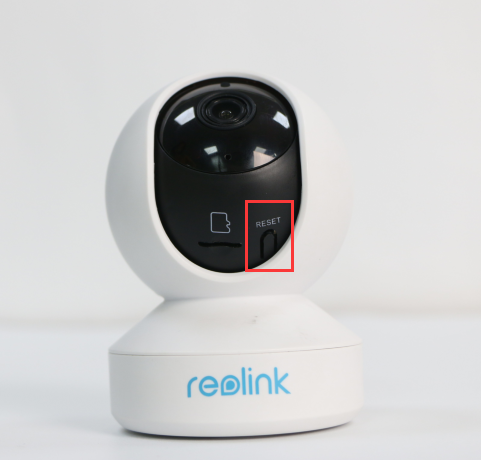
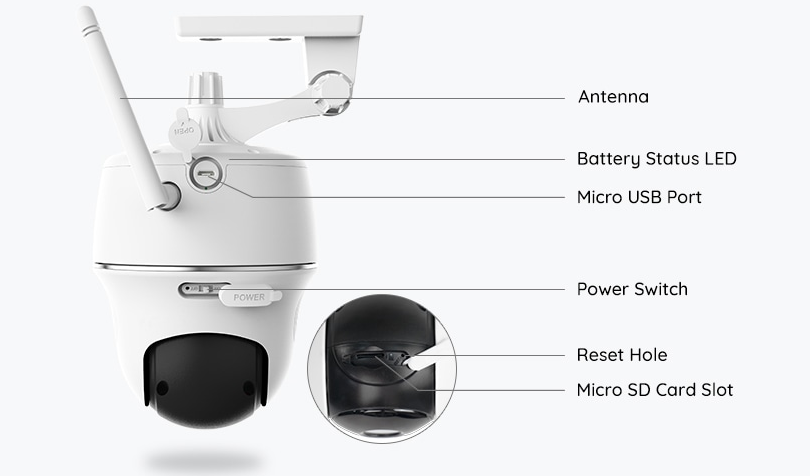
To reset a Reolink camera, press and hold the reset button for 5 seconds. Release button when the camera resets.
Reolink cameras offer advanced features for home and business surveillance. However, there may be instances where you need to reset the camera to troubleshoot issues or reconfigure settings. Knowing how to reset your Reolink camera can be beneficial in maintaining optimal performance and ensuring your security system functions seamlessly.
In this guide, we will explore the step-by-step process to reset your Reolink camera effectively and efficiently. So, let’s dive into the simple yet crucial steps to reset your Reolink camera when needed.

Credit: www.reddit.com
Why Resetting Reolink Camera Is Necessary
Resetting a Reolink camera is a necessary step to ensure the proper functioning and security of your surveillance system. There are two main reasons why resetting your camera becomes essential: suspected compromised security and camera malfunctioning. Let’s delve into each of these reasons in more detail.
Suspected Compromised Security
If you suspect that the security of your Reolink camera has been compromised, it is crucial to reset it as soon as possible. This could happen if you have noticed unusual activities or unauthorized access to your camera feed or settings. Resetting the camera will remove any potential malware, spyware, or unauthorized access from your device, helping to restore your system’s integrity.
If you have sensitive information or valuable assets under surveillance, the security of your camera system should be paramount. Timely resetting can prevent any potential security breaches and ensure the privacy of your footage.
Camera Malfunctioning
Another situation that calls for resetting your Reolink camera is if you encounter any malfunctioning issues. Over time, cameras can face technical glitches and errors that might disrupt their normal operation. This can result in blurry images, sudden freezes, or even camera failures.
By performing a reset, you can troubleshoot and resolve these issues. Resetting the camera can clear any temporary software or hardware problems that might have arisen and return it to a factory default state. This can help eliminate any software conflicts or corrupted settings that could be causing the camera to malfunction.
After resetting your camera, you can then reconfigure it, apply necessary updates, or contact technical support if the problem persists. This simple step can save you time and frustration while ensuring your camera operates smoothly.
In conclusion, resetting your Reolink camera is necessary in situations where compromised security or camera malfunctioning are suspected. By resetting, you can mitigate potential security risks and resolve any technical problems that may arise, ensuring the optimal performance and safety of your surveillance system.

Credit: community.reolink.com
Resetting Reolink Camera: Step-by-step Guide
Resetting your Reolink camera can be a simple yet essential task, especially if you encounter any issues with its functionality. Following a step-by-step guide can help you reset your camera quickly and efficiently. In this post, we will walk you through the process of resetting your Reolink camera using a simple, user-friendly method.
Step 1: Power Off The Camera
To begin the reset process, ensure that the Reolink camera is powered off. Locate the power source and safely disconnect it from the camera to proceed to the next step.
Step 2: Locate The Reset Button
Next, you will need to locate the reset button on the camera. The reset button is typically a small, recessed button that is designed to prevent accidental activation, so it may require a tool, such as a paperclip, to press properly.
Step 3: Press And Hold The Reset Button
Using the tip of the paperclip or a similar tool, press and hold the reset button on the camera. Ensure that it is fully depressed and held in place for the next step of the process.
Step 4: Release The Reset Button
After holding the reset button for a few seconds, release it to allow the camera to initiate the reset process. This action will clear any previous settings and return the camera to its default state.
Step 5: Wait For The Camera To Restart
Now, wait for the camera to restart and initialize the reset. This may take a few moments, so be patient during this brief period. Once the camera has restarted, it should be reset and ready for reconfiguration.
Precautions To Take Before Resetting Reolink Camera
Before resetting your Reolink camera, it is crucial to take necessary precautions to avoid any data loss or damage. Follow these important steps to ensure a smooth and successful reset process.
Backup Footage And Camera Settings
Prioritize backing up any important footage saved on your Reolink camera to avoid losing valuable recordings. Also, remember to export camera settings to retain your preferred configurations after the reset.
Disconnect From Power Source
Make sure to disconnect your Reolink camera from any power sources before initiating the reset procedure to prevent potential electrical hazards.
Take Note Of Camera Orientation
Before resetting your Reolink camera, double-check and note down the camera’s orientation to easily reposition it correctly post-reset. This will ensure optimal surveillance coverage.

Credit: www.youtube.com
Common Issues Resolved By Resetting Reolink Camera
Resetting your Reolink camera can effectively troubleshoot various common issues that users may encounter with their security cameras.
Failed Camera Connection
- Ensure camera is properly powered and connected.
- Resetting the camera can fix connectivity issues.
- Verify network settings for seamless connection.
Inability To Access Camera Settings
- Resetting the camera can restore access to settings.
- Ensure login credentials are correct.
- Check for any firmware updates that may be causing issues.
Poor Video Quality
- Reset the camera to improve video quality.
- Adjust camera positioning for better visuals.
- Ensure sufficient lighting for clearer recordings.
By resetting your Reolink camera, you can efficiently resolve these common issues and ensure optimal performance of your security system.
Alternative Ways To Reset Reolink Camera
When troubleshooting issues with your Reolink camera, there may come a time where a reset is necessary. In addition to the standard factory reset procedure, there are alternative methods to reset your Reolink camera. These alternative methods can be useful if the typical reset process is not possible or if you prefer a different approach. Explore the following alternative ways to reset your Reolink camera to get it back to its default settings.
Using Reolink App
One alternative method to reset your Reolink camera is by utilizing the Reolink app. To do this, open the Reolink app on your mobile device and navigate to the camera settings. Look for the option to reset the camera, which can typically be found in the camera settings or device management section. Select the reset option and follow the on-screen prompts to initiate the reset process. This method is convenient for users who prefer managing their camera settings from their mobile devices.
Resetting Via Web Browser
If you prefer using a web browser to reset your Reolink camera, you can access the camera’s settings through a computer or mobile browser. Log in to your Reolink account through the web interface and locate the camera you wish to reset. Within the camera settings, there should be an option to reset the device to its default settings. Click on the reset option and confirm the action to proceed with the reset process. This method provides flexibility for users who prefer managing their camera settings through a web browser.
When To Seek Professional Help
If you’re experiencing issues with your Reolink camera, it may be time to seek professional help. Resetting the camera can help resolve common problems and restore functionality.
Persistent Camera Issues
If you have been facing persistent issues with your Reolink camera, it might be time to consider seeking professional help. Persistent camera issues can range from frequent disconnections, poor video quality, to malfunctioning motion detection. These issues can disrupt the functionality of your camera and compromise the security of your property. By seeking professional help, you can address these issues effectively and ensure the smooth operation of your Reolink camera.Lack Of Technical Expertise
Not everyone is an expert when it comes to troubleshooting camera problems. If you find yourself lacking the technical expertise required to reset your Reolink camera, it is advisable to seek professional assistance. Resetting a camera involves delicate procedures that may require in-depth knowledge of the camera’s settings and software. By seeking help from professionals, you can avoid potential damage to your camera and ensure that it is reset correctly. Knowing when to seek professional help is crucial in resolving issues with your Reolink camera. Here are some situations where seeking professional assistance is recommended:- Repeated attempts at troubleshooting: If you have attempted to reset your camera multiple times without any success, it is a clear indication that a professional’s intervention is required.
- Complex camera setup: Some Reolink camera setups may be more complex and require the expertise of a professional to ensure proper functioning.
- Hardware or software issues: If you suspect that your camera is experiencing hardware or software-related problems, it is best to seek professional help to diagnose and fix the issues.
- Time constraints: If you have limited time or are unsure about troubleshooting techniques, seeking professional help can save you time and effort in the long run.
Conclusion
To sum up, resetting your Reolink camera is a simple process that can resolve various technical issues. By following the steps outlined in this guide, you can ensure that your camera is functioning optimally. Regular maintenance and troubleshooting can help you get the most out of your security system.
Keep your Reolink camera in top condition and enjoy heightened security and peace of mind.


0 comments