
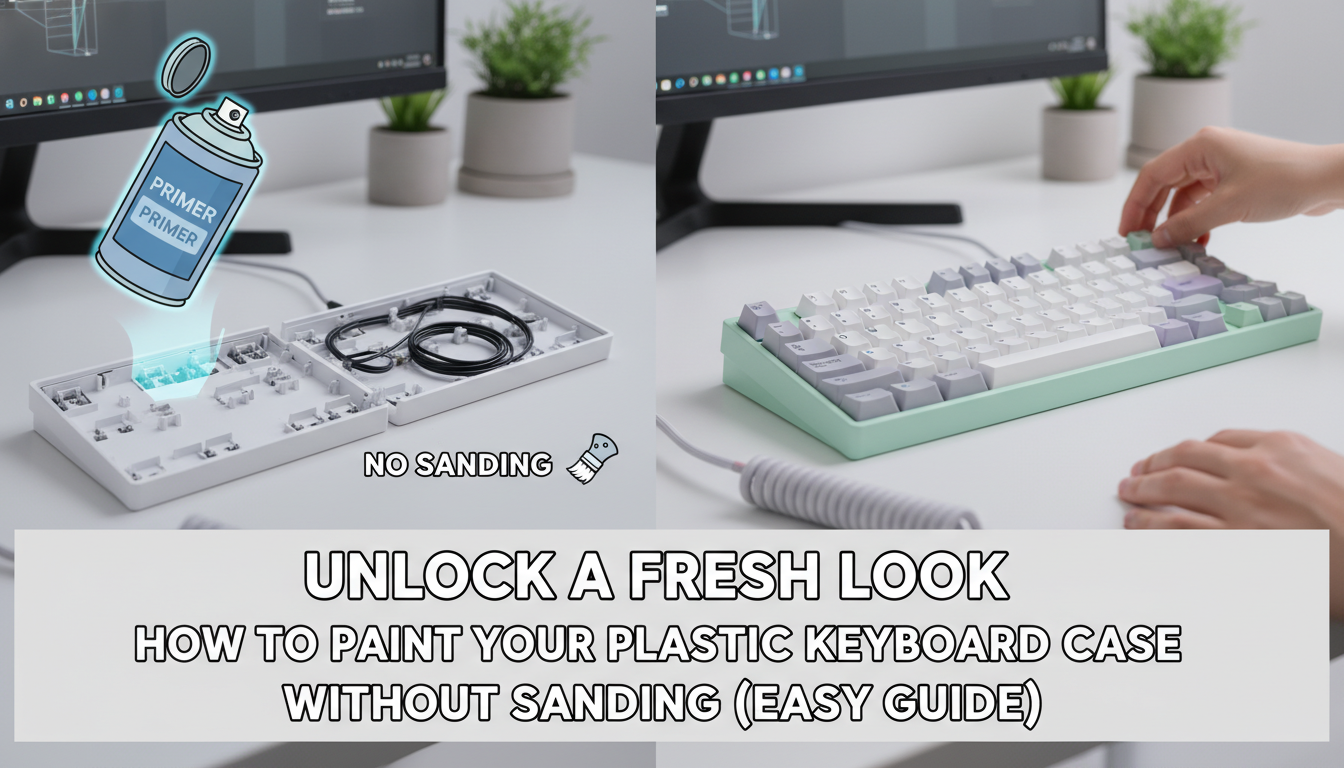
Is your mechanical keyboard starting to feel a little… beige? We’ve all been there. You spend hours scrolling through Instagram or Reddit, drooling over stunning, color-coordinated battle stations, only to look down at your own plain, plastic chassis. You want that custom aesthetic—maybe a matte pastel pink or a sleek, industrial charcoal—but the thought of dismantling your board and spending an entire afternoon sanding down plastic feels like a chore you just don’t have time for.
The good news is that customizing your setup doesn’t have to be a dusty, labor-intensive nightmare. While traditional wisdom insists that scuffing up the surface is non-negotiable for paint adhesion, modern formulations and a few clever prep tricks have changed the game. In this guide, we are going to unlock a fresh look for your workspace by bypassing the sandpaper entirely. Whether you are a seasoned modder looking for a quick weekend project or a beginner afraid of ruining your gear, this easy, sanding-free method will give you that smooth, factory-grade finish you crave without the elbow grease. Let’s get painting.
Are you tired of staring at the same dull, standard keyboard day in and day out? We all dream of a setup that reflects our unique personality, but the path to a custom aesthetic often feels blocked by one messy, time-consuming obstacle: sanding. The idea of scuffing up your expensive gear with abrasive paper is daunting, and let’s face it—nobody likes cleaning up that fine plastic dust.
Here is the good news: you can achieve a flawless, professional-grade finish without a single grain of sandpaper. This guide is designed to help you ditch the dust and embrace a smarter, cleaner way to customize. By swapping mechanical abrasion for the science of specialized adhesion promoters, you can create a bond that is durable and scratch-resistant without the elbow grease.
In this walkthrough, we will demystify the process and cover everything you need to know to upgrade your keyboard case, including:
- The Secret Sauce: Identifying the specific primers that bite into plastic chemically.
- Meticulous Prep: Cleaning techniques that ensure your paint sticks for good.
- Flawless Application: How to spray for a smooth, factory-like look.
- Sealing: Locking in your vibrant new color for long-term durability.
Put down the sandpaper and grab your gloves—it’s time to transform your setup effortlessly!
Why Skip the Sanding? Understanding Adhesion on Plastic
For decades, the golden rule of painting was “sand to stick.” Traditional preparation relies on creating a mechanical bond, where you physically scratch the surface to give the paint something to grip. However, with advancements in coating technology, we can now often trade physical abrasion for advanced chemistry.
Modern adhesion promoters and direct-to-plastic primers function by creating a chemical bond. Instead of relying on friction from scratches, these agents modify the surface tension of the plastic or slightly soften the substrate. This reaction allows the new coat to fuse directly with the material rather than just sitting on top of it. This method is particularly effective for distinct scenarios where sandpaper does more harm than good.
Adopting a no-sand approach offers several key benefits:
- Preserved Surface Texture: Sanding inevitably flattens natural grains. Chemical adhesion keeps detailed textures, such as automotive interior grains or molded patterns, perfectly intact.
- Structural Integrity: Delicate, thin, or brittle plastics can crack under the pressure of sanding; chemical priming is non-invasive and safe for fragile parts.
- Efficiency and Cleanliness: Eliminating the sanding step removes the risk of airborne dust settling into your wet paint, ensuring a cleaner finish and a faster workflow.
By identifying the right plastic and using the correct adhesion promoter, you can achieve a durable, factory-grade finish without ever picking up a sanding block.
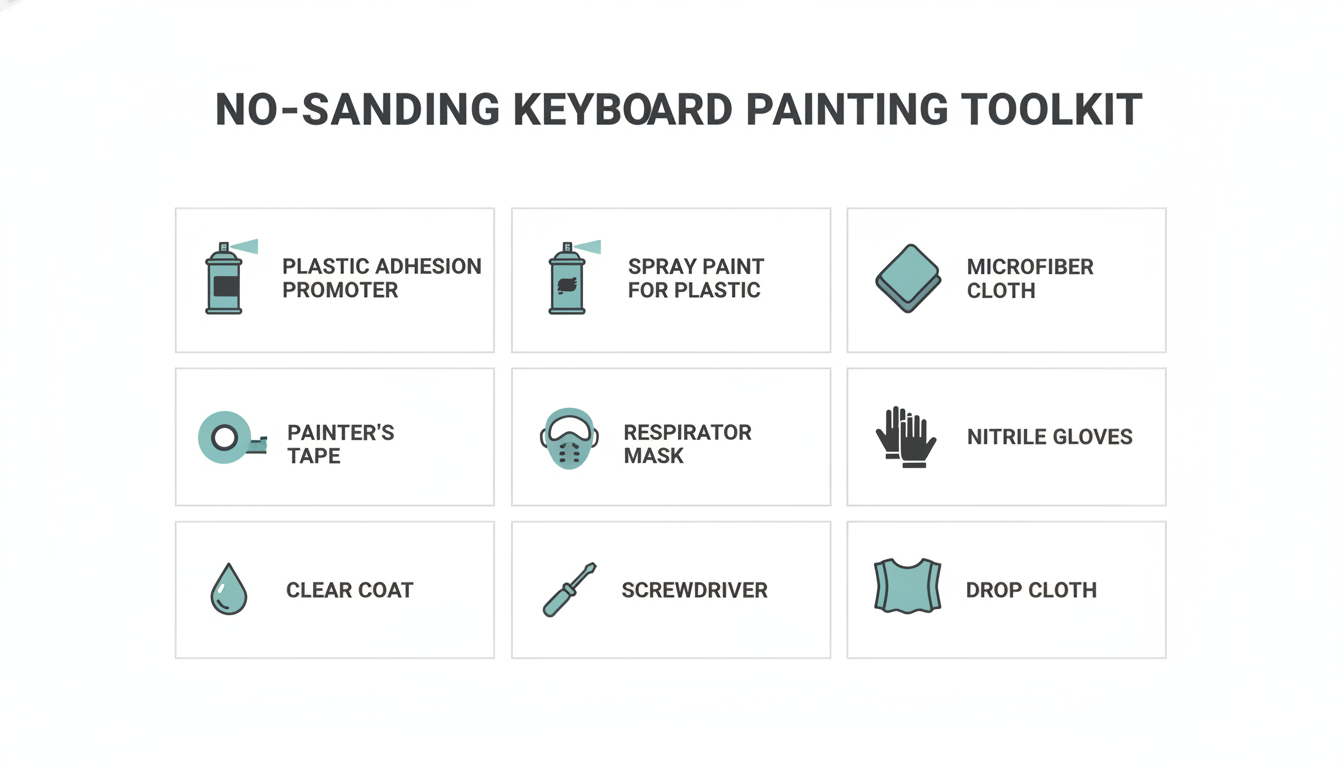
To achieve a flawless, durable finish without the grit of sanding, you must replace mechanical abrasion with chemical adhesion. Your toolkit is the most critical variable in this equation; substituting any of these items can lead to peeling or bubbling.
Here is your essential checklist for a no-sand success:
- TSP (Trisodium Phosphate) or Heavy-Duty Degreaser: Since you aren’t sanding away surface contaminants, you must chemically obliterate them. This removes stubborn mold release agents and oils that prevent paint from bonding.
- Scuff Pad or Scrubbing Sponge: Use this during your wash step. While not “sanding,” a firm scrub helps the degreaser penetrate textured plastics.
- Isopropyl Alcohol (90%+): The final fail-safe. A quick wipe-down just before priming ensures absolutely no residue remains to interfere with the chemical bond.
- Adhesion Promoter: The “secret weapon” for no-sanding projects. This clear primer acts as a chemical bridge, biting into the smooth plastic surface so your paint has something to grab onto.
- Plastic-Formulated Spray Paint: Choose paints explicitly labeled “bonds to plastic.” These contain flexible resins that expand and contract with the material, preventing cracks.
- High-Quality Respirator: Adhesion promoters and spray paints release strong VOCs. A simple dust mask isn’t enough; protect your lungs with a proper respirator.
- Lint-Free Tack Cloths: To trap microscopic dust particles right before you spray.
With this arsenal, you are ready to create a chemical bond that rivals any sanded finish.
Analysis: The No-Sanding Toolkit: Essential Materials You’ll Need
Disassembly and Meticulous Cleaning: The Foundation of Success
Skipping the sandpaper does not mean skipping preparation. In fact, without the mechanical grip provided by sanding, the chemical bond of your primer relies entirely on surface purity. A flawless finish starts with a pristine canvas.
Begin by carefully disassembling your keyboard. Use the appropriate screwdriver bits to avoid stripping heads and document every step. Take photos of the internal layout and organize screws in a magnetic tray or labeled bags to ensure a headache-free reassembly later.
Once the case is stripped, shift your focus to cleaning. This is the most vital step for ensuring adhesion:
- Dust Removal: clear away loose debris using compressed air or a soft anti-static brush.
- Deep Wash: Scrub the case with warm water and mild dish soap to remove accumulated grime, then allow it to dry completely.
- Degrease: Wipe every inch of the surface with 90%+ Isopropyl Alcohol or a plastic-safe prep cleaner. Even invisible finger oils will cause paint to bead, separate, or peel over time.
Finally, protect the functional components. Use high-quality painter’s tape to mask off USB ports, internal standoffs, and battery compartments. If you wish to preserve a manufacturer logo, cover it now and carefully trim the excess tape with a hobby knife for a sharp, professional edge.
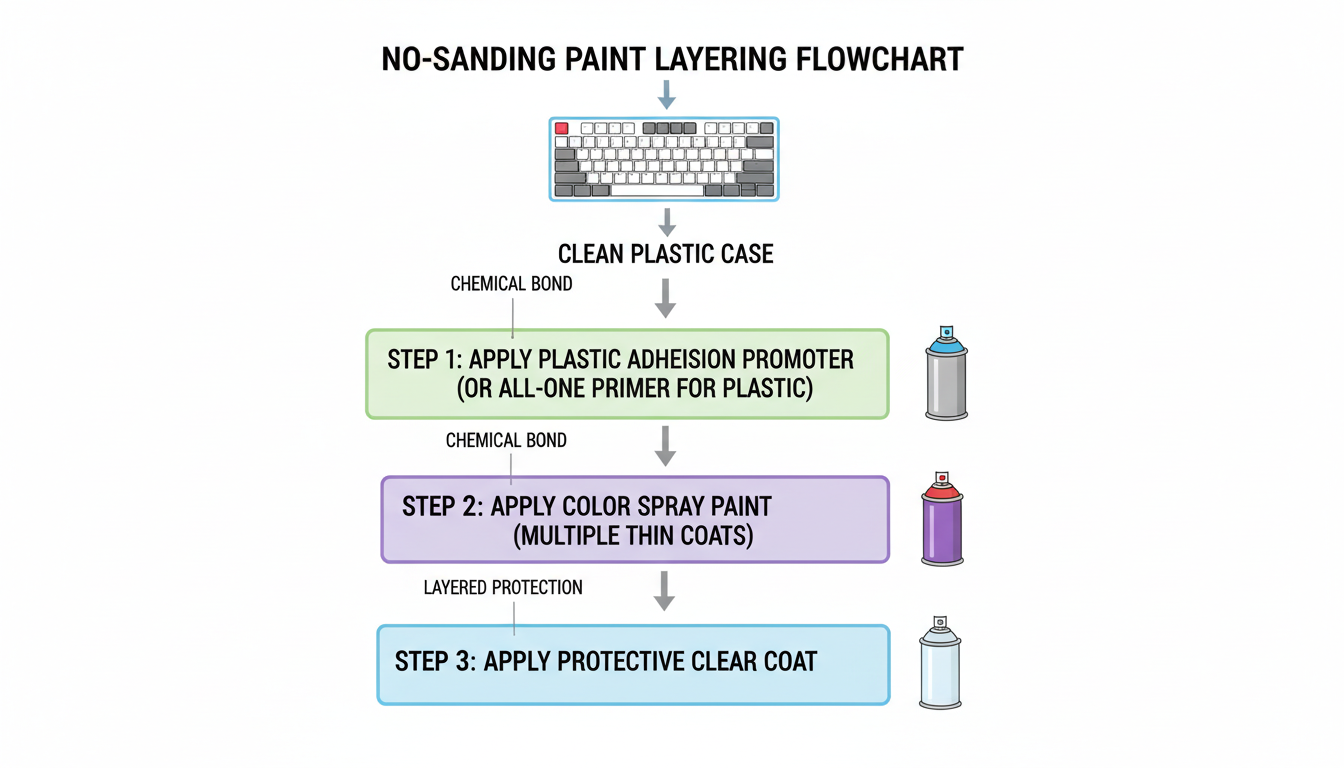
The Game Changer: Applying Plastic Adhesion Promoter or All-in-One Primer
This is the absolute cornerstone of the no-sanding method. Forget the elbow grease of scuffing; plastic adhesion promoters do the heavy lifting through science. Unlike sanding, which creates mechanical grooves for paint to grip, these products work by chemically modifying the plastic’s surface. They slightly soften the material, opening its “pores” to create a molecular bond that is incredibly durable without requiring a single scratch.
For your project, you will generally choose between two paths:
- Dedicated Adhesion Promoters: These are clear primers specifically designed to act as the “glue” between slick plastic and your color coat. They offer the strongest insurance policy against peeling.
- All-in-One Paint + Primer: Modern formulations that combine the bonding agent with pigment. These offer convenience and speed for standard furniture updates.
However, chemistry only works if applied correctly. Success relies entirely on precision over volume. Apply light, mist-like coats while holding the can the recommended distance (usually 8–12 inches) from the surface. Do not try to achieve full coverage on the first pass. Most importantly, strictly adhere to the manufacturer’s flash-off times—the specific waiting period between coats. Rushing this step traps solvents and weakens the bond. Patience here is the difference between a factory-finish look and a peeling disaster.
Analysis: The Game Changer: Applying Plastic Adhesion Promoter or All-in-One Primer
Choosing and Applying Your Color: Precision Painting Techniques
With your case primed, you have arrived at the most transformative step. Select a spray paint specifically formulated for plastic (such as high-quality acrylics or enamels) to ensure a permanent chemical bond. Consider your finish carefully: matte or satin sheens are excellent for hiding minor surface imperfections, while high-gloss demands a flawless base but offers a premium, factory-fresh look.
Before you begin, ensure your workspace is well-ventilated with low humidity. Always practice on scrap material first to get a feel for the nozzle pressure. To achieve a professional, drip-free finish, adhere to these golden rules:
- Shake the can vigorously for at least one minute to mix the pigments and propellant.
- Maintain a consistent distance of 8 to 12 inches from the surface.
- Use smooth, sweeping motions, starting the spray off the object and ending off it.
- Apply multiple thin, mist-like coats rather than one heavy layer.
Patience is your best tool here. Respect the specific drying and re-coat windows listed on your paint can. Rushing the process can lead to wrinkling or tackiness, so let the paint cure properly to let your custom color truly shine.
The Finishing Touch: Protecting Your Paint with a Clear Coat
You’ve poured hours into sanding, priming, and painting your custom project, but don’t walk away just yet! **Don’t skip this vital step.** Applying a clear coat is the crucial barrier that stands between your masterpiece and the elements. A high-quality clear coat does more than just add a professional sheen; it acts as a hardened shield against **scratches, skin oils, UV degradation, and everyday wear and tear**.
Before you start spraying, ensure you choose a clear coat that is **chemically compatible** with your specific base paint. Mismatched formulas can lead to disastrous bubbling or peeling. The application process mirrors your color layers: aim for multiple **thin, even coats** rather than one heavy layer. This technique prevents drips and ensures a smooth, uniform surface.
However, the true secret to durability is patience. While the surface might feel dry to the touch within an hour, the **full cure time** for a clear coat often takes **several days to a week**. Rushing this stage is the most common mistake enthusiasts make.
**Tips for a showroom-quality finish:**
* **Layer Wisely:** Apply 3-4 light coats, allowing proper flash time between sprays.
* **Wait it Out:** Let the object cure for at least **72 hours** before handling or reassembly to ensure maximum hardness.
* **Environment Matters:** Spray in a dust-free, low-humidity area to keep the finish pristine.
Conclusion: Enjoy Your Custom, Sand-Free Keyboard!
Congratulations! By following this guide, you have successfully transformed your plastic keyboard case from generic to distinct, all without touching a single piece of sandpaper. You’ve proven that with the right specialized materials—like high-quality adhesion promoters and vinyl dyes—you can achieve a finish that is both durable and professional, bypassing the dust and fatigue of traditional methods.
As you admire your handiwork, remember the key takeaways that made this project a success:
- Preparation is King: Thorough cleaning was the secret to ensuring your paint adhered perfectly without scuffing the surface.
- Patience Pays Off: Respecting those drying times was crucial for creating a hard, chip-resistant coat.
- Smart DIY: You utilized chemical adhesion rather than mechanical abrasion to preserve the original texture and integrity of the case.
Now comes the most satisfying part: reassembly. Carefully put your PCB, plate, and keycaps back together, plug it in, and type away. Your setup is no longer just a tool; it is a unique expression of your creative vision. Whether you aimed for a retro aesthetic or a modern matte finish, enjoy the fresh, personalized look of your custom keyboard!
0 comments