
To take a screenshot on an Asus laptop, press the “PrtScn” key. Then paste it into a program like Paint.
Capturing your screen on an Asus laptop is simple and quick. Whether you want to save an image, document, or webpage, taking a screenshot can be incredibly useful. By following a few easy steps, you can capture and store important information that you may need to reference later.
Let’s delve into the process of taking screenshots on your Asus laptop and explore the different methods available to help you effortlessly capture anything on your screen.
Methods For Taking A Screenshot On An Asus Laptop
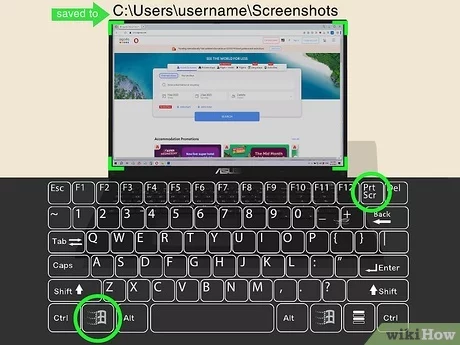
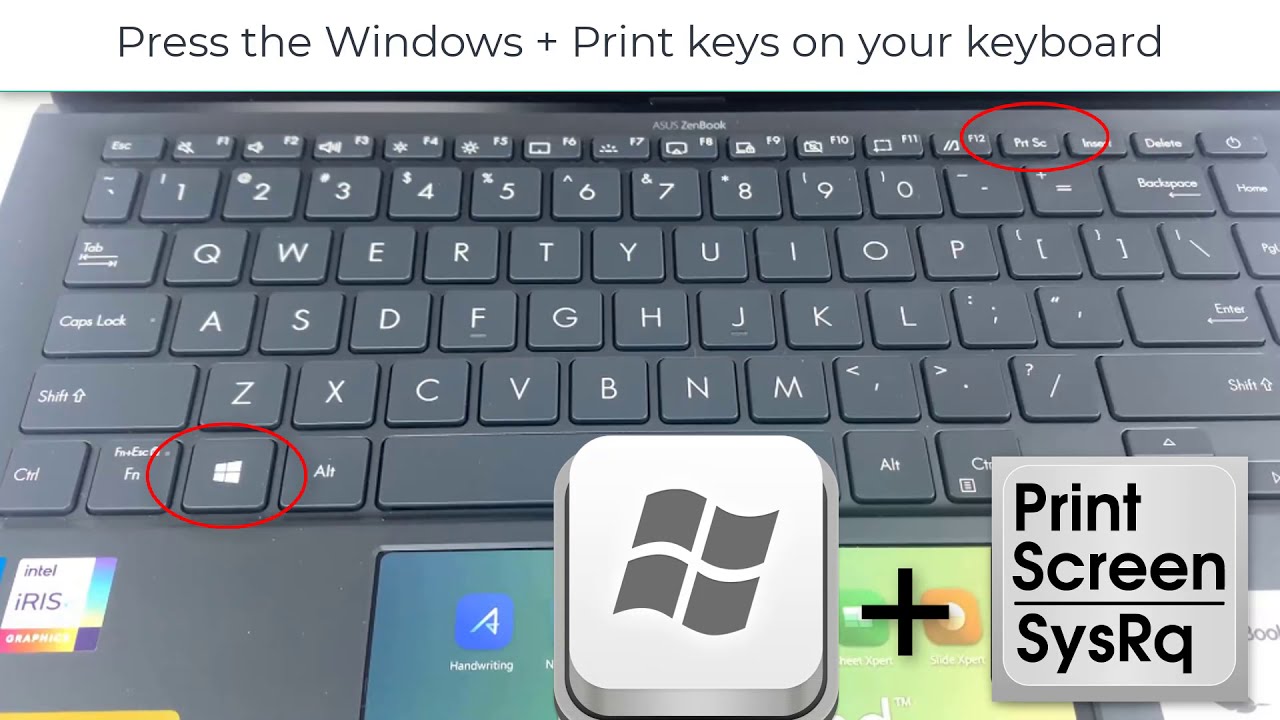
To take a screenshot on an Asus laptop, simply press the “Print Screen” key or “Windows + Print Screen” keys to capture the entire screen or use the “Alt + Print Screen” keys to select a specific window. The saved image can be found in the “Screenshots” folder under “Pictures”.
Methods for Taking a Screenshot on an Asus Laptop When it comes to capturing and saving moments on your Asus laptop screen, there are multiple efficient methods to do so. Whether it’s a complete screen capture or a specific area, Asus laptops offer various options to suit your specific needs. Let’s explore how you can take a screenshot on your Asus laptop using the print screen key, the Windows Snipping Tool, and the Asus Screen Capture Tool. Using the Print Screen Key One way to take a screenshot on your Asus laptop is by using the print screen key. Pressing the “PrtScn” key on your keyboard will capture the entire screen. To save the screenshot, you can paste it into an image editing program, such as Paint, and then save it as a file. Using the Windows Snipping Tool Another method for taking a screenshot on your Asus laptop is by utilizing the Windows Snipping Tool. This tool allows you to capture a custom, defined area of your screen. Simply open the Windows Snipping Tool, select the type of snip you want (such as free-form or rectangular), and then click and drag the cursor to capture the desired area. You can then save the snip as an image file. Using the Asus Screen Capture Tool Asus also offers its own Screen Capture Tool that provides a user-friendly way to take screenshots on your Asus laptop. This tool offers various screenshot modes, including full screen, select window, or custom area, making it convenient for users to capture and save screenshots with ease. By applying these methods, users can easily capture screenshots on their Asus laptops, enabling them to save and share important information or memorable moments with others. Whether it’s for work or personal use, Asus laptops offer versatile options for capturing screen content effortlessly.
Credit: www.youtube.com
Using The Print Screen Key
Want to take a screenshot on your Asus laptop? Learn how to do it using the Print Screen key below.
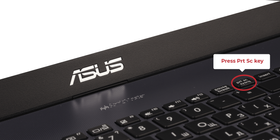
Locating The Print Screen Key
The Print Screen key on most Asus laptops can usually be found near the top right corner of the keyboard. It may be labeled as “PrtScn” or “PrtSc”.
Taking A Full Screen Screenshot
- Press the Print Screen key (PrtScn) to capture the entire screen.
- Open an image editing program like Paint and press Ctrl + V to paste the screenshot.
Taking A Screenshot Of A Specific Window
- Press Alt + PrtScn to capture only the active window on your Asus laptop.
- Open an image editing program and press Ctrl + V to paste the screenshot.
Saving The Screenshot
- After pasting the screenshot in an editing program, click on File > Save As to save the image in your desired format.
- Choose a location on your laptop to save the screenshot and give it a relevant file name.
Using The Windows Snipping Tool
Using the Windows Snipping Tool on your Asus laptop is a quick and convenient way to capture screenshots. Below, we’ll guide you through the process step by step.
Opening The Snipping Tool
Access the Windows Snipping Tool on your Asus laptop by typing “Snipping Tool” in the search bar. Select the application from the search results to open it.
Choosing The Type Of Screenshot
- Once the Snipping Tool is open, click on the “Mode” button to choose the type of screenshot you want to capture – Free-form, Rectangular, Window, or Full-screen.
Capturing The Screenshot
- After selecting the mode, position your cursor on the screen where you want to start the screenshot and click and drag to select the area you wish to capture.
- Release the mouse button to capture the screenshot. The selected area will appear in the Snipping Tool window.
Editing And Saving The Screenshot
To edit the screenshot, you can use the pencil and highlighter tools to annotate or emphasize parts of the image. Click on the File menu and select Save As to save the screenshot to your desired location on your Asus laptop.
Credit: screenrec.com
Using The Asus Screen Capture Tool
Using the Asus Screen Capture Tool is an efficient way to capture, edit, and save screenshots on your Asus laptop. This built-in feature provides a convenient method for taking snapshots of your screen, whether you want to capture a particular moment or document a process. In this guide, we will walk you through the steps of accessing the Asus Screen Capture Tool, taking a screenshot, and editing and saving the captured image.
Accessing The Asus Screen Capture Tool
To access the Asus Screen Capture Tool, simply press the “Fn” and “Print Screen” keys simultaneously on your Asus laptop. This will activate the tool and allow you to capture the desired area of your screen.
Taking A Screenshot
Once the Asus Screen Capture Tool is activated, you can select the area of the screen you wish to capture by clicking and dragging your cursor. This flexible feature enables you to capture the entire screen, a specific window, or a custom area with ease.
Editing And Saving The Screenshot
After capturing the screenshot, the Asus Screen Capture Tool provides options for editing the image, such as adding annotations, text, or highlighting specific areas. Once you are satisfied with the edits, you can save the screenshot to a location of your choice, ensuring that the captured image is readily accessible for future use.
Troubleshooting
Encountering issues while trying to take a screenshot on your Asus laptop can be frustrating. But don’t worry, we’ve got you covered! In this troubleshooting section, we will address three common problems and provide simple solutions so you can capture those important moments effortlessly.
Print Screen Key Not Working
If you find that your Print Screen key isn’t functioning as expected, there are a few possible causes. First, make sure that you are pressing the correct key combination. On most Asus laptops, the Print Screen key is labeled as “PrtSc” and is typically located in the top row of the keyboard.
If pressing the Print Screen key alone doesn’t work, try combining it with the “Fn” key. Sometimes, laptops require this additional key to activate certain functions. Pressing “Fn + PrtSc” should capture the entire screen, saving it to the clipboard.
However, if these combinations don’t work, it’s possible that the Print Screen key is disabled. To enable it, you can check the BIOS settings of your Asus laptop. Restart your laptop and press the specific key (usually Delete or F2) to enter the BIOS interface. Look for the “Function Key Behavior” or a similar option and ensure that it is set to “Function Key” or “Multimedia Key”. Save any changes made and exit the BIOS.
Snipping Tool Not Installed
If your Asus laptop does not have the Snipping Tool installed, you can still capture screenshots by using the pre-installed Windows utility called “Snip & Sketch”. This tool provides similar functionality and is just as easy to use.
- Press the Start button and type “Snip & Sketch” in the search bar.
- Click on the Snip & Sketch app in the search results to open it.
- In the Snip & Sketch window, click on the New button to start the snipping process.
- Select the area you want to capture by dragging the cursor over it.
- After making your selection, the snipped image will open in the Snip & Sketch editor.
- From here, you can annotate, save, or share the screenshot as needed.
Screen Capture Tool Not Available
If you are unable to find any screen capture tool on your Asus laptop, don’t worry, there are several alternatives available for you to consider.
| Tool | Description |
|---|---|
| Lightshot | A lightweight and easy-to-use screen capture tool. It allows you to capture, annotate, and share screenshots effortlessly. |
| Greenshot | A powerful screen capture software that offers various capturing modes, editing capabilities, and sharing options. |
| ShareX | A feature-rich screen capture tool with advanced functionalities like custom workflows, image editing, and automatic sharing options. |
These third-party tools are widely used and can be easily downloaded and installed on your Asus laptop. Simply choose the one that suits your needs and preferences, and you’ll be able to capture screenshots effortlessly.
Other Screenshot Methods
To take a screenshot on an Asus laptop, use the keyboard shortcut “Fn + Print Screen. ” You can also use the Snipping Tool or the Snip & Sketch app for more flexibility in capturing specific areas on the screen.
Other Screenshot Methods In addition to the built-in methods, there are several other ways you can take screenshots on your Asus laptop. These alternative methods offer more flexibility and customization options, allowing you to capture exactly what you need. Whether you prefer third-party screenshot applications or using keyboard shortcuts, there is a method that suits your preferences and requirements.Third-party Screenshot Applications
If you are looking for additional features and capabilities, third-party screenshot applications can be a great solution. These applications offer a range of advanced options, such as capturing scrolling web pages, annotating screenshots, and even recording your screen. Some popular third-party options include:- Snagit: A powerful screenshot tool that allows you to capture images, videos, and even GIFs. With its comprehensive editing features, you can easily enhance and customize your screenshots.
- Lightshot: This lightweight application offers intuitive features like cropping, highlighting, and drawing tools. It also allows you to instantly share your screenshots via social media or email.
- Greenshot: With Greenshot, you can capture full-screen shots, specific windows, or even specific regions of your screen. It also provides options for adding annotations and exporting your screenshots to various file formats.
Using Keyboard Shortcuts
If you prefer a quick and effortless method, using keyboard shortcuts can be a convenient way to take screenshots on your Asus laptop. Here are some commonly used keyboard shortcuts for capturing screenshots:- Print Screen (PrtSc) key: Pressing the PrtSc key captures the entire screen. To save the screenshot, simply paste it into an image editing application, such as Microsoft Paint, and save it.
- Alt + Print Screen: This combination captures only the active window on your screen. Again, paste the screenshot into an image editing application and save it as desired.
- Windows + Shift + S: On newer versions of Windows, this keyboard shortcut opens the Snip & Sketch tool, allowing you to select a specific region for capturing a screenshot. The screenshot is automatically saved to your clipboard, ready for pasting.
Credit: softkeys.uk
Frequently Asked Questions Of How Do I Take A Screenshot On An Asus Laptop
How Can I Take A Screenshot On My Asus Laptop?
To take a screenshot on your Asus laptop, press the “Fn” key and the “Print Screen” key together. The screenshot will be saved in your clipboard, which you can then paste into an image editing program or document.
Is There A Built-in Screenshot Tool On Asus Laptops?
Yes, Asus laptops come with a built-in screenshot tool called “Snipping Tool”. You can access it by pressing the “Windows” key, typing “Snipping Tool” in the search bar, and selecting it from the results. This tool allows you to capture screenshots of selected areas, windows, or the entire screen.
How Do I Take A Screenshot Of Just One Window On My Asus Laptop?
To take a screenshot of just one window on your Asus laptop, press the “Alt” key and the “Print Screen” key together. This will capture a screenshot of the active window only, which you can then paste into an image editing program or document.
Conclusion
Taking a screenshot on your Asus laptop is a simple process that can come in handy for various reasons. By using the keyboard or built-in screenshot tools, you can easily capture and save images of your screen. This quick and convenient method will allow you to share visuals or save important information with ease.
0 comments