
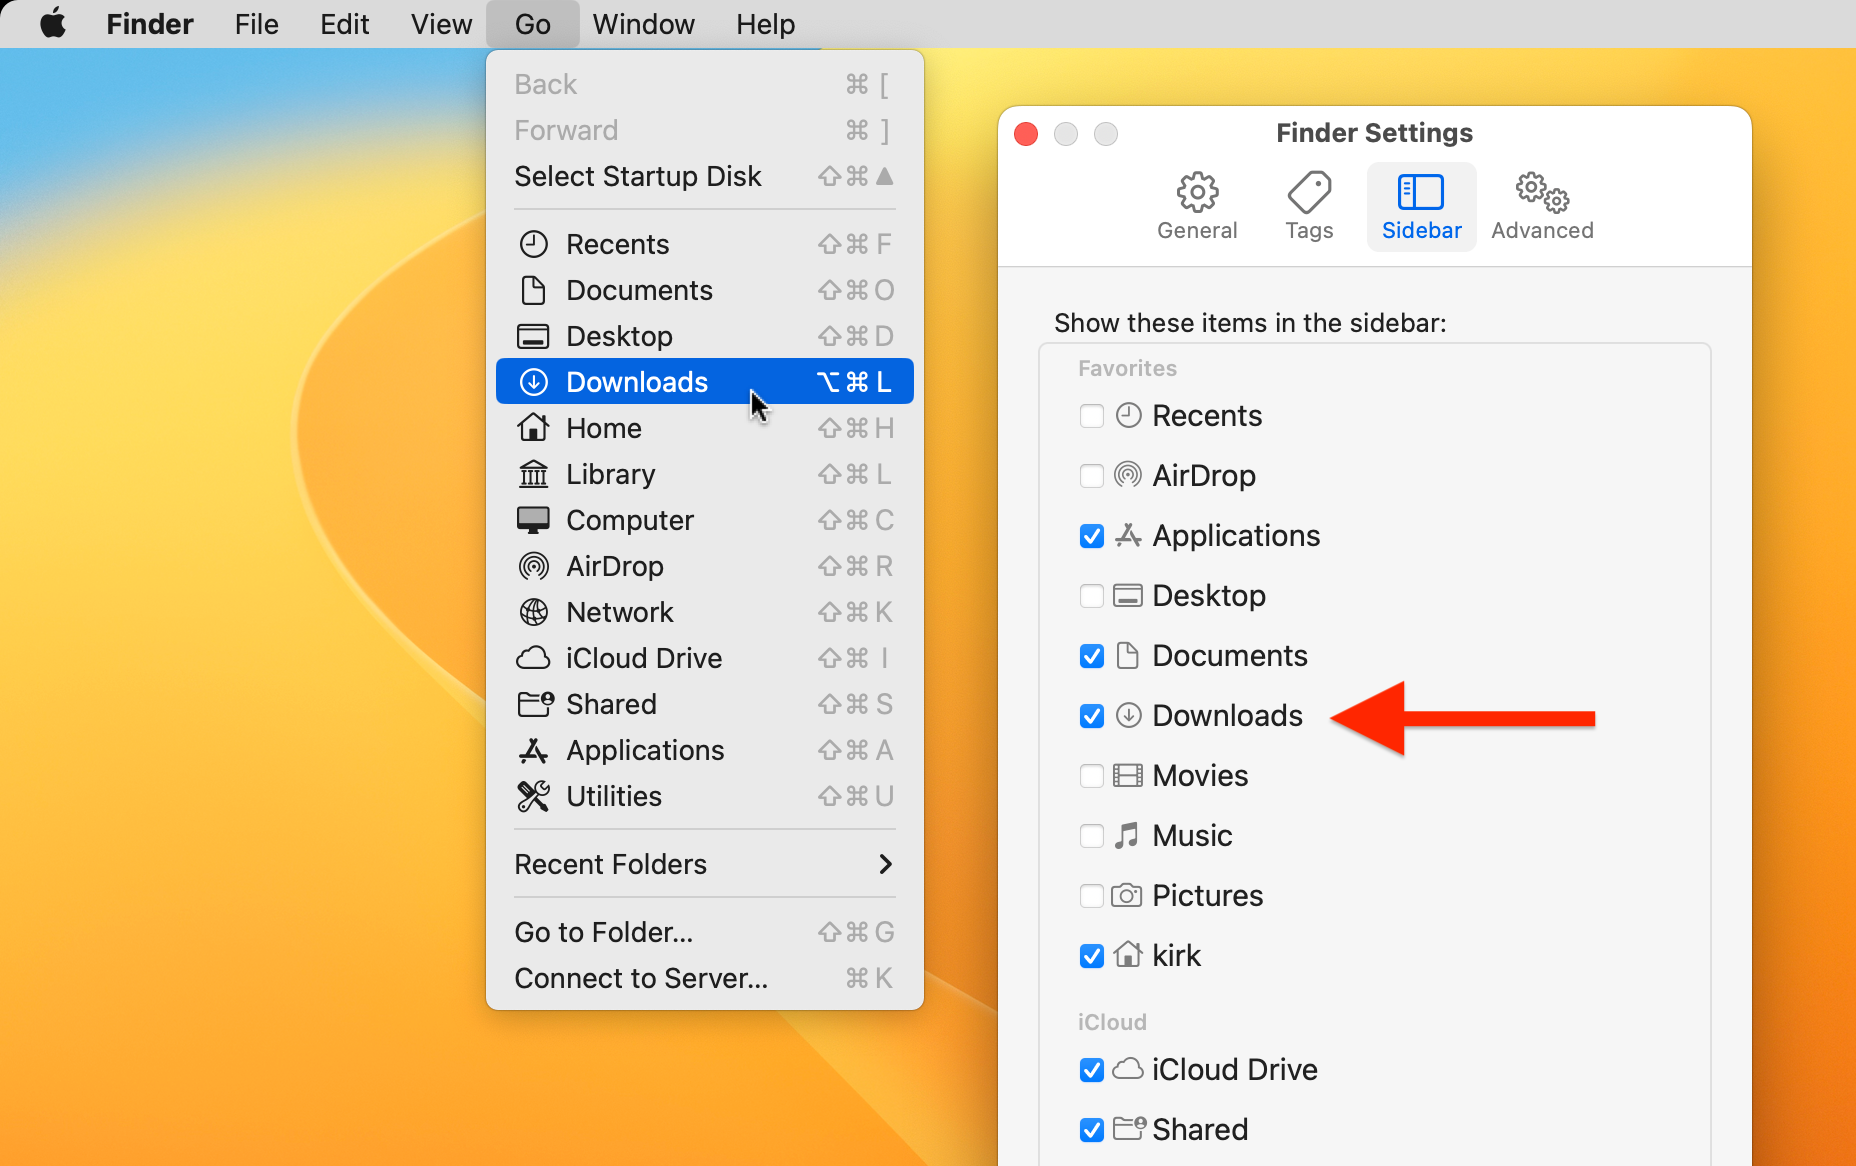
To access downloads on a MacBook, click on the Finder icon in the Dock. Then, select “Downloads” from the sidebar.
Accessing downloads on your MacBook is a simple process that allows you to easily find and manage files you’ve downloaded from the internet or received as attachments. By following a few quick steps, you can access your downloaded files in no time.
This guide will help you navigate through Finder to locate and view your downloaded items effortlessly. Whether it’s a document, image, or software update, knowing how to access your downloads will help you stay organized and efficient on your Mac. Let’s explore the steps to access your downloads on a MacBook seamlessly.
Accessing Downloads Folder
Accessing the Downloads folder on your MacBook allows you to easily locate and manage the files you’ve downloaded from the internet or received as email attachments. Whether you prefer using Finder, the Dock, or Spotlight, each method provides quick access to your downloaded content.
Using Finder
To access your Downloads folder using Finder, follow these simple steps:
- Click on the Finder icon located in the Dock.
- In the Finder window, you’ll find Downloads listed in the sidebar. Click on it to view the contents of the Downloads folder.
Using Dock
If you prefer to access your Downloads folder directly from the Dock, here’s how:
- Locate the Downloads folder icon on the right side of the Dock.
- Simply click on the Downloads icon to open the folder and access your downloaded files.
Using Spotlight
Spotlight search also provides a quick way to access your Downloads folder:
- Press Command + Spacebar to open Spotlight search.
- Type Downloads and press Enter to quickly locate and open the Downloads folder.
Credit: svgcutsblog.com
Customizing Downloads Settings
Customizing your download settings on your Macbook allows you to personalize how and where your files are saved. Follow these simple steps to effectively manage your downloads.
Changing Download Location
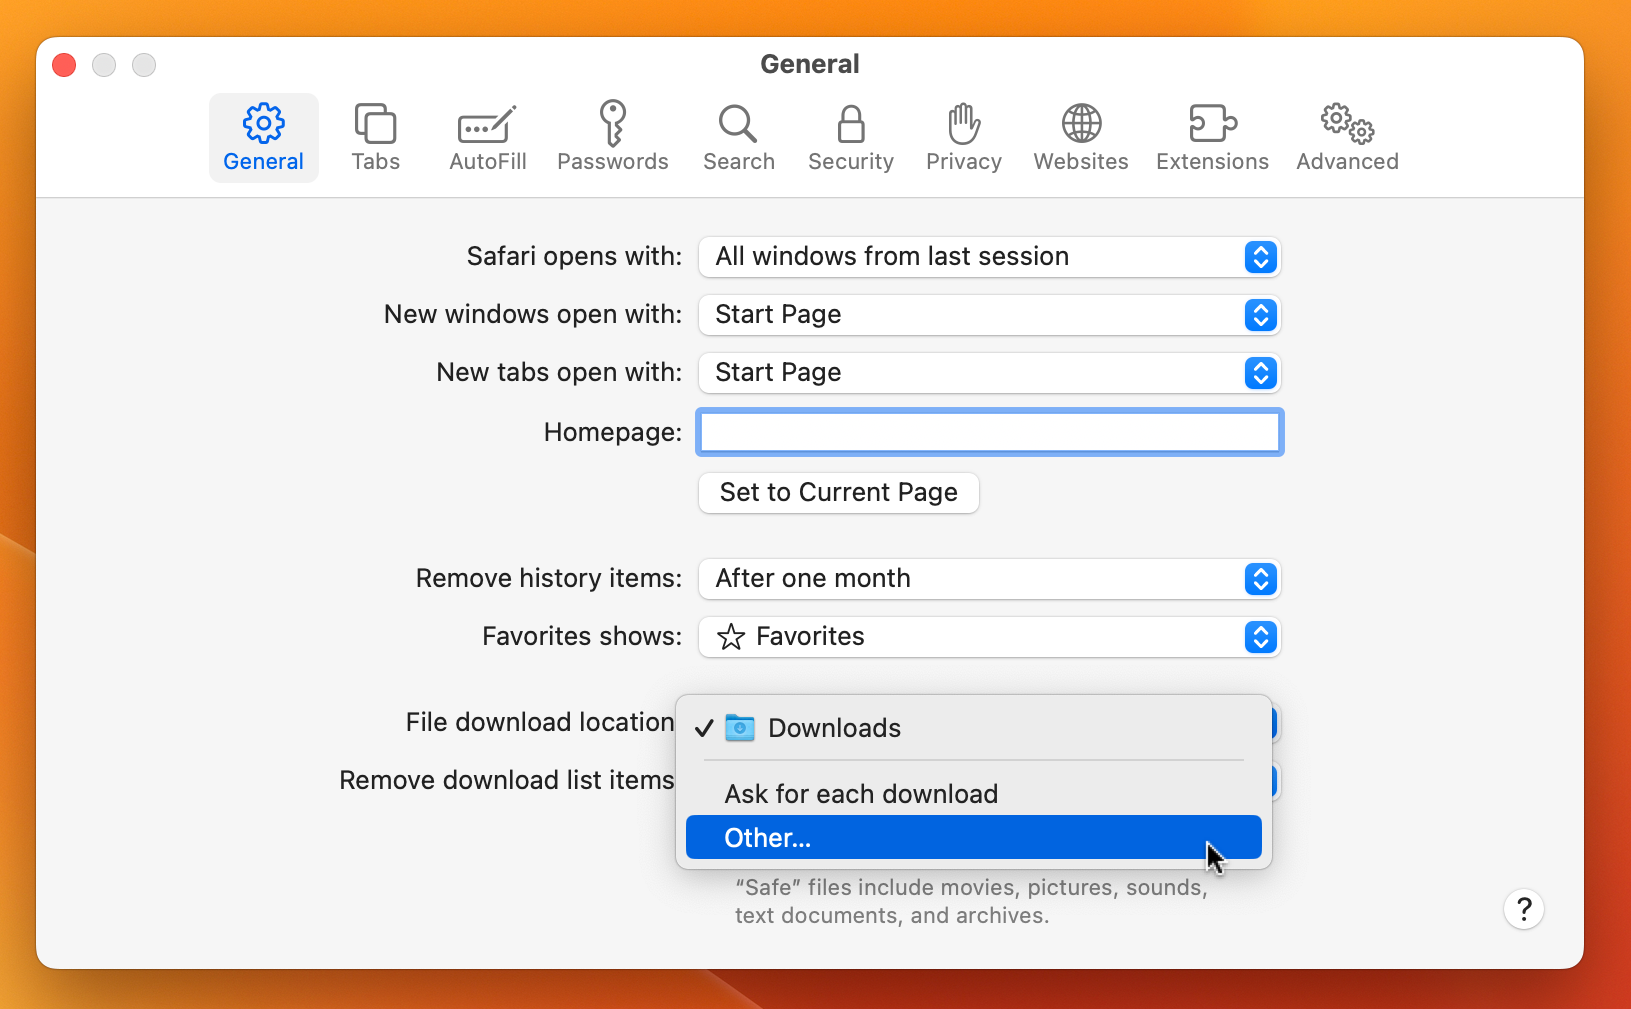
- Access Safari preferences by clicking on Safari in the top menu bar.
- Choose Preferences, then click on the General tab.
- Locate the ‘File download location’ option and select ‘Other’ to choose a new location.
- Click on ‘Downloads’ in the Finder sidebar to change your default download location.
Setting Download Options
- Open Safari and go to Safari Preferences.
- Click on the ‘General’ tab and find the ‘File download location’ option.
- Adjust download options such as ‘Remove download list items’ and ‘Open “safe” files after downloading’.
- Choose whether to ask before downloading safe files or set download notifications.
Sorting And Organizing Downloads
Easily access and manage your downloads on Macbook by utilizing the Downloads folder. Organize files by creating subfolders based on file types or categories to keep everything in order. Use the search function to quickly find specific items.
Sorting and Organizing Downloads on your MacBook is crucial to efficiently managing your files. Let’s explore three ways you can quickly organize your downloaded content: By Date, By File Type, and By Name.By Date
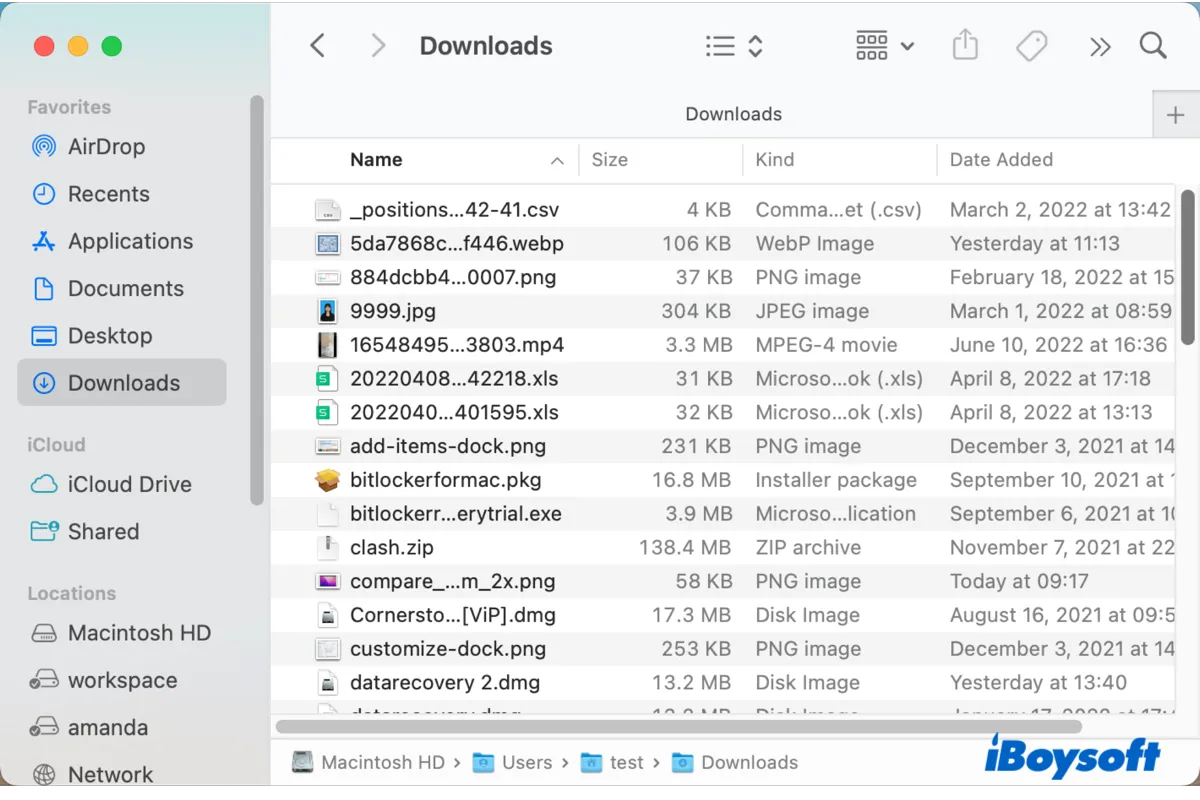
To sort downloads by date on your MacBook, follow these straightforward steps: 1. Open the Downloads folder. 2. Click on the “Date Modified” tab to arrange files by the most recent download date.By File Type
Organizing downloads by file type can simplify your search. Here’s how to categorize your downloads by file type: 1. Access the Downloads folder. 2. Select the “Kind” tab to group downloads by their file extensions.By Name
Sorting downloads by name ensures easy access to specific files. Here’s how you can alphabetically arrange your downloads: 1. Open the Downloads folder. 2. Click on the “Name” tab to arrange files in alphabetical order. Efficiently managing your downloads on a MacBook allows for easy access and reduces clutter.Viewing And Managing Downloaded Files
When it comes to using your Macbook, accessing and managing downloaded files is a valuable skill. After you’ve downloaded files from the internet, it’s essential to know how to view and manage them efficiently. This tutorial will guide you through the process of opening, moving, and deleting downloaded files on your Macbook.
Opening Files
To open a downloaded file on your Macbook, simply double-click on the file icon. This action will launch the default application associated with that file type, allowing you to view or edit its contents. Alternatively, you can right-click on the file and select “Open With” to choose a specific application for viewing the file.
Moving Files
If you want to move a downloaded file to a different location on your Macbook, you can simply drag and drop the file to the desired folder or location. You can also use the cut and paste function by using the Command + C and Command + V shortcuts to move the file to a new location.
Deleting Files
To delete a downloaded file that you no longer need, right-click on the file and select “Move to Trash” from the context menu. Alternatively, you can drag the file to the Trash icon located in the dock. Remember to empty the Trash regularly to free up storage space on your Macbook.
Clearing Download History
Clearing your download history on your MacBook is a simple yet effective way to declutter your system and ensure optimal performance. By removing unnecessary download records, you can free up disk space and maintain a well-organized Downloads folder. In this article, we will guide you through the process of clearing your download history in web browsers and the Downloads folder on your Macbook.
History In Web Browsers
Web browsers keep track of the files you download to make it easier to find them later. However, a long list of downloads can become burdensome and potentially compromise your privacy. Clearing your download history in web browsers eliminates the clutter and helps protect your sensitive information.
Here’s how you can clear your download history in popular web browsers:
| Web Browser | Steps to Clear Download History |
|---|---|
| Safari |
|
| Google Chrome |
|
| Mozilla Firefox |
|
History In Downloads Folder
In addition to clearing your download history in web browsers, it’s also important to clear the history within your Downloads folder on your Macbook. This ensures that the actual files you have downloaded are properly organized and easily accessible.
Follow these steps to clear your download history in the Downloads folder:
- Open Finder by clicking on the Finder icon located in your Dock, or by pressing Command + Space and typing “Finder”.
- In the Finder window, click on “Downloads” in the sidebar to access your Downloads folder.
- Select the files you want to remove from the history, or press Command + A to select all files.
- Right-click or Control-click on the selected files and choose “Move to Trash”.
- Empty the Trash by right-clicking on the Trash icon in the Dock and selecting “Empty Trash”.
By following these simple steps, you can keep your Macbook clutter-free and maintain an organized system. Clearing your download history in web browsers and the Downloads folder will help optimize your Macbook’s performance and ensure a smooth user experience.
Credit: www.intego.com
Troubleshooting Download Issues
While using your MacBook, you may encounter issues when trying to access or download files. Understanding how to troubleshoot these issues is essential to ensure a smooth and uninterrupted user experience. In this section, we will explore three common troubleshooting methods to help you resolve download issues on your MacBook.
Checking Internet Connection
The first step in troubleshooting download issues is to check your internet connection. A weak or intermittent connection can hinder the download process. To check your internet connection:
- Ensure that your MacBook is connected to a stable Wi-Fi network.
- Open a web browser and try visiting a reliable website to confirm if the internet is working properly.
- If there are any issues with the internet connection, try restarting your Wi-Fi router or contacting your internet service provider for assistance.
Clearing Cache
Another common cause of download issues on a MacBook is a cluttered cache. Clearing your cache can help resolve these problems. Here’s how to do it:
- Open the Safari browser.
- Go to the “Safari” menu and click on “Preferences”.
- Select the “Advanced” tab.
- Check the box next to “Show Develop menu in menu bar”.
- Close the Preferences window and go to the “Develop” menu.
- Select “Empty Caches” to clear the cache.
- Restart your MacBook and try downloading the file again.
Disabling Download Restrictions
Your MacBook may have download restrictions enabled, preventing certain files from being downloaded. Disabling these restrictions can help resolve the issue. Here’s how:
- Open the “System Preferences” on your MacBook.
- Click on “Security & Privacy”.
- Select the “General” tab.
- Click on the padlock icon at the bottom left corner of the window and enter your administrator password to unlock the preferences.
- Under the “Allow apps downloaded from”, select “Anywhere”.
- Close the preferences window and try downloading the file again.
By following these troubleshooting steps, you can overcome common download issues on your MacBook. Checking your internet connection, clearing the cache, and disabling download restrictions are effective ways to ensure a seamless download experience. Now you can enjoy the convenience of accessing your downloaded files without any hassle.
Credit: iboysoft.com
Frequently Asked Questions On How To Access Downloads On Macbook
How Do I Access Downloads On Macbook?
To access downloads on a Macbook, you can go to the “Finder” icon on your dock and click on it. Then, select “Downloads” from the sidebar to open the Downloads folder. Alternatively, you can use the shortcut “Command + Option + L” to quickly open the Downloads folder.
Where Are Downloads Stored On Macbook?
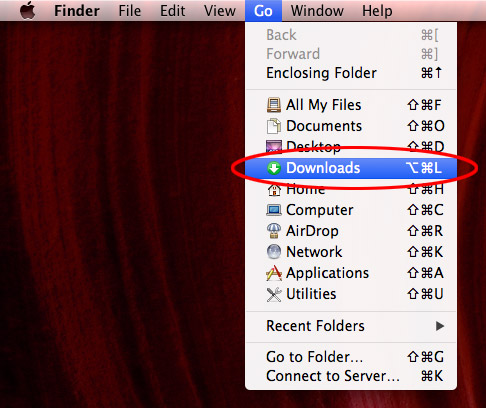
Downloads on Macbook are usually stored in the Downloads folder, which can be found in your Finder sidebar. You can also access it by going to the “Go” menu in Finder and selecting “Downloads. “
How Can I Find My Download History On Macbook?
To find your download history on Macbook, go to the “Finder” and open your “Downloads” folder. You will see a list of all your downloaded files. Alternatively, you can use the shortcut “Option + Command + L” to directly open the Downloads folder.
How Do I View My Recent Downloads On Macbook?
To view your recent downloads on Macbook, click on the “Finder” icon on your dock. Then, select “Downloads” from the sidebar. The files in the Downloads folder will be sorted by the most recent downloads at the top.
Conclusion
Accessing and managing downloads on your Macbook is simple and straightforward. By using the Finder and the Downloads folder, you can easily locate, organize, and delete downloaded files. Additionally, utilizing shortcuts and keyboard commands can enhance your downloading experience. With these tips, you can efficiently manage your downloads on your Macbook.
0 comments