
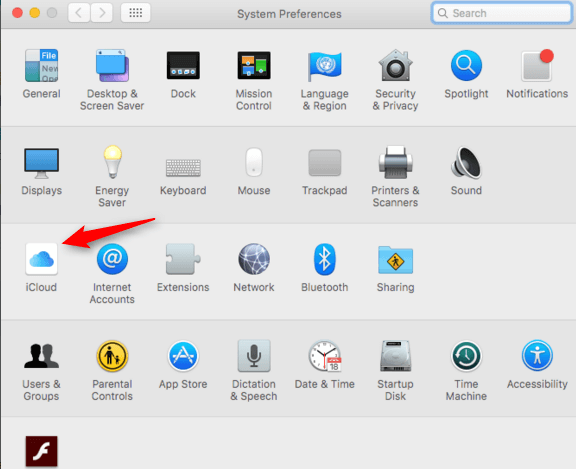
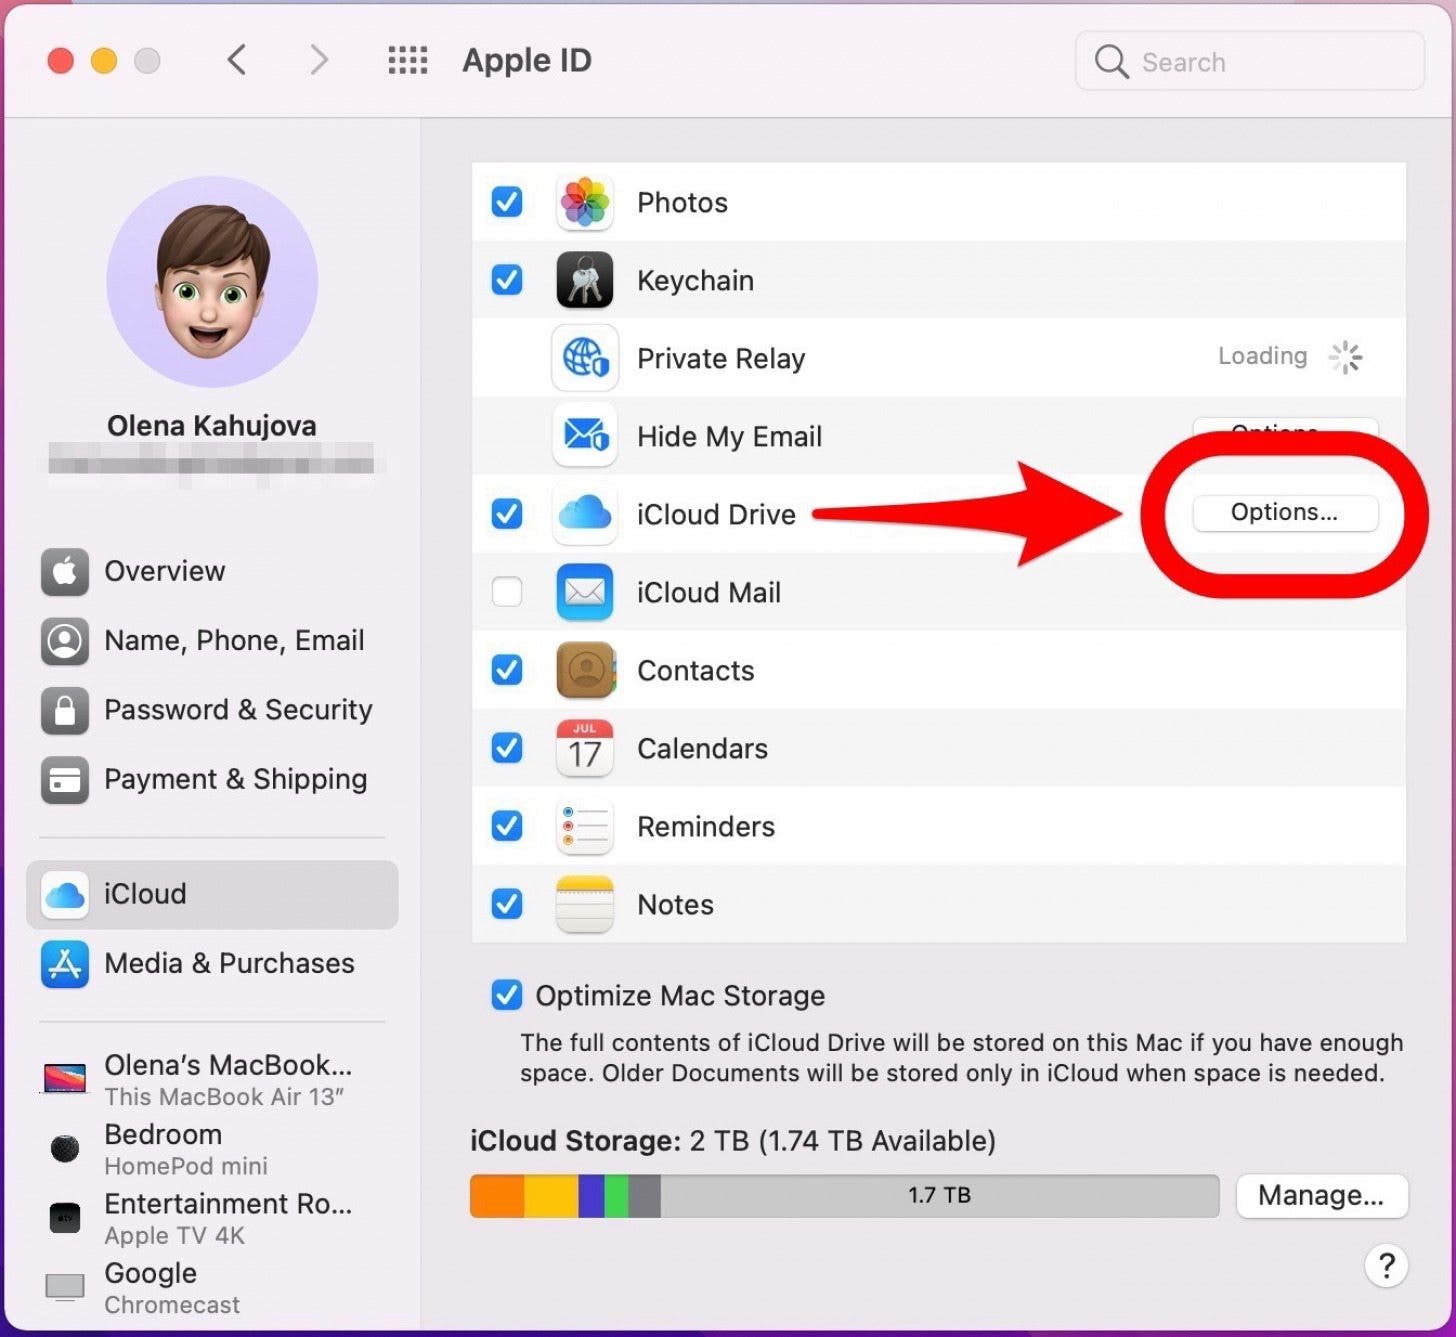
To back up your MacBook to iCloud, go to System Preferences, select Apple ID, and then choose iCloud. Click on “Options” next to iCloud Drive to make sure your desired files are backed up.
In the digital age, preserving your MacBook’s data is paramount. By backing up to iCloud, you can ensure your important files are safe and accessible from anywhere. This simple guide will walk you through the steps to seamlessly back up your valuable data to iCloud.
With a few easy clicks, you can safeguard your documents, photos, and other precious files in the cloud, providing peace of mind in case of any mishaps. Let’s delve into the straightforward process of securing your MacBook data through iCloud backup.
Credit: www.iphonelife.com
Why Backup Your Macbook To Icloud
When it comes to safeguarding your valuable data on your MacBook, backing up to iCloud is an essential practice. The cloud storage service provided by Apple offers a reliable and convenient way to ensure that your files, photos, and documents are protected from data loss risks such as device theft or damage.
Data Loss Risks
Data loss can occur due to various reasons such as hardware malfunction, accidental deletion, or software issues. By backing up your MacBook to iCloud, you can prevent the risk of losing important files and data.
Device Theft Or Damage
In the unfortunate event of device theft or damage, having your MacBook backed up to iCloud ensures that your essential data is safe and accessible from any other device. Whether your MacBook is lost, stolen, or damaged, you can easily retrieve your files from iCloud and continue your work without disruption.
Setting Up Icloud Backup
iCloud Backup for your MacBook is a convenient way to keep your data safe and secure. Setting it up is a straightforward process that ensures your important files are always backed up.
Enable Icloud Backup
To enable iCloud Backup on your MacBook, follow these simple steps:
- Go to Apple menu and choose System Preferences.
- Click on Apple ID.
- Choose iCloud on the sidebar.
- Check the box next to iCloud Backup to enable it.
Choose Backup Frequency
You can choose how often your MacBook backs up to iCloud by selecting the backup frequency:
- Continuous Backup: Allows iCloud to automatically backup your MacBook whenever it’s connected to Wi-Fi and plugged in.
- Manual Backup: Gives you the flexibility to initiate backups as needed by clicking Back Up Now in the iCloud Backup settings.
Managing Icloud Storage
Learn how to efficiently manage your iCloud storage by backing up your MacBook to iCloud. Simply go to System Preferences, select Apple ID, click on iCloud, and choose the storage plan that suits your needs. This ensures that your important data is securely stored and easily accessible from any device.
Checking Storage Space
Your iCloud storage space can quickly fill up, affecting your ability to back up your Macbook.
- Go to Settings on your Macbook and select iCloud.
- Check the Available storage space to see how much is left.
- If it’s nearing full, consider deleting unnecessary files or upgrading storage plan.
Optimizing Storage
To ensure efficient use of your iCloud storage, follow these steps:
- Enable iCloud Backup for automatic back-ups of your Macbook.
- Manage your photo library by selecting Optimize Mac Storage.
- Utilize iCloud Drive for easy access to files across devices.
Credit: nektony.com
Backup Your Macbook To Icloud
It’s crucial to regularly backup your Macbook to iCloud to ensure that your valuable files and data are safe and accessible at all times. Here’s a step-by-step guide to help you backup your Macbook to iCloud securely.
Connect To Wi-fi
Step 1: Ensure that your Macbook is connected to a stable Wi-Fi network.
Step 2: Go to the Apple menu and select “System Preferences.”
Step 3: Click on “Network” and select your Wi-Fi network from the list. Enter the password if prompted.
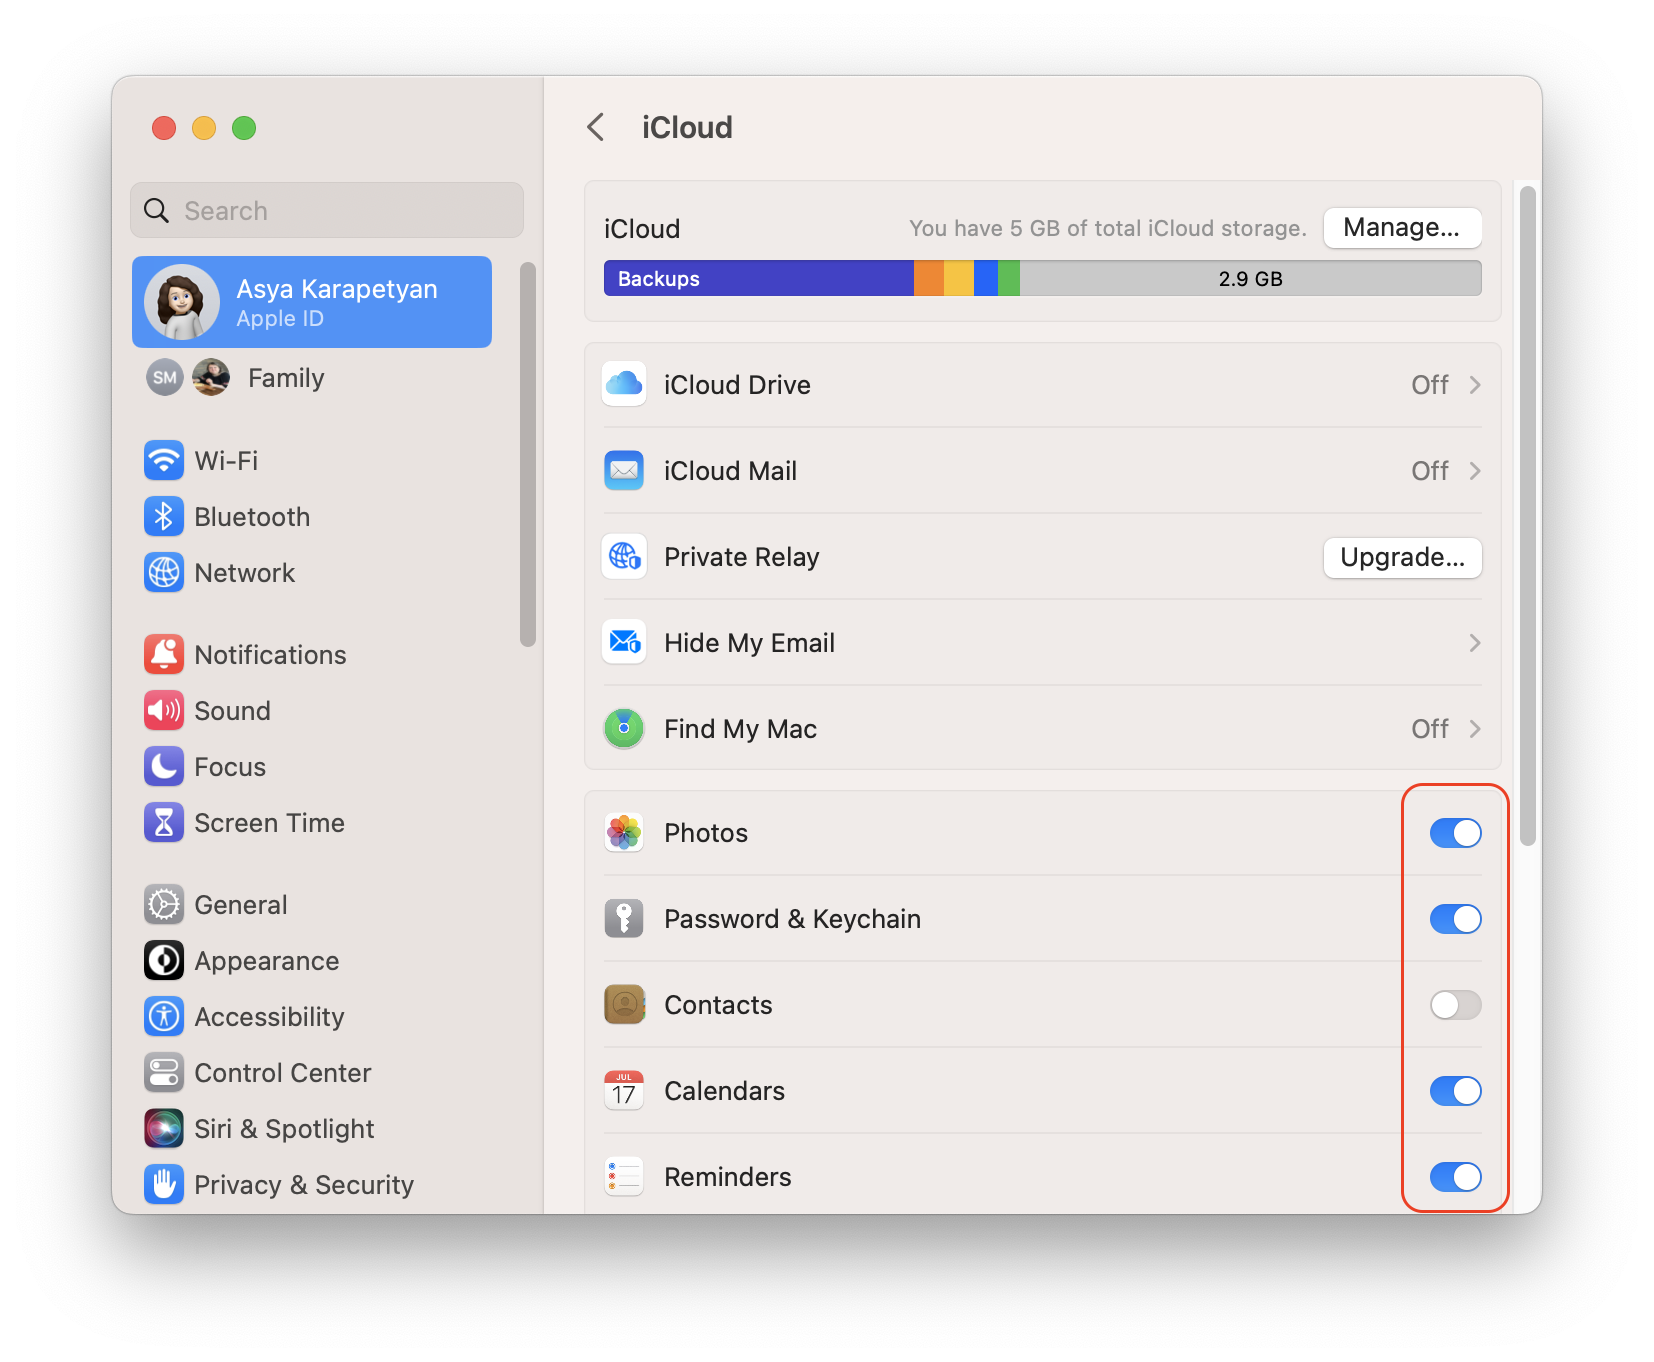
Enable Icloud Drive
Step 1: Open the Apple menu and select “System Preferences.”
Step 2: Click on “Apple ID” and sign in with your Apple ID if you haven’t already.
Step 3: Tick the checkbox next to “iCloud Drive” to enable it.
Start Backup
Step 1: Go to “System Preferences” from the Apple menu.
Step 2: Click on “Apple ID” and sign in if prompted.
Step 3: Select “iCloud” and then click on “Manage” to ensure that your important files are being backed up to iCloud.
Restoring Data From Icloud Backup
Learn how to effortlessly back up your Macbook to iCloud, allowing for hassle-free data restoration when needed. With this simple process, you can secure your important files and ensure peace of mind.
Erase Macbook
To restore data from your iCloud backup, you first need to erase your MacBook. Erasing your MacBook is a crucial step as it ensures that your device is clean and ready for the restoration process. Follow these simple steps to erase your MacBook:
- Click on the Apple menu in the top-left corner of your screen.
- Select “Restart” from the drop-down menu to reboot your MacBook.
- While your MacBook is restarting, press and hold the “Command” and “R” keys simultaneously.
- This will initiate the macOS Utilities window, where you can select “Disk Utility” and click on “Continue.”
- In the Disk Utility window, choose your startup disk and click on the “Erase” button.
- Select the format you prefer, such as APFS or Mac OS Extended (Journaled).
- Click on “Erase” to confirm the erasure of your MacBook.
- Once the erasure is complete, you can exit Disk Utility and proceed with restoring your data.
Restore From Icloud Backup
After erasing your MacBook, you can proceed with the restoration of your data from your iCloud backup. Follow these steps to restore your data:
- Restart your MacBook and navigate to the macOS Utilities window by pressing and holding the “Command” and “R” keys during startup.
- In the macOS Utilities window, select “Restore from Time Machine Backup.”
- Click on “Continue” and choose your desired backup source, which in this case is your iCloud backup.
- Sign in to your iCloud account using your Apple ID and password.
- Once signed in, select the specific backup you wish to restore from and click on “Continue.”
- Follow the on-screen instructions to complete the restoration process.
- After the restoration is finished, your MacBook will restart, and you can sign in to your account to access your restored data.
Troubleshooting
Even though backing up your MacBook to iCloud is a straightforward process, occasionally you may encounter some issues. In this troubleshooting guide, we will address two common problems: the “Insufficient Storage” error and slow backup speed.
Insufficient Storage Error
If you receive an “Insufficient Storage” error message when trying to back up your MacBook to iCloud, it means that you don’t have enough available storage space in your iCloud account to complete the backup. This error can be frustrating, but there are a few simple steps you can take to resolve it:
- Check your iCloud Storage: Go to the Apple menu on your MacBook, select “System Preferences,” and click on “Apple ID.” Under the “iCloud” tab, you’ll be able to see how much storage space you’re currently using.
- Manage your iCloud Storage: If you’re running out of storage, you may need to free up some space by deleting unnecessary files or purchasing additional iCloud storage.
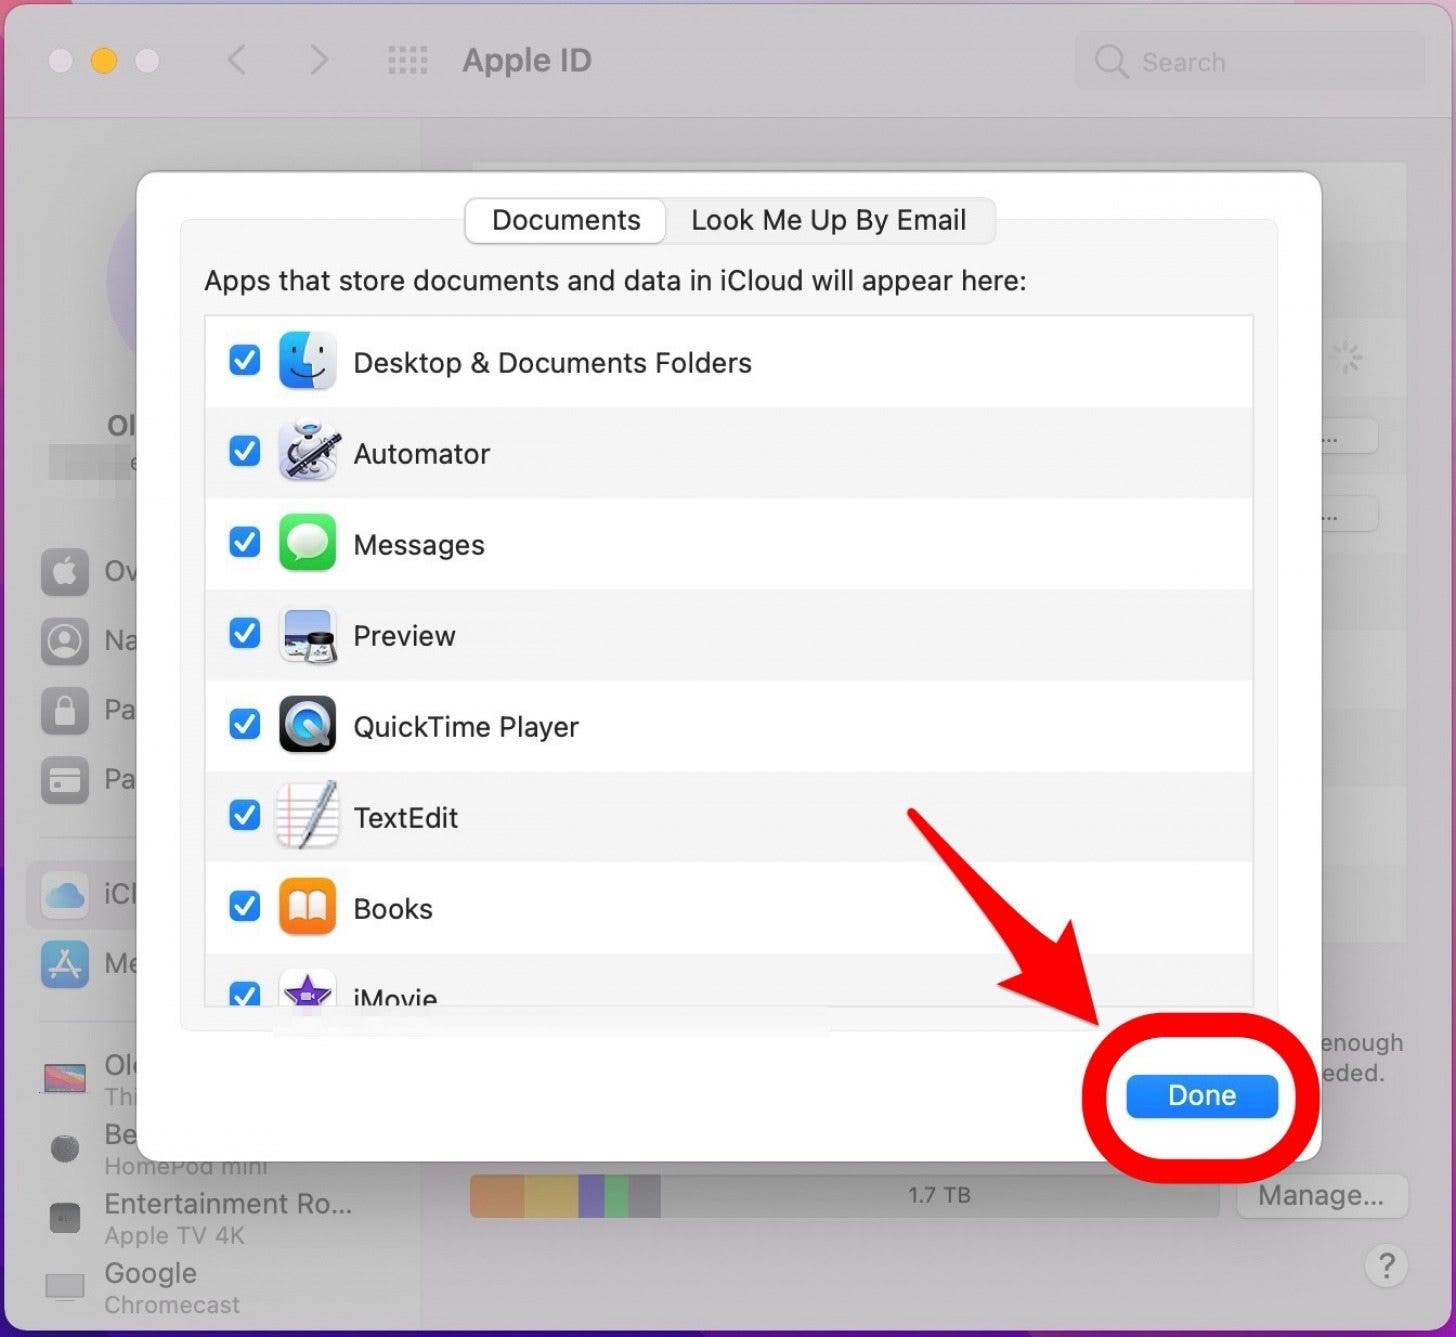
- Optimize iCloud Backup: To optimize your backup and save space, you can choose to exclude certain apps or data from being backed up to iCloud. This can be done in the “Manage Storage” section under the “iCloud” tab in your MacBook’s “System Preferences.”
By following these steps, you should be able to resolve the “Insufficient Storage” error and continue with your MacBook backup to iCloud.
Slow Backup Speed
If your MacBook backup to iCloud is taking longer than usual or you’re experiencing slow backup speed, there are a few potential causes to consider:
- Check your internet connection: Slow internet speeds can significantly impact the backup process. Ensure that your MacBook is connected to a stable and high-speed internet connection.
- Restart your MacBook and router: Sometimes, simply restarting your devices can help resolve slow backup speed issues. Power off your MacBook and router, wait a few seconds, and then power them back on.
- Reduce network congestion: If you’re experiencing slow backup speeds during peak hours, try scheduling your backup during less congested times.
- Remove unnecessary files: The more files you have, the longer it may take to back up your MacBook. Consider deleting unnecessary files or transferring them to an external storage device to speed up the backup process.
By following these troubleshooting steps, you should be able to improve the speed of your MacBook backup to iCloud. Remember to keep your internet connection strong and optimize your device’s storage to ensure a smooth backup process.
Credit: www.iphonelife.com
Frequently Asked Questions Of How To Back Up Macbook To Icloud
How Do I Back Up My Macbook To Icloud?
To back up your MacBook to iCloud, go to System Preferences, select Apple ID, click on iCloud, and check the box next to iCloud Backup. Your MacBook will then automatically back up to iCloud whenever it’s connected to Wi-Fi and charging.
Why Should I Back Up My Macbook To Icloud?
Backing up your MacBook to iCloud ensures that your important files and data are secure and protected in case of any accidents, theft, or hardware failure. It provides an additional layer of data protection and allows you to easily restore your files if needed.
Can I Access My Icloud Backup On Other Devices?
Yes, you can access your iCloud backup on other Apple devices. By signing in to the same iCloud account, you can easily restore your iCloud backup on your iPhone, iPad, or any other Apple device and have access to your files and data across multiple devices.
How Much Storage Does Icloud Backup Provide For My Macbook?
By default, iCloud provides 5GB of free storage for each Apple ID. However, if you require more storage for your MacBook backup, you can upgrade to a paid iCloud storage plan that offers more storage options based on your needs.
Conclusion
Backing up your MacBook to iCloud is a crucial step to ensure the safety of your valuable data. This seamless process offers convenience and peace of mind, allowing you to access your files from anywhere. By following the simple steps outlined in this guide, you can safeguard your information and avoid potential loss.
0 comments