

To check SSD or HDD in Windows 11, open “Disk Management” and look for the disk type. When it comes to determining the storage type of your computer, identifying whether it’s an SSD (Solid State Drive) or HDD (Hard Disk Drive) is essential for troubleshooting and upgrading purposes.
In this guide, we will explore the simple steps to check whether your computer is using an SSD or HDD in Windows 11. By following these steps, you will be able to quickly ascertain the type of storage drive your computer is utilizing, allowing you to make more informed decisions regarding your system’s storage needs.
Let’s delve into the process of checking SSD or HDD on Windows 11.
Why Check Ssd Or Hdd
It’s imperative to regularly check the health of your storage devices, whether SSD or HDD, to ensure your computer runs smoothly and data is safeguarded.
Importance Of Checking Storage Device
Monitoring your SSD or HDD is crucial to avoid potential data loss, system crashes, and performance degradation. Regular checks can also help predict any impending issues and take preventive actions.
Potential Issues With Storage Devices
Over time, storage devices can develop bad sectors, file system errors, and physical damage that may lead to data loss or slow down the system. Regular inspections help identify these issues early and mitigate any potential risks.
Using Device Manager
Accessing Device Manager
To begin, open Device Manager by right-clicking on the Start button.
Locating Ssd Or Hdd
In Device Manager, expand the ‘Disk drives’ category to view your SSD or HDD.
Checking Device Properties
- Right-click on your SSD or HDD and select ‘Properties’.
- Under the ‘Details’ tab, look for the ‘Hardware Ids’ to identify your device.
Using Command Prompt
If you need to check whether your drive is SSD or HDD in Windows 11, using Command Prompt can provide you with detailed information.
Opening Command Prompt
In Windows 11, click the Start button and type ‘cmd’ in the search bar. Right-click on Command Prompt and select Run as administrator.
Running Disk Management Commands
Once Command Prompt is open, type ‘wmic diskdrive get model,name,mediatype’ and press Enter. This command will display information about your drives.
Interpreting The Results
The ‘mediatype’ field will specify whether the drive is SSD or HDD. If it indicates 3, it is an SSD; if it shows 2, it is an HDD.

Credit: m.youtube.com
Using Third-party Tools
When it comes to checking the health and status of your SSD or HDD in Windows 11, using third-party tools can provide more in-depth insights and diagnostics. These tools are equipped with advanced features that can help you monitor the performance, temperature, and overall condition of your storage devices with greater precision.
Introduction To Third-party Tools
Third-party tools are software applications designed specifically for monitoring and analyzing the health of SSDs and HDDs. They offer a range of functionalities, such as real-time monitoring, detailed diagnostic reports, and optimization options, providing a comprehensive overview of your storage devices’ performance and reliability.
Popular Tools For Ssd/hdd Checking
Several popular third-party tools are widely used for checking the health of SSDs and HDDs in Windows 11. These tools include CrystalDiskInfo, HD Tune, SSD Life, and HDDScan. Each of these tools comes with its unique set of features and capabilities, making them valuable assets for ensuring the optimal functioning of your storage drives.
Installing And Using The Tools
Installing these third-party tools is straightforward – simply download the software from their official websites or trusted sources and follow the installation prompts. Once installed, you can launch the application and select the respective storage drive you want to analyze. These tools provide detailed information such as drive temperature, health status, usage statistics, and S.M.A.R.T attributes, empowering you to make informed decisions about the maintenance and optimization of your storage devices.
Checking Disk Health
Monitoring the health of your SSD or HDD is crucial to ensure optimal performance and prevent potential data loss. Windows 11 provides built-in tools to easily check the health of your disks. In this guide, we will walk you through the process of checking disk health using SMART tools and interpreting the health reports.
Understanding Disk Health Monitoring
Disk health monitoring involves keeping track of the critical parameters and attributes of your SSD or HDD to identify any potential issues. By monitoring disk health, you can detect early warning signs of imminent failures and take necessary actions to prevent data loss.
Using Smart Tools
The Self-Monitoring, Analysis, and Reporting Technology (SMART) is a system built into modern hard drives and solid-state drives that can provide valuable information about the health of your disks. Windows 11 includes SMART tools that allow you to access and analyze this information.
- Open the Windows 11 Start Menu and search for “Command Prompt.”
- Right-click on Command Prompt and select “Run as administrator.”
- In the Command Prompt window, type wmic diskdrive get status and press Enter. This will display the status of your disks, including any error codes.
- You can also use third-party software like CrystalDiskInfo or Hard Disk Sentinel to get a more detailed analysis of your disk health.
Interpreting Health Reports
Once you have obtained the health report of your SSD or HDD, it is essential to interpret the information correctly. Here are a few key attributes to consider:
- Power-On Hours: This indicates the total running time of your disk. Higher values suggest older drives that may be more prone to failure.
- Reallocated Sectors Count: This reveals the number of bad sectors that have been replaced by spare sectors. A high count may indicate a failing disk.
- Temperature: Monitoring the temperature of your disk is crucial. Excessive heat can lead to performance issues and potential drive failure.
- Read Error Rate: This indicates the frequency of read errors, which should ideally be low.
By understanding these attributes and conducting regular disk health checks, you can ensure the longevity and proper functioning of your SSD or HDD. Remember to take appropriate actions if you notice any alarming indicators to prevent data loss.
Testing Disk Read/write Speed
Testing the read/write speed of your SSD or HDD is crucial to ensure optimal performance and identify any potential issues. Disk speed refers to how quickly your computer’s storage can access and transfer data. It affects various aspects of your computer’s performance, such as boot times, application loading times, and file transfer speeds.
Tools For Testing Read/write Speed
There are several tools you can use to test the read/write speed of your disk in Windows 11. These tools help you measure the actual performance of your storage device and provide you with valuable insights for troubleshooting or benchmarking purposes. Here are a few commonly used options:
- CrystalDiskMark: CrystalDiskMark is a popular benchmarking tool that assesses the sequential and random read/write speeds of your storage device. It provides detailed results that help you determine the performance capabilities of your SSD or HDD.
- ATTO Disk Benchmark: ATTO Disk Benchmark is another reliable tool for measuring the performance of your disk. It tests various file transfer sizes and allows you to analyze read and write speeds, as well as input/output operations per second (IOPS).
- Windows Performance Monitor: Windows Performance Monitor is a built-in tool in Windows 11 that allows you to monitor and analyze various performance metrics, including disk utilization and average response time. It provides real-time data and can help you identify any performance bottlenecks.
Running Speed Tests
Once you have selected a suitable tool, you can proceed to run speed tests to evaluate the performance of your SSD or HDD. Follow these steps to get accurate results:
- Close all unnecessary applications: Before running the speed tests, it is advisable to close any unnecessary applications and processes that might interfere with the results. This ensures that the tests are not affected by background tasks.
- Select the appropriate test settings: Configure the test settings according to your requirements. You can choose the file size, test duration, and the number of test runs. For accurate and consistent results, it is recommended to use default settings or follow best practices recommended by the tool you are using.
- Start the test: Click on the “Start” or “Run” button to initiate the speed test. The tool will then perform various read and write operations on your disk, measuring the speed at which data can be transferred.
- Review the results: Once the test is complete, review the results provided by the tool. Pay attention to metrics such as sequential and random read/write speeds, latency, and IOPS. Compare these results with the expected performance of your storage device to identify any discrepancies or potential issues.
By regularly testing the read/write speed of your SSD or HDD in Windows 11, you can ensure that your storage device is functioning optimally and take proactive measures to address any performance concerns. These tests provide valuable insights that can help you make informed decisions regarding storage upgrades or troubleshooting steps.
Checking For Bad Sectors
In Windows 11, checking for bad sectors on your SSD or HDD is essential to ensure the health and performance of your storage device. Bad sectors are damaged areas on the disk that can lead to data loss and system instability if not addressed promptly.
Understanding Bad Sectors
Bad sectors are areas on the disk that cannot be read from or written to properly. They can occur due to physical damage, aging, or other factors, impacting the reliability of your storage device. Understanding the presence of bad sectors can help prevent potential data loss and system crashes.
Identifying Bad Sectors
The Windows 11 operating system provides tools to help identify bad sectors on your storage devices. Utilizing built-in utilities such as Check Disk (chkdsk) can scan for and flag any problematic areas on the disk, allowing you to take appropriate action.
Dealing With Bad Sectors
Dealing with bad sectors involves understanding the severity of the issue and taking appropriate steps such as backing up important data, repairing the disk using chkdsk, or considering a replacement for severely damaged drives. It’s important to address bad sectors to maintain the integrity of your storage device and prevent potential data loss.
Credit: m.youtube.com
Data Recovery And Backup
Importance Of Data Backup
Backing up your data regularly is essential to prevent data loss in case of hardware failures or data corruption.
Tools For Data Recovery
- Windows File Recovery: Built-in tool for recovering deleted files.
- Third-party software: Programs like Recuva or EaseUS for more advanced recovery.
Creating Regular Backups
- Use built-in Windows backup: Set up scheduled backups for automatic protection.
- External drives or cloud storage: Store backups in multiple locations for added security.
By following these steps, you can ensure your data is safe and accessible in case of any emergencies.
Maintenance And Optimization
In order to ensure your SSD or HDD in Windows 11 performs optimally, maintenance and optimization are essential tasks. By implementing regular upkeep, you can prevent potential issues and enhance the overall lifespan of your storage drive.
Cleaning Temporary Files And Junk
To keep your SSD or HDD running smoothly, regularly delete temporary files and junk data. Removing clutter frees up space and improves system performance.
Defragmenting The Drive
Defragmenting your drive organizes data for faster access and read times. This process enhances overall efficiency and helps prevent data fragmentation.
Updating Drivers And Firmware
Regularly update drivers and firmware to ensure your SSD or HDD is utilizing the latest enhancements and capabilities. Keeping software up to date can resolve compatibility issues and improve stability.
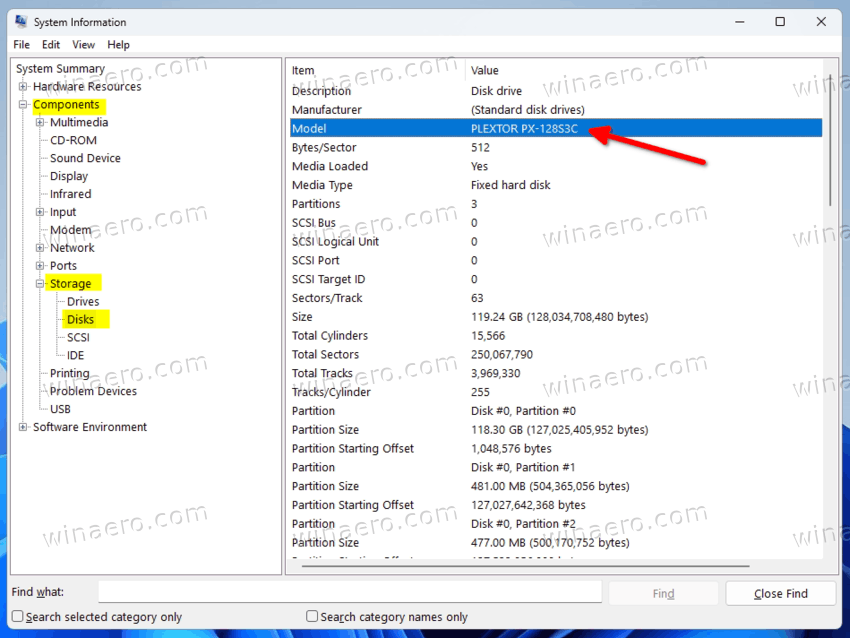
Credit: winaero.com
Frequently Asked Questions Of How To Check Ssd Or Hdd In Windows 11
How Can I Check If My Computer Has An Ssd Or Hdd?
To check if your computer has an SSD or HDD, you can go to the Device Manager in Windows 11. Click on the Start button, type “Device Manager,” and open the application. Expand the “Disk drives” category. If it says “Solid State Drive” or “SSD” next to your disk drive, it means you have an SSD.
If it says “Hard Disk Drive” or “HDD,” then you have a mechanical hard drive.
What Is The Difference Between An Ssd And An Hdd?
The main difference between an SSD (Solid State Drive) and an HDD (Hard Disk Drive) is the technology they use. SSDs use flash memory, while HDDs use spinning platters and a mechanical arm to read and write data. SSDs are faster, more durable, and consume less power compared to HDDs, making them ideal for faster boot times and improved overall performance.
Can I Upgrade From An Hdd To An Ssd On Windows 11?
Yes, you can upgrade from an HDD to an SSD on Windows 11. It can significantly improve your computer’s performance and reduce boot times. However, the process involves cloning the data from your HDD to the new SSD or performing a fresh installation of the operating system on the new SSD.
It is recommended to consult with a professional or follow a step-by-step guide to ensure a successful upgrade.
How Do I Check The Available Storage Space On My Ssd Or Hdd?
To check the available storage space on your SSD or HDD in Windows 11, you can open File Explorer and navigate to “This PC. ” Right-click on your SSD or HDD drive and select “Properties. ” A window will appear showing the used and free space on the drive, allowing you to determine how much storage is available.
Conclusion
Checking whether your system runs on an SSD or HDD is crucial for optimizing performance. By employing the methods discussed in this guide, you can effectively determine the drive type in Windows 11. Understanding your drive’s specifications will aid in making informed decisions and undertaking appropriate actions for your system.
0 comments