
To remove Apple ID from MacBook, go to System Preferences, select Apple ID, and click Sign Out. Removing an Apple ID from your MacBook is a simple process that only takes a few minutes.
By following the steps provided in this guide, you can effectively disassociate the Apple ID from your device. This action is essential if you are selling or giving away your MacBook or if you want to use a different Apple ID.
Ensuring that your personal information is not accessible to others is crucial for maintaining your privacy and security. Let’s explore the step-by-step process to remove your Apple ID from your MacBook effortlessly.
Prepare For Removal
When it comes to removing an Apple ID from your MacBook, it’s important to prepare for the process to ensure that everything goes smoothly. Before taking any steps, make sure to sign out of iCloud and back up your data to avoid any potential loss. Follow these essential steps to prepare your MacBook for the removal of an Apple ID.
Sign Out Of Icloud
To begin the preparation for removing the Apple ID from your MacBook, start by signing out of iCloud. This will disconnect your MacBook from your iCloud account and prevent any potential syncing issues during the removal process. Open the Apple menu, select “System Preferences,” and then click on “Apple ID.” From there, click “Overview” and then “Sign Out” to complete the process.
Back Up Your Data
Before proceeding with the removal of the Apple ID, it’s crucial to back up all of your important data to prevent any loss. You can utilize Time Machine or any other backup method of your choice to create a complete backup of your MacBook. This ensures that you can restore your data if any unforeseen issues occur during the Apple ID removal process.
Unlink Apple Id From Itunes
Deauthorize Your Computer
To ensure your Macbook is no longer tied to your Apple ID in iTunes, follow these easy steps to deauthorize your computer:
- Open iTunes on your Macbook.
- Go to the “Account” menu at the top of your screen.
- Select “Authorizations” and then choose “Deauthorize This Computer.”
- Enter your Apple ID and password when prompted.
- Click on “Deauthorize” to unlink your Macbook from iTunes.
Disconnect From Itunes
If you want to thoroughly remove your Apple ID from your Macbook, ensure you disconnect from iTunes by following these steps:
- Open iTunes on your Macbook.
- Click on your account profile at the top right corner of the screen.
- Select “Account Info” from the drop-down menu.
- Scroll down to the “iTunes in the Cloud” section.
- Click “Manage Devices” and then choose to “Remove” your Macbook from the list.
Remove Apple Id From Keychain
If you want to remove your Apple ID from Keychain on your MacBook, follow these simple steps:
Open Keychain Access
In the top-right corner of your screen, click on the magnifying glass and search for “Keychain Access” to open the application.
Locate And Delete Apple Id
- Inside Keychain Access, type your Apple ID into the search bar to locate it in the keychain list.
- Select the Apple ID entry and press the “Delete” key on your keyboard to remove it from Keychain.
:max_bytes(150000):strip_icc()/Removefromaccount-1a39fc402cb64b37a84498fb956e3950.jpg)
Credit: www.lifewire.com
Sign Out Of Messages And Facetime
When you’re ready to remove your Apple ID from your MacBook, it’s important to ensure that you’re signed out of all associated services, including Messages and FaceTime. Signing out of these services ensures that your personal information is no longer tied to your device, allowing for a smooth transition to a new Apple ID or the continued use of your MacBook without any associated accounts.
Open Messages And Facetime
If you’re currently signed in to Messages and FaceTime, the first step to remove your Apple ID is to open these applications on your MacBook. By accessing these services, you’ll be able to navigate to the necessary settings to sign out of your Apple ID.
Sign Out Of Accounts
Once you have both Messages and FaceTime open, it’s time to sign out of your Apple ID from these services. Follow these steps to ensure a smooth disassociation of your account from your MacBook:
- Open Messages:
- Select ‘Messages’ from the top menu and click ‘Preferences.’
- Choose the ‘iMessage’ tab and click on ‘Sign Out.’
- Open FaceTime:
- Click on ‘FaceTime’ from the top menu and select ‘Preferences.’
- Click on the ‘Sign Out’ button to unlink your Apple ID.
Disable Apple Id In System Preferences
Removing your Apple ID from your Macbook can be necessary in certain situations, whether you’re selling your device or simply want to start fresh. One of the steps involved in this process is disabling your Apple ID in System Preferences. By following these simple steps, you can ensure that your Apple ID is no longer linked to your Macbook.
Emopen System Preferences/em
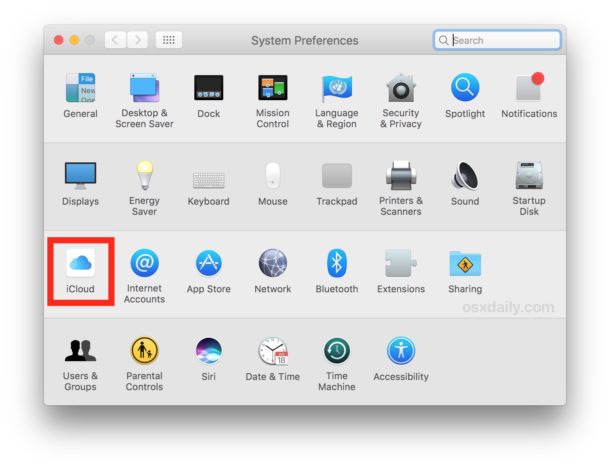
To begin, open System Preferences on your Macbook. You can find this by clicking on the Apple logo in the top left corner of your screen and selecting “System Preferences” from the dropdown menu.
Emnavigate To Apple Id/em
Once you have opened System Preferences, look for the icon labeled “Apple ID” and click on it to access the Apple ID settings. This icon is recognizable by the blue background with a white silhouette of an apple.
Emuncheck Allow Apple Id Sign In Apps/em
Within the Apple ID settings, you will see various options that are associated with your Apple ID. Look for the option that says “Allow Apple ID sign in apps” and uncheck the box next to it. This will disable the Apple ID sign-in feature for all apps on your Macbook.
By following these steps, you have successfully disabled your Apple ID in System Preferences. It’s important to note that this action does not delete your Apple ID or any associated content, but it does prevent your Apple ID from being used on your Macbook. This can be beneficial if you no longer want your Apple ID linked to this device. Remember to save any changes made and proceed with any other necessary steps to completely remove your Apple ID from your Macbook.
Credit: osxdaily.com
Remove Apple Id From App Store
Removing your Apple ID from the App Store is a straightforward process that can be done in a few simple steps. By signing out, you are effectively removing your Apple ID credentials from the App Store on your Macbook. In this section, we will guide you on how to remove your Apple ID from the App Store and ensure a smooth disconnection from your account.
Open App Store
To remove your Apple ID from the App Store, start by opening the App Store application on your Macbook. You can easily locate the App Store icon in your dock or by using Spotlight Search. Once the App Store is open, follow the steps below to proceed with signing out of your Apple ID.
Sign Out Of Apple Id
To remove your Apple ID from the App Store, you need to sign out of your account. Here’s a step-by-step guide on how to do it:
- Click on the “Sign In” button located in the lower-left corner of the App Store window.
- A popup window will appear with your Apple ID details. Click on your Apple ID.
- From the dropdown menu, choose “Sign Out.” You will be prompted to confirm your decision.
- Enter your Apple ID password to complete the sign-out process.
- The App Store will now be disconnected from your Apple ID, and you can proceed to use it without being signed in.
By following these steps, you have successfully removed your Apple ID from the App Store on your Macbook. Keep in mind that signing out of your Apple ID on the App Store does not affect your account’s functionality on other devices or services.
Restart Your Macbook
If you want to remove your Apple ID from your MacBook, one of the things you’ll need to do is to restart your MacBook. This clears the system’s cache and can help make sure the changes to your Apple ID are fully recognized by the system.
Shut Down Your Macbook
First, you’ll want to shut down your MacBook. To do this, simply click on the Apple logo in the top-left corner of the screen, and then select “Shut Down” from the dropdown menu. Wait for your Macbook to completely power off before proceeding.
Power On Your Macbook
Once your MacBook is shut down, press and hold the power button until you see the Apple logo. Your Macbook will begin to power on, and you can then continue with the process of removing your Apple ID.
:max_bytes(150000):strip_icc()/how-to-sign-out-of-apple-id-on-mac-52098301-268c52e6b9454a8ea323b519c52ae0f8-02e7a96a5f9449eaaa105efba6191513.jpg)
Credit: www.lifewire.com
Verify Apple Id Removal
Before completely removing your Apple ID from your MacBook, ensure that it is successfully disconnected from all services and applications.
Check Icloud Preferences
- Go to System Preferences on your Mac.
- Select Apple ID and sign out if necessary.
- Ensure all iCloud services are turned off.
Check Itunes And App Store
- Open iTunes on your MacBook.
- Go to Account and sign out if signed in.
- Open App Store and repeat the sign-out process.
Check Messages And Facetime
- Open Messages and FaceTime applications.
- Sign out of your Apple ID if logged in.
- Ensure no active connections tied to your Apple ID.
Reconfiguring With A New Apple Id
Signing in with a New Apple ID:
- Select “Apple Menu” and open “System Preferences”
- Click on “Apple ID” and choose “Overview”
- Press “Sign Out” and then “Sign In” with your new Apple ID
Sync Data with New Apple ID:
- Go to “System Preferences” and click on “Apple ID”
- Choose the data you want to sync with your new Apple ID
- Click on “Sync Now” to update your information
Frequently Asked Questions On How To Remove Apple Id From Macbook
How Do I Remove Apple Id From Macbook?
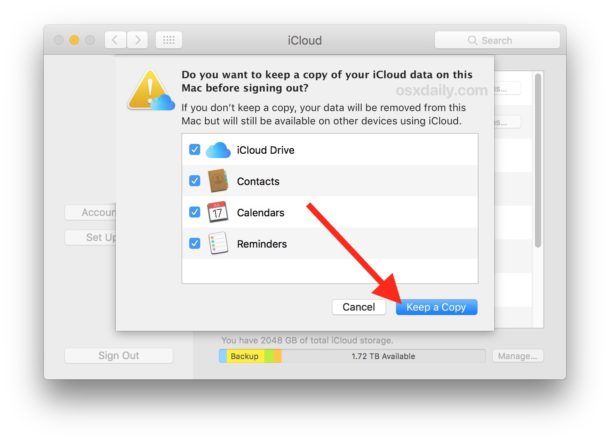
To remove your Apple ID from your MacBook, go to System Preferences, click on iCloud, and then click the Sign Out or Remove button. Follow the on-screen instructions to complete the process. Make sure to back up your data before removing the Apple ID to avoid any data loss.
Conclusion
Removing an Apple ID from a MacBook is essential to ensure privacy and security. By following the simple steps outlined users can easily detach their Apple ID from their device, allowing for a seamless transition. By doing so, they can rest assured that their personal information remains protected.
0 comments