
There is nothing quite like the excitement of modding your mechanical keyboard. You have your new switches lined up, your keycaps are removed, and you are ready to transform that loud, clacky typing experience into something buttery smooth. But then, disaster strikes: the switch puller is missing. If you own a budget-friendly hot-swappable board populated with Outemu switches, you know the panic is real. These switches are notorious for their tight tolerances and unique wing-latch housing, making them incredibly stubborn to remove even with the official tool, let alone without it.
However, before you resort to brute force or dangerous prying that could permanently damage your PCB, stop right there. You don’t need to wait days for a delivery truck to finish your build. In this “Ultimate DIY Guide,” we prove that necessity is truly the mother of invention. We will walk you through safe, effective, and ingenious methods to remove your Outemu switches using items you likely have lying around your desk. We are prioritizing the structural integrity of your keyboard plate and switch housing, ensuring that “DIY” doesn’t turn into “destroy it yourself.” Let’s get those stubborn switches out safely and get you back to typing!
Introduction: Why You Might Need to Remove Switches Without a Puller
It’s a frustration every mechanical keyboard enthusiast eventually faces: you’re ready to customize your board, clean your setup, or replace a faulty key, but the switch puller is nowhere to be found. Perhaps it was lost in a cluttered drawer, the flimsy plastic tool included in the box snapped, or maybe you simply haven’t invested in a high-quality puller yet.
Outemu switches are a staple in the mechanical keyboard world, frequently found in budget-friendly, hot-swappable keyboards. Because of their unique pin design, they can be tight, making removal tricky even with tools. The goal of this guide is to provide you with safe, effective, and DIY-friendly methods to remove these switches using items you likely already have at home.
However, proceeding without the proper equipment requires a heightened sense of caution. To avoid costly mistakes, keep the following in mind:
- Protect the PCB: Using improvised tools increases the risk of scratching the circuit board.
- Watch the Housing: Outemu housings can be brittle; excessive force can crack the plastic.
- Mind the Pins: Pulling at an angle can easily bend the metal contact pins.
Removing switches without a puller is absolutely doable, but it requires a gentle touch and plenty of patience. If you are ready to proceed carefully, let’s look at how to get the job done safely.
Understanding Outemu Switches: The ‘Clips’ That Hold Them
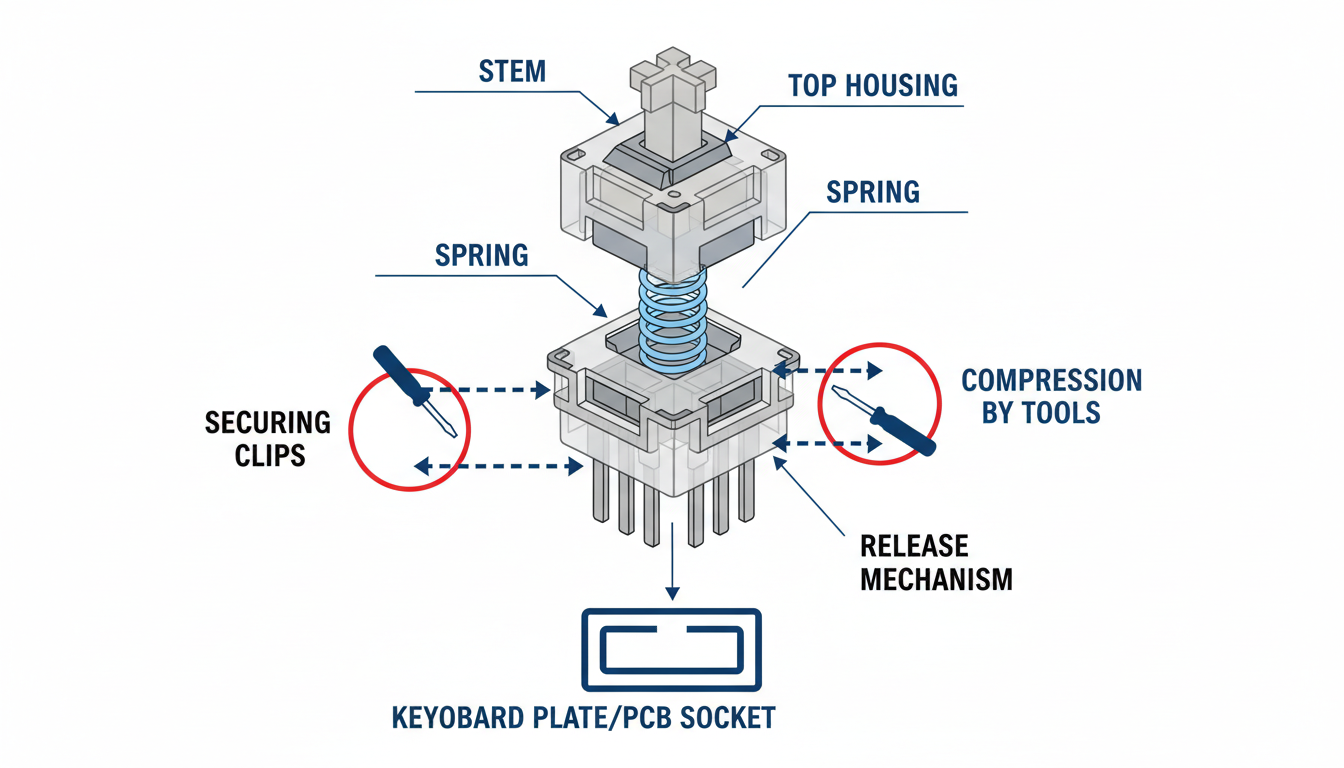
To safely remove your switches without official tools, you must first understand the anatomy of what actually holds them in place. Unlike soldered switches that are permanently fused to the circuit board, hot-swappable Outemu switches rely on a mechanical latching system to stay secure.
The secret lies in the housing mechanics. If you look closely at a loose switch, you will notice two small plastic clips (or retention tabs) located on the top and bottom edges of the casing. When you push a switch into your keyboard, these clips expand and snap underneath the mounting plate, locking the component firmly against the PCB socket.
A standard metal switch puller is designed to perform a very specific action to bypass this lock:
- Compression: The tool’s prongs squeeze the plastic tabs inward simultaneously.
- Release: This squeezing action retracts the tabs so they are flush with the housing, clearing the edge of the mounting plate.
- Extraction: Once the clips are disengaged, the switch lifts out with zero resistance.
This mechanics is the key to improvisation. When using alternative tools, your goal is not simply to pry the switch out, but to replicate this compression. Understanding that you must disengage these “anchors” before pulling is the difference between a successful swap and a broken switch housing.
Analysis: Understanding Outemu Switches: The ‘Clips’ That Hold Them
Essential DIY Tools: What You’ll Need From Around the House
While a dedicated switch puller is the safest bet, you can successfully hot-swap switches using common items found in your junk drawer or tool kit. The primary goal is to find tools precise enough to compress the locking clips located on the top and bottom of the switch housing, allowing it to release from the plate.
Prioritize these substitutes based on stability and grip:
- Fine-tip Tweezers: Often the most effective DIY solution. Bent-tip tweezers are preferred, as they allow you to pinch both release tabs simultaneously without your hand blocking the view.
- Small Flathead Screwdrivers: A screwdriver from a jeweler’s repair kit is excellent for gently wedging the tabs loose, typically one side at a time.
- Dental Picks: These offer great precision for reaching under the switch housing to depress the latch.
- Paper Clips: As a last resort, stiff, carefully modified paper clips can work, though they are prone to bending under pressure.
Beyond the removal tools, ensure your workspace is prepared. You will still need a standard keycap puller to expose the switches first. Additionally, set up good lighting so you can clearly see the tiny release tabs, and lay down a soft cloth or desk mat to protect your keyboard’s casing and prevent scratches if a tool slips.
The Primary Method: Tweezers or Small Screwdrivers Technique
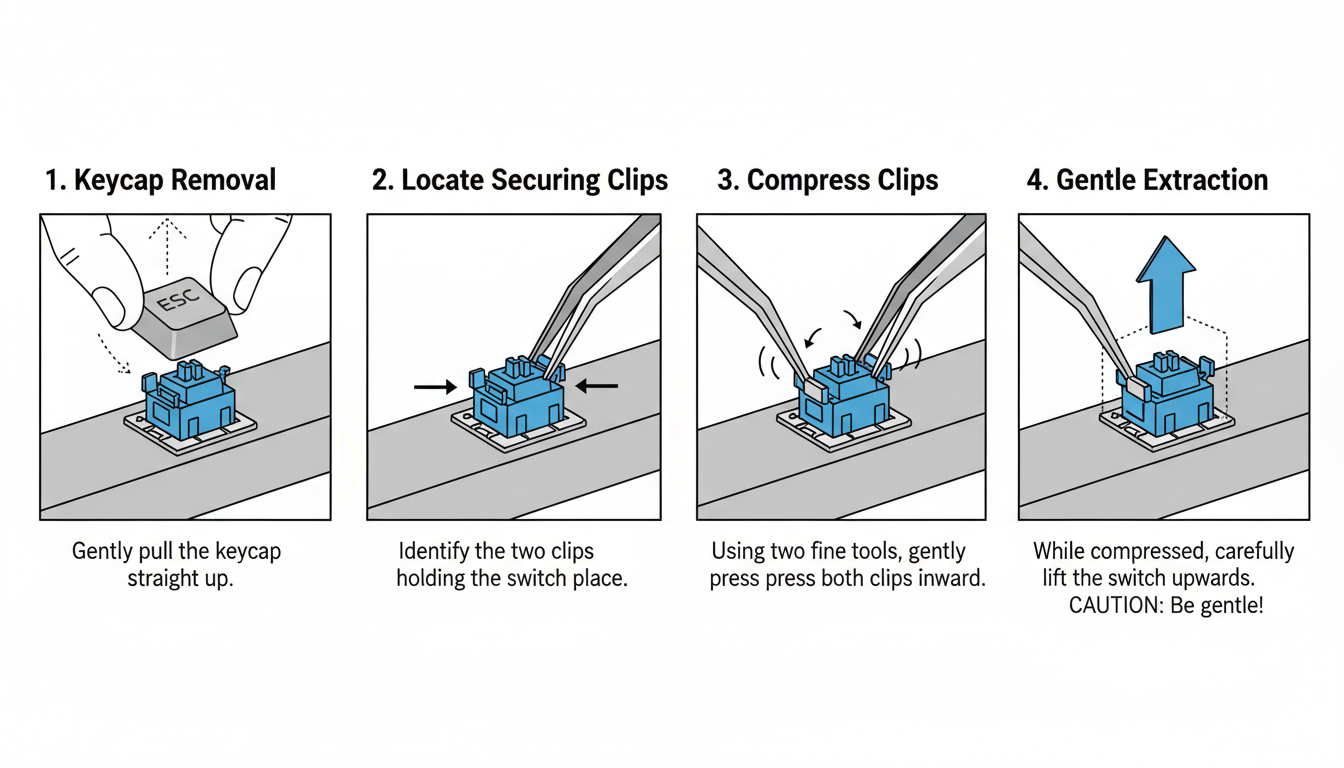
If you find yourself without a dedicated tool, this technique is the most effective way to remove switches safely. Begin by pulling the keycap off to fully expose the switch housing.
- Identify the Securing Clips: Locate the two plastic retention tabs that lock the switch into the plate. On most standard mechanical switches, these are found on the top and bottom edges.
- Position Your Tools: take two fine-tip tweezers or very small flathead screwdrivers. Place the tips directly against these locking clips.
- Compress and Lift: The goal is to simultaneously compress both clips inwards toward the center of the switch. While maintaining this compression, apply gentle, consistent upward pressure to slide the switch out of the socket.
If the switch feels stubborn, avoid using excessive force. Instead, use a subtle ‘rocking’ motion (north to south) while pulling up to help dislodge it. If maneuvering two tools at once proves difficult, you can work on one side at a time—unclip the top tab and lift slightly, then repeat for the bottom. Remember, patience is key; rushing the process can easily crack the switch housing or bend the delicate metal pins underneath.
Analysis: The Primary Method: Tweezers or Small Screwdrivers Technique
Alternative Approaches & Advanced Tips for Tricky Switches
When standard tools fail or aren’t at hand, a little ingenuity goes a long way. Explore these less common but viable methods for removing stubborn switches without damaging your keyboard.
- Custom Paper Clip Puller: In a pinch, a standard paper clip can be transformed into a precision tool. Straighten a large paper clip and bend it into a “U” shape. For improved leverage, use pliers to bend the very tips inward at a 90-degree angle to create small “hooks” that grip the locking tabs more securely than smooth wire. This custom shape allows for better compression of the clips and reduces slip.
- The Single-Side “Shim” Method: If you only have a single bent-tip tweezer or a dental pick, you can “walk” the switch out. Insert the tool tip to compress one locking clip at a time. While keeping the clip compressed, use the tool to gently pry that side of the switch upwards just enough to clear the plate. Repeat for the opposite side to release the switch fully.
- Leveraging the Plate (With Caution): For an extremely stuck switch, you may need a slight leverage assist. Place a thin, non-conductive buffer—like a plastic guitar pick or a strip of electrical tape—on the plate right next to the switch. Rest your prying tool on this buffer to protect the plate from scratches while you lift the switch housing.
Troubleshooting Stuck Switches: If a switch feels unusually stuck, stop immediately. Do not force it. Re-examine your grip to ensure you are compressing the plastic locking tabs and not just grabbing the housing. Verify the keyboard is actually hot-swappable and not soldered. If the switch remains jammed, a metal contact pin may be bent and wedged inside the socket; try gently wiggling the switch side-to-side while pulling to free it.
Troubleshooting Common Issues and Preventing Damage
Even with the best tools, you may encounter stubborn switches or minor mishaps. Staying calm and using the right techniques will save your keyboard from permanent damage.
- If a switch won’t budge: Stop immediately. Do not force it. Re-evaluate your grip on the release tabs; often, the switch puller isn’t compressing the locking clips fully. Verify that your keyboard is actually hot-swappable—soldered switches will not pull out and forcing them will rip the PCB traces.
- Fixing bent pins: It is common for pins to bend during removal or insertion. If this happens, use a pair of flat-nose tweezers to gently straighten them. Uncurl any folded tips slowly to avoid snapping the metal. If a pin breaks off completely, the switch must be replaced.
- Preventing scratches and PCB damage: Work slowly and methodically. To protect the delicate PCB surface from accidental tool slips, you can apply a layer of protective film or masking tape around the switch area before working. Always support the hot-swap socket from the back if possible, as excessive downward pressure can pop the socket off the circuit board.
Distinguish between minor cosmetic wear (scratches on the plate) and functional damage (lifted pads or broken sockets). While scratches are acceptable, a loose hot-swap socket requires professional soldering repair to restore functionality.
Best Practices for Future Switch Maintenance
To ensure your mechanical keyboard remains a reliable daily driver, adopting a few maintenance habits is essential. While hot-swappable boards make customization easy, the components are precision-engineered and require respect to maintain their longevity.
- Invest in the Right Tools: If you anticipate swapping switches frequently, we strongly advocate investing in a dedicated, high-quality switch puller. The flimsy tools often included with keyboards can slip, scratching your plate or damaging the switch housing. A proper tool ensures a secure grip and smoother removal.
- Mind the Pins: The most common issue during installation is bent pins. Before insertion, visually inspect the switch to ensure the two metal contact pins are perfectly straight. Align the switch carefully with the socket holes; if you meet resistance, do not force it. Remove the switch, check the pins, and try again to avoid permanently damaging the hot-swap socket.
- Respect the Lifespan: Hot-swap sockets are durable but not invincible; most are rated for a specific number of cycles (often around 100). Gentle, deliberate handling prevents the sockets from loosening over time, ensuring a consistent electrical connection.
- Clean Before Insertion: An empty keyboard plate is the easiest to clean. Take a moment to brush away dust, hair, or crumbs from the plate and PCB before inserting new switches to prevent debris from interfering with the contacts.
Ultimately, removing Outemu switches without a dedicated puller proves that resourcefulness can often substitute for specialized gear. While having the official tool is convenient, it is entirely possible to achieve the same results using common household items like a thin flathead screwdriver or modified tweezers. The secret ingredient isn’t the tool itself, but your approach.
To ensure success and the safety of your keyboard, keep these core principles in mind:
- Prioritize Precision: Focus strictly on the top and bottom locking tabs. Blindly prying at the sides will only damage the switch housing or your PCB.
- Patience is Key: Treat each switch as its own project. Rushing leads to bent pins and broken clips, while a slow, methodical pace ensures a clean removal.
- Never Force It: If a switch feels stuck, stop immediately. Re-adjust your angle and try to depress the locking clips again. Brute force is the enemy of delicate electronics.
By understanding the mechanics of how the switch locks into the plate, you can manipulate it free without expensive equipment. Take your time, breathe, and trust the process. There is a distinct sense of satisfaction in executing a DIY solution that relies on skill and care rather than just buying another gadget.
FAQ: Your Questions About DIY Switch Removal Answered
Venturing into DIY keyboard maintenance without the “official” gear can feel risky. Here are the answers to the most common concerns to help you modify your board with confidence.
- Is it safe to remove switches without a puller?
Yes, but only if you remain patient. While a dedicated tool is ideal, makeshift methods are safe provided you work slowly to apply even leverage. Rushing is the main cause of mishaps. - Will this damage my keyboard or switches?
If you are too forceful, there is a risk of minor cosmetic scratching on the switch housing or bending the metal pins. However, if you follow the proper rocking technique, permanent damage to the PCB is very unlikely. - Can I use these methods for soldered switches?
Absolutely not. These prying techniques are exclusively for hot-swappable keyboards. Attempting to pry out a soldered switch will rip the contact pads off your PCB, permanently destroying the keyboard. Soldered boards require a soldering iron. - How do I know if my switches are hot-swappable?
Most hot-swappable boards are advertised as such. To be sure, look at the PCB under the keycaps; hot-swap boards have visible sockets that the switch pins slide into, rather than permanent solder points. - What if I bend a switch pin?
Don’t panic. You can usually salvage the switch by gently straightening the pin with fine-tip tweezers. Be extremely careful, as the metal can snap if bent repeatedly.
Conclusion
While removing Outemu switches without a dedicated puller is entirely possible, it requires patience, a steady hand, and the right improvised tools. Whether you use a small flathead screwdriver, bent paperclips, or guitar picks, the priority should always be protecting your keyboard’s PCB and the switch housing. Remember that these DIY methods are best suited for hot-swappable keyboards; attempting to pull soldered switches without desoldering will result in permanent damage.
If you find yourself struggling with stubborn switches or notice the plastic housing bending, it is often safer to pause and wait until you can acquire a proper switch puller. However, by following the safety steps and techniques outlined in this guide, you can successfully swap your switches and get back to typing with a fresh feel and sound.
Frequently Asked Questions (FAQ)
- 1. Can I remove Outemu switches if my keyboard is not hot-swappable?
- No, you cannot simply pull them out. If your keyboard is not hot-swappable, the switches are soldered directly to the PCB. You must use a soldering iron and a desoldering pump (or wick) to remove the solder before the switches can be released. Pulling soldered switches will rip the conductive pads off the circuit board, ruining the keyboard.
- 2. Why are my Outemu switches so hard to pull out?
- Outemu switches are notorious for having a very tight fit, especially in Outemu-specific sockets found on budget keyboards (like Redragon or Tecware). The plastic locking tabs on the top and bottom of the switch housing are often stiff. This tightness makes them harder to remove than Cherry or Gateron switches, requiring more force and a careful “rocking” motion to wiggle them free.
- 3. Is it safe to use a screwdriver to remove switches?
- It can be safe if done correctly, but it carries a higher risk than using a real puller. A flathead screwdriver can easily scratch the keyboard plate or crack the plastic switch housing if you apply too much leverage. To minimize risk, use a very small precision screwdriver, apply gentle pressure to the locking tabs, and avoid prying directly against the delicate PCB surface.
- 4. What are the best household alternatives to a switch puller?
- The most effective DIY tools are usually bent paperclips or bobby pins shaped into a “U” to hook under the tabs, or two small flathead screwdrivers used to depress the top and bottom tabs simultaneously. In a pinch, rigid items like guitar picks or stiff plastic cards can also help wedge the switch loose.
- 5. I accidentally cracked the top plastic of the switch. Is it still usable?
- Usually, yes. If the damage is only cosmetic (like a chipped edge on the housing), the switch will likely still function. However, if the crack interferes with the stem’s movement or if the locking tabs are completely broken off, the switch may not sit securely in the socket or type smoothly. In that case, it is best to replace it.
0 comments