
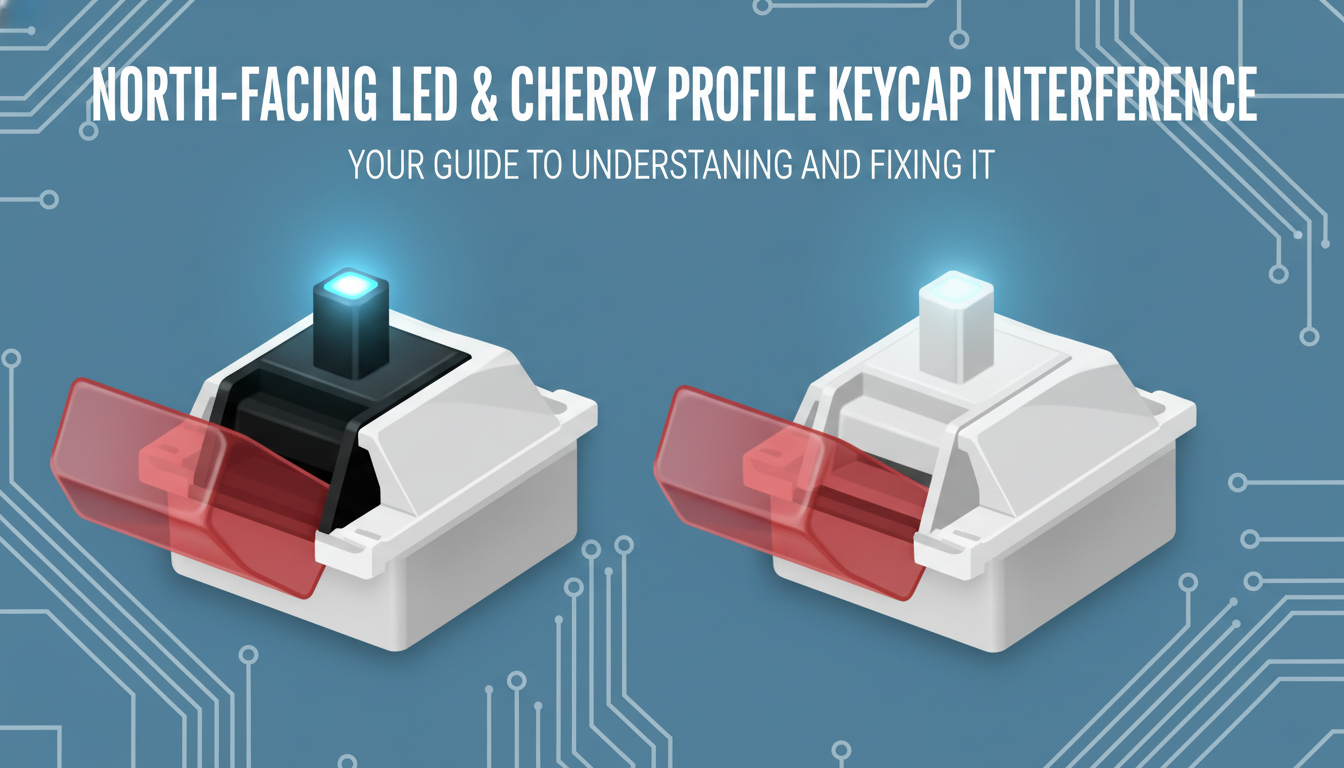
Picture this: You’ve just unboxed a stunning set of Cherry profile keycaps, ready to give your mechanical keyboard a visual and acoustic upgrade. You eagerly mount them, anticipating that crisp, satisfying typing experience. But as soon as your fingers hit the home row, disappointment sets in. Instead of a clean “thock,” you hear a harsh plastic collision, and the keys feel strangely mushy on the bottom-out. If this scenario sounds familiar, you haven’t bought a defective product—you’ve likely encountered the notorious North-facing LED interference.
This specific geometry mismatch is a rite of passage for many in the keyboard hobby, occurring when the interior of shorter keycaps clashes with the switch housing on keyboards designed with top-positioned LEDs. While it can ruin the feel of a premium build, it certainly isn’t a death sentence for your setup. In this guide, we will demystify exactly why this hardware conflict happens, help you identify if your board is affected, and walk you through the most effective fixes. From simple washer mods to specific switch choices, we’ll ensure you can rock your favorite keycaps without compromising on sound or feel.
Introduction: The Quest for Perfect Keystrokes
For many mechanical keyboard enthusiasts, the journey begins with a simple desire: a typing experience that looks as good as it feels. We chase the perfect aesthetic with sculpted **Cherry profile keycaps**, renowned for their comfortable ergonomics and sleek design. However, a hidden adversary often lurks beneath these premium caps, especially on popular RGB-centric boards: the **North-facing LED orientation**.
This common architectural clash creates a phenomenon known as **keycap interference**. It occurs when the lower internal wall of a Cherry profile keycap collides with the top housing of a North-facing switch before the key is fully pressed. Instead of a clean, satisfying bottom-out, you are left with a compromised keystroke.
Why does this matter? This subtle collision robs you of the premium experience you paid for:
* **Inconsistent Sound:** The distinct “thock” or “clack” is replaced by a hollow, plastic-on-plastic tapping noise, particularly on the home row.
* **Mushy Feel:** The abrupt stop prevents the switch from traveling its full distance, creating a jarring and uneven tactile sensation.
It is a frustrating nuance that can turn a dream build into a disappointment. But fear not—this is a solvable puzzle. In the following guide, we will walk you through how to identify if your board is at risk and explore the most effective methods to banish interference for good.
What is Cherry Profile and Why is it So Popular?
Originating from the legendary Cherry G80 series, the Cherry profile has established itself as the “gold standard” within the custom mechanical keyboard community. Visually, these keycaps feature a cylindrical top and a sculpted design, meaning each row (R1 through R4) possesses a specific height and angle engineered to cradle your fingers naturally during reach.
What truly sets Cherry profile apart is its low-profile architecture. Sitting significantly lower than standard keycaps, they reduce the distance your fingers need to stretch, offering a comfortable, fatigue-free typing experience. Acoustically, the shorter height results in less internal echo, often producing the deep, bass-heavy “thocky” sound signature that enthusiasts crave.
How it compares to the competition:
- vs. OEM: Cherry shares a similar sculpted shape to OEM (found on most pre-built keyboards) but is roughly 2–3mm shorter, providing a lower center of gravity.
- vs. SA: While SA is tall, spherical, and vintage-inspired, Cherry is much lower, offering a faster actuation feel and significantly less wobble.
- vs. DSA: Unlike the flat, uniform height of DSA, Cherry is sculpted to fit the natural curvature of the hand.
Ultimately, the blend of ergonomic comfort, superior acoustic performance, and massive aftermarket support makes Cherry profile the definitive choice for premium custom builds.
Understanding North-Facing LEDs on Your PCB
If you have ever removed a keycap and noticed the LED sitting at the top of the switch housing, you are looking at a “north-facing” orientation. This design choice is deliberate and serves a specific purpose in the mechanical keyboard world, though it comes with a notable trade-off for enthusiasts.
Why Manufacturers Choose North-Facing:
The primary benefit is illumination. Since most keycaps feature legends (letters and symbols) on the upper half of the key, placing the LED at the north position puts the light source directly underneath the legend. This results in:
- Significantly brighter and more even backlighting.
- Crisp, clear visibility for “shine-through” keycaps, popular in gaming setups.
The Interference Trade-Off:
While great for RGB, this orientation can cause interference with Cherry profile keycaps. Cherry caps are lower and have angled thick skirts. On the middle rows (like the home row), when you fully press the key, the interior of the keycap can hit the top of the switch housing (where the LED protrudes) before the switch bottoms out. This collision creates an inconsistent sound and a harsh bottom-out feel that many enthusiasts try to avoid.
Analysis: Understanding North-Facing LEDs on Your PCB
The Core Problem: Cherry Profile Keycap Interference Explained
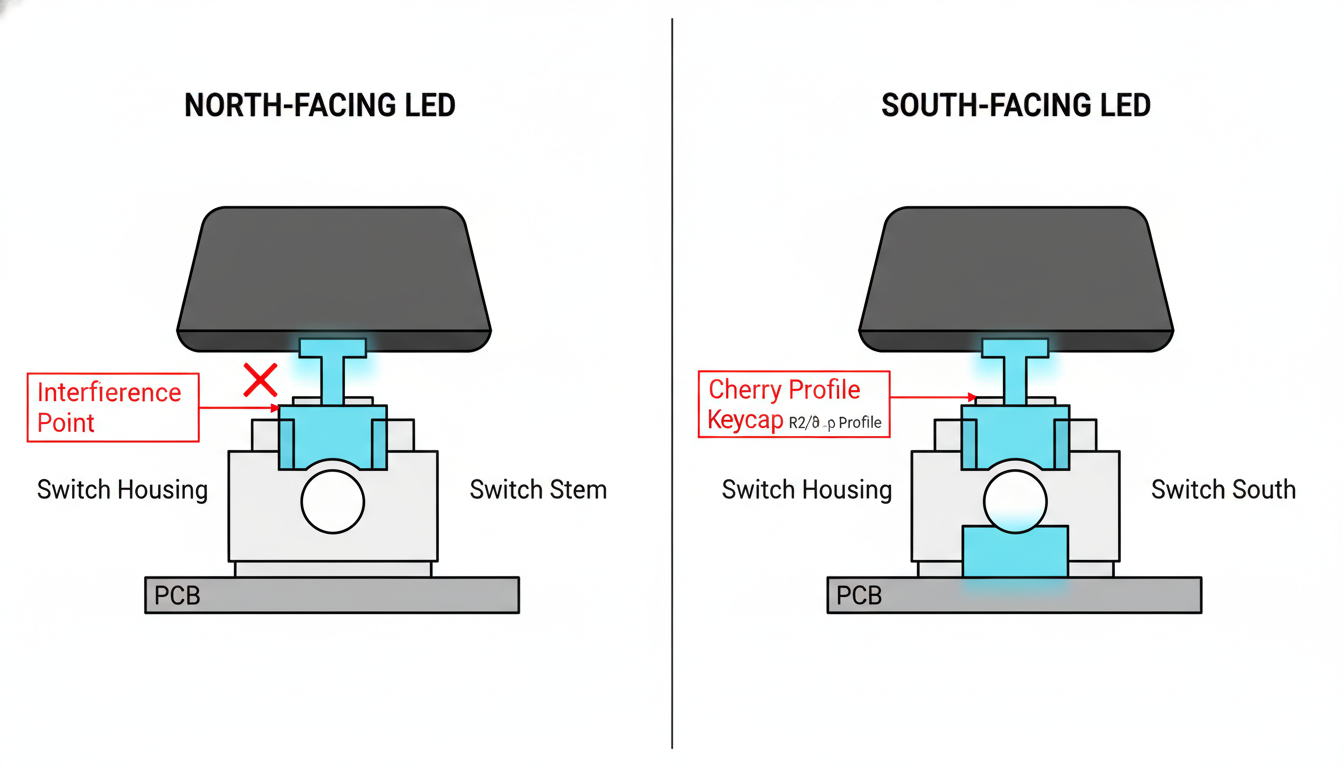
At the heart of the “north-facing vs. south-facing” debate lies a specific mechanical incompatibility known as keycap interference. This phenomenon occurs when the internal geometry of a Cherry profile keycap—specifically the thick, angled lower skirt—collides with the top housing of a switch before the stem can fully bottom out. This issue is most prevalent on the R2 and R3 rows (the “home” and “QWERTY” rows), where the keycaps are sculpted to be lower and more aggressively angled.
Standard Cherry keycaps are designed for switches with south-facing LEDs, where the switch housing slopes away to accommodate the keycap’s profile. However, when a switch is rotated 180 degrees to a north-facing orientation (placing the LED at the top), the bulky “nameplate” side of the switch housing ends up directly in the travel path of the keycap’s descending south wall.
The consequences of this collision extend beyond simple geometry, fundamentally altering the typing experience:
- Mushy Feel: Instead of a crisp, solid bottom-out against the switch floor, the keystroke ends abruptly as plastic hits plastic, resulting in a dampened, inconsistent sensation.
- Reduced Key Travel: The interference physically stops the key from traveling its full distance, often cutting off the intended actuation depth or bottom-out point.
- Altered Acoustics: The pleasant “thock” or “clack” is replaced by a harsh, hollow, or muted sound caused by the skirt impacting the housing.
- Potential Long-Term Wear: Repeated, unintended impact between the keycap skirt and switch housing can lead to scratches, deformation, or accelerated wear on both components over time.
Identifying Interference on Your Keyboard Setup
Do your keys feel mushy or sound unexpectedly dull? You might be facing mechanical interference. This generally occurs when the interior wall of a keycap strikes the switch housing before the stem fully bottoms out. Before you swap out your entire board, use these practical steps to confirm the issue.
Start with a visual inspection. Remove a keycap from the home row (Row 3), as this is the most susceptible area when using Cherry profile caps on north-facing switches. Flip the cap over and look for faint rub marks or scuffs on the interior north-facing wall. You may also see corresponding marks on the switch housing or LED.
If you cannot see marks, try the Paper Test to verify:
- Cut a small, thin strip of standard printer paper.
- Place the strip between the top side (north side) of the switch and the keycap.
- Press the key down slowly.
If the paper gets pinched tight or trapped before the switch hits the bottom, you have confirmed interference. Alternatively, press keys very slowly; if you feel abnormal friction or hear a plastic-on-plastic collision sooner than expected, interference is likely the culprit.
Solutions for North-Facing LED Interference: A Comprehensive Guide
Dealing with the dreaded “interference”—that unpleasant clicking sound or mushy feel when a keycap strikes the switch housing—can be frustrating. Fortunately, there are several effective ways to resolve this issue, ranging from simple component swaps to preventative build choices.
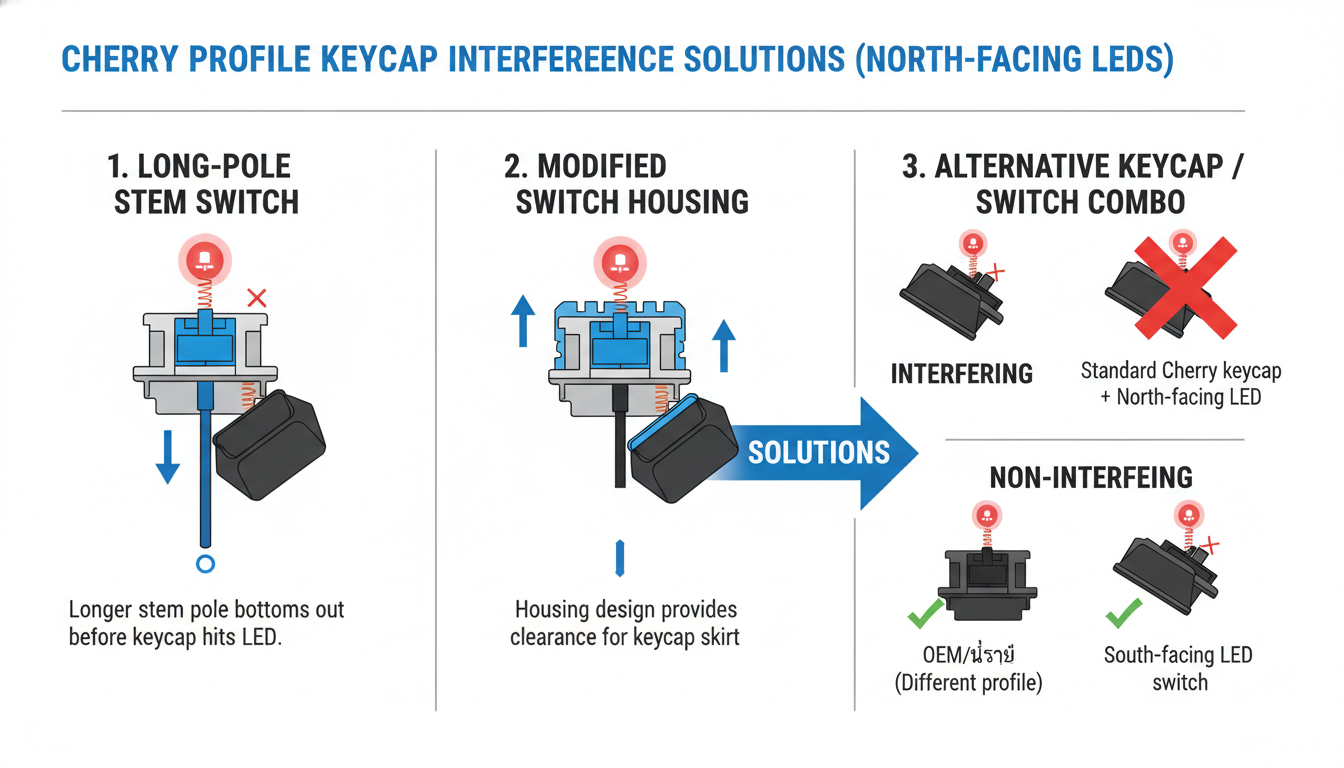
- Switch Modifications: One of the most effective solutions is swapping to long-pole switches. Because the central pole of the stem is longer, the switch bottoms out early, stopping the travel before the keycap can hit the top housing. You can also look for switches featuring modified top housings specifically design with recessed LED slots to provide extra clearance.
- Keycap Alternatives: If you aren’t married to the Cherry profile, switching to taller profiles like OEM, SA, or XDA will instantly solve the problem as they sit higher above the switch. For those who prefer the cylindrical feel of Cherry, seek out modern sets explicitly labeled as “interference-free” or designed with thinner internal walls.
- PCB Choice: For your next build, the best preventative measure is selecting a south-facing PCB. This orientation places the LED at the bottom of the socket, completely removing the physical obstruction. This has rapidly become the standard in the enthusiast custom keyboard market for this exact reason.
- Advanced Modifications: In rare cases, enthusiasts may sand down the switch housing or the interior of the keycap. However, we strongly caution against this method. It is time-consuming, permanently alters your components, and carries a high risk of damaging the structural integrity of your keyboard.
Analysis: Solutions for North-Facing LED Interference: A Comprehensive Guide
The Future of Compatibility: How Manufacturers Are Responding
The mechanical keyboard landscape is undergoing a significant shift as manufacturers actively listen to enthusiast feedback regarding interference issues. The industry is moving away from a strict “RGB-first” mentality toward prioritizing typing feel and acoustic integrity. This evolution is primarily driven by two key innovations that are rapidly becoming standard:
- South-Facing LED PCBs: The most effective solution has been the widespread adoption of south-facing sockets in new custom kits and even entry-level pre-builts. By positioning the LED at the bottom of the switch slot, manufacturers ensure the switch housing clears the thick internal walls of Cherry profile keycaps, completely eliminating the dreaded collision sound and inconsistent feel.
- Interference-Free Switch Molds: Switch manufacturers are responding by refining their “Cherry-compatible” designs. Many modern switches now feature long-pole stems or aggressively chamfered top housings. These geometric tweaks physically prevent the keycap from striking the switch body, ensuring compatibility even on older North-facing printed circuit boards.
This rapid adaptation highlights the vital role of community feedback in driving innovation. What began as a niche complaint on hobbyist forums has effectively forced a new manufacturing standard, ensuring that future builds are defined by seamless compatibility rather than compromise.
Conclusion: Achieving Your Perfect Typing Experience
While the potential clash between Cherry profile keycaps and north-facing LEDs is a well-documented quirk in the mechanical keyboard hobby, it is far from a dealbreaker. As we have explored, this interference—caused by the keycap striking the switch housing before bottoming out—can alter the intended sound and feel of your board. However, this common hurdle should not deter you from building a setup that meets your aesthetic and ergonomic standards.
Fortunately, the community and manufacturers have developed a variety of effective workarounds:
- Switch Selection: Installing long-pole switches is often the cleanest fix, as the extended stem prevents the keycap from hitting the housing. Alternatively, switches with rounded top housings (like certain Gateron models) can naturally mitigate the issue.
- Keycap Alternatives: If you are flexible, taller profiles like OEM or SA clear the housing effortlessly. For those committed to the Cherry look, seek out manufacturers specifically molding “interference-free” keycaps with thinner internal walls.
- Simple Modifications: For existing builds, affordable tweaks like placing washers on the switch stems can introduce just enough clearance to eliminate the collision without sacrificing stability.
Ultimately, the “perfect” mechanical keyboard is subjective. Do not be afraid to experiment with these variables to discover what works best for your typing style. By understanding the mechanics behind the interference and utilizing these solutions, you can ensure a typing experience that is both visually stunning and acoustically satisfying.
FAQ: Your Questions Answered
Curious about how your switches and keycaps interact? Here are quick answers to the most common questions regarding interference and PCB orientation.
- Does all Cherry profile interfere with north-facing LEDs?
Not necessarily. While standard Cherry profile keycaps often collide with north-facing switch housings (specifically on the home row), many modern manufacturers like Akko produce Cherry-style caps with slightly different internal dimensions to avoid this. Additionally, newer switch molds (like Gateron G Pro) are often designed to prevent this collision entirely. - Is keycap interference harmful to my keyboard?
No. Interference is purely a sensory issue. It creates an inconsistent sound and a slightly “mushy” bottom-out feel, but it will not damage your switches, keycaps, or PCB. - What are ‘long-pole’ switches?
These are switches with a longer central stem pole. Because the pole hits the bottom of the housing early, the total travel distance is reduced. This stops the keycap from traveling far enough down to hit the switch housing, effectively bypassing interference issues. - Can I just ignore minor interference?
Absolutely. If the change in sound or feel doesn’t bother you, there is no functional reason to fix it. Many users don’t even notice it during normal typing. - Are south-facing PCBs always better?
It depends on your priorities. South-facing is preferred for maximum keycap compatibility and sound. North-facing is superior if you want bright RGB backlighting that shines through legends. - How do I know if my PCB has north or south-facing LEDs?
Simply remove a keycap and look at the switch. If the LED (or the slot for it) is located at the top of the switch, it is north-facing. If it is at the bottom, it is south-facing.
Conclusion
Understanding the interaction between north-facing LEDs and Cherry profile keycaps is essential for any mechanical keyboard enthusiast aiming for the perfect typing experience. While the interference issue—caused by the keycap striking the switch housing before bottoming out—can be frustrating, it is not a dead end for your build.
Key Takeaways:
- The Core Issue: Interference primarily affects Row 3 (A-row) Cherry profile keycaps on north-facing switches, resulting in a hollow sound and mushy feel.
- It’s Not Universal: Not all north-facing boards suffer from this. The issue depends heavily on your specific switch stem length and top housing geometry.
- Solvable Problems: You don’t always need a new keyboard. Simple fixes range from using “long-pole” switches and stem washers to simply swapping to a taller keycap profile like OEM.
Frequently Asked Questions
- 1. Does north-facing interference affect all keycap profiles?
- No. This issue is specific to Cherry profile keycaps due to their low height and angled internal walls. Taller profiles like OEM, SA, DSA, and MT3 have enough clearance to avoid hitting the switch housing.
- 2. Will interference damage my switches or keycaps?
- No, it will not cause physical damage or prevent the key from registering a press. It is purely a cosmetic and tactile issue that alters the sound signature and bottom-out feel of the keys.
- 3. How can I test if my keyboard has interference?
- You can perform the “paper test.” Place a small strip of thin paper between the switch housing (north side) and the keycap. Press the key down; if the paper gets trapped and cannot be pulled out easily while the key is held down, you likely have interference.
- 4. Can I fix interference without buying a new keyboard?
- Yes. The most effective non-destructive fix is to swap your switches for long-pole switches (which bottom out on the center pole rather than the rails) or switches with updated housings designed to clear north-facing LEDs (like newer Gateron molds). Alternatively, you can use small washers on the switch stems to slightly lift the keycaps.
- 5. Why do manufacturers still make north-facing PCBs if this is a known issue?
- North-facing LEDs are superior for illuminating “shine-through” keycaps where the legends are located at the top of the key. Since many gaming keyboards prioritize RGB lighting effects and legible backlit legends over custom keycap compatibility, north-facing orientation remains the industry standard for mass-produced boards.
0 comments