
To back up a MacBook, use Time Machine or a cloud service like iCloud or Google Drive. Creating regular backups protects your data and ensures easy recovery in case of a system failure.
Backing up your MacBook is crucial to safeguard important files, photos, and documents. Plus, it offers peace of mind knowing that your data is safe and secure. Whether you choose to back up to an external hard drive or a cloud service, the process is simple and essential.
We will explore the various methods of backing up your MacBook effectively to prevent data loss and keep your information protected.
Importance Of Regular Backups
Regular backups of your MacBook are crucial to safeguarding your important files and data. Whether it’s valuable documents, cherished photos, or essential work projects, losing this information can be devastating. Here’s why maintaining regular backups is of utmost importance.
Protection Against Data Loss
Backing up your MacBook ensures that your important files and data are protected. In the event of accidental deletion, hardware failure, or even theft, having a backup allows you to easily recover your files without the risk of permanent loss.
Recovery From System Failures
Regular backups provide a safety net in the face of system failures. Whether it’s a software issue, malfunctioning hardware, or a complete system crash, a recent backup can enable you to quickly restore your MacBook to its previous state, minimizing downtime and preventing potential data loss.
Choosing A Backup Method
When it comes to protecting your MacBook data, selecting the right backup method is crucial. Here are some reliable options to consider:
Cloud-based Backup Solutions
Using cloud-based backup services like iCloud or Dropbox is convenient and secure.
- Automatically backs up your data
- Accessible from anywhere with an internet connection
- Encryption ensures data safety
External Hard Drives
Storing backups on external hard drives is another reliable option.
- Fast and efficient way to backup large files
- Provides an extra layer of offline protection
- Regularly connect and update your backups
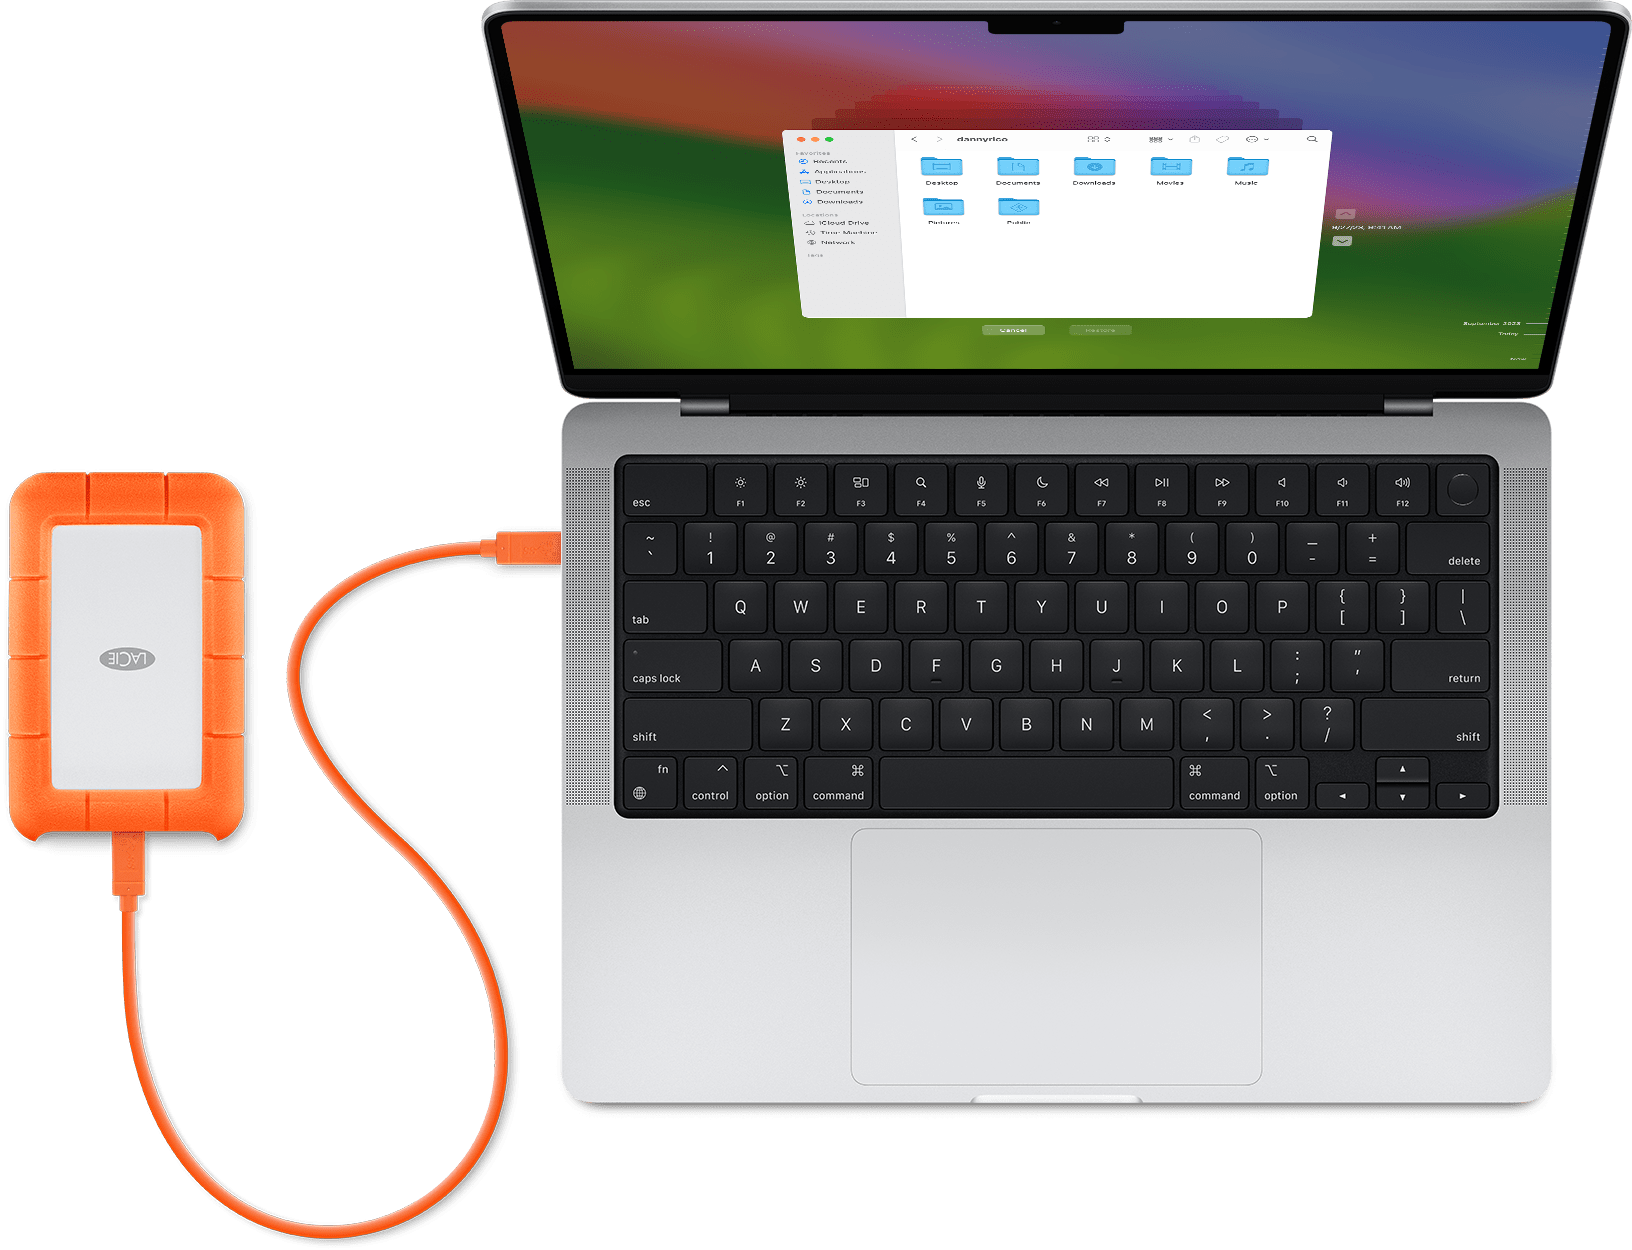
Setting Up Time Machine
Backing up your MacBook is crucial to keep your data safe. Time Machine, a built-in feature of macOS, makes this process easy.
Enabling Time Machine
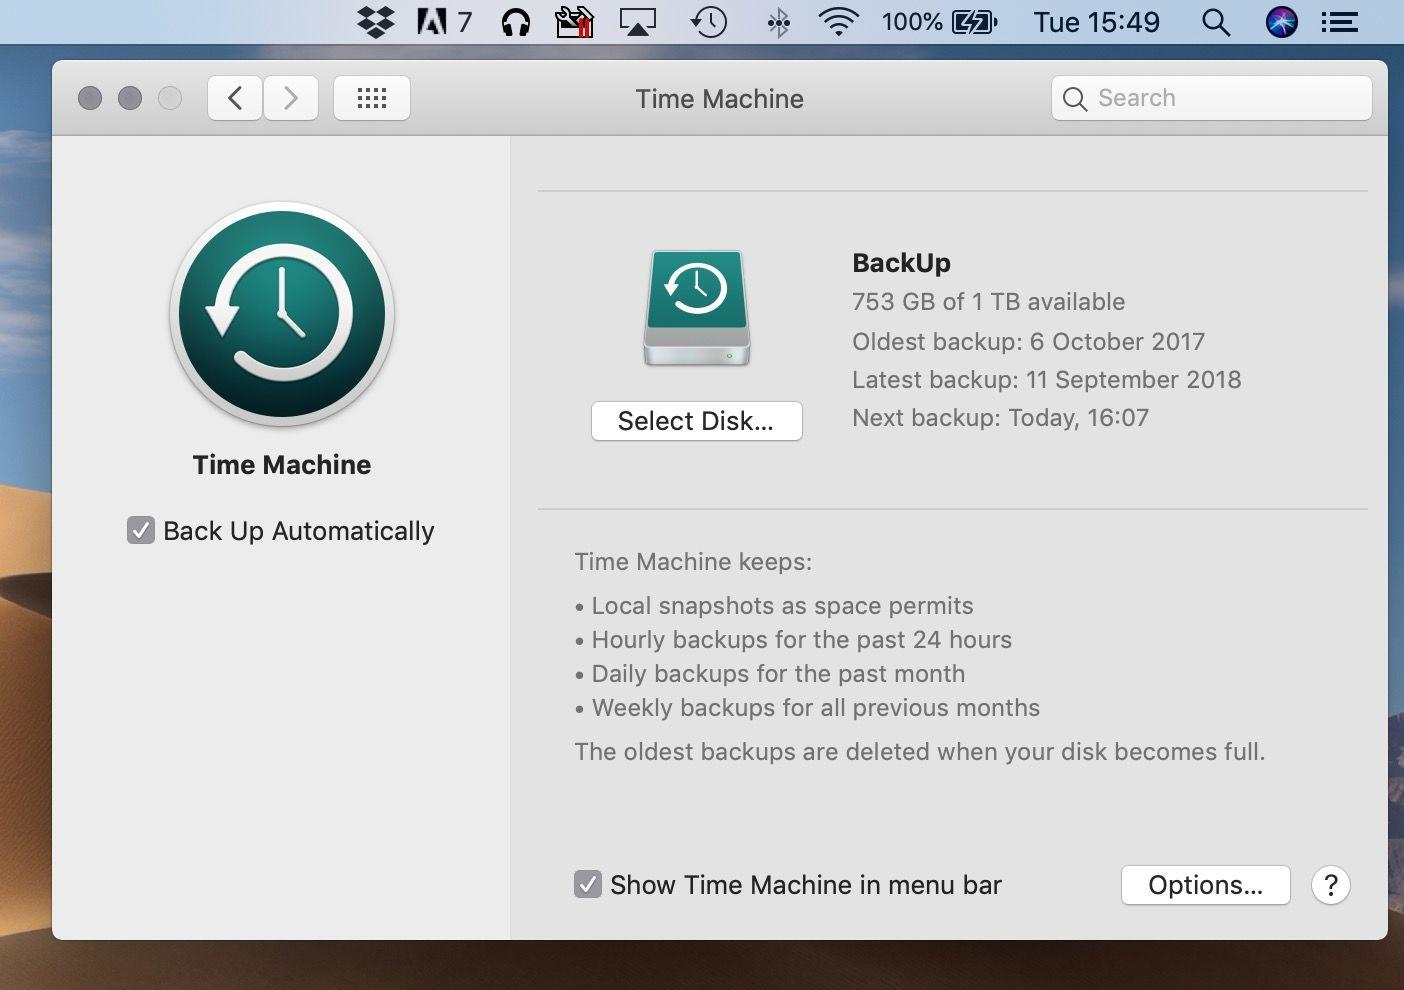
To enable Time Machine, go to System Preferences and click on Time Machine.
Toggle the switch to turn Time Machine on.
Connect an external hard drive for backups.
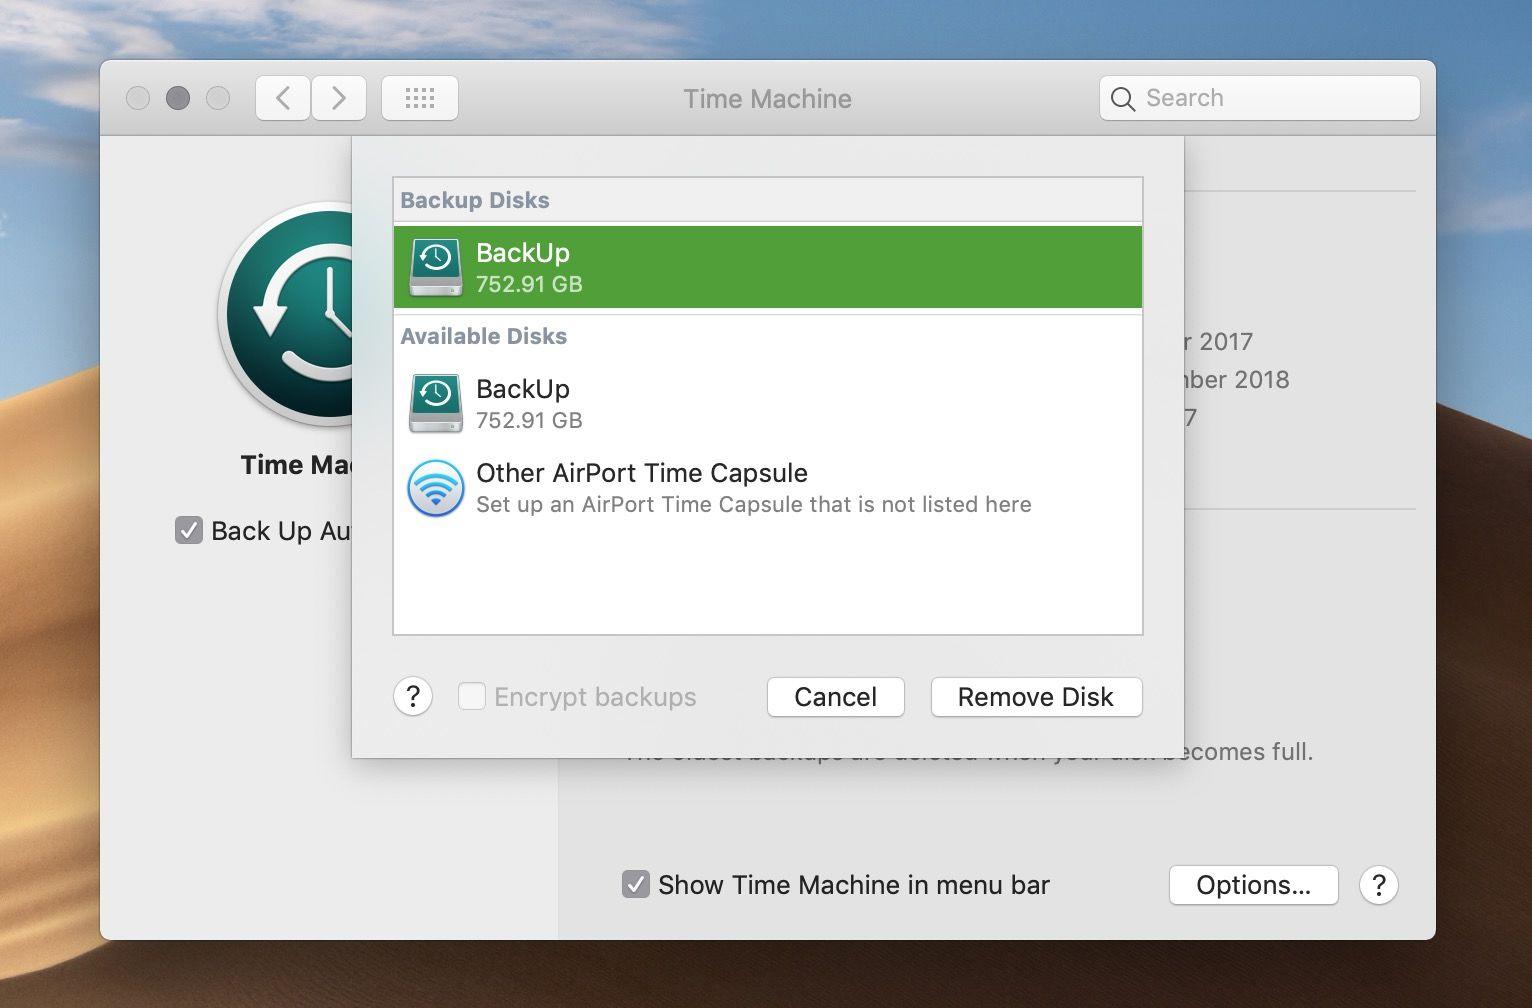
Selecting A Backup Destination
Within Time Machine preferences, choose the disk you want to use for backups.
Click ‘Select Backup Disk’ and choose your external drive.
Ensure the drive has enough space for your backups.
Time Machine will automatically start backing up your MacBook.
Configuring Backup Settings
When it comes to protecting your Macbook from data loss, configuring backup settings is essential. This ensures that your important files and data are backed up regularly and securely. By customizing the backup settings, you can tailor the process to suit your specific needs and preferences.
Frequency And Scheduling
When configuring backup settings on your Macbook, it’s crucial to determine the frequency and scheduling of backups. This involves choosing how often the backups should occur and the specific times at which they should be performed. Through the Time Machine utility, you can schedule backups to run at regular intervals, such as hourly, daily, or weekly, depending on your requirements.
Excluding Files And Folders
When setting up backups for your Macbook, it’s vital to consider which files and folders should be included or excluded. While backing up all data is important, there may be certain files or directories that you prefer not to include in the backup process. By specifying these exclusions, you can ensure that only relevant and necessary data is backed up, saving time and storage space.
Restoring From A Backup
Restoring your Macbook from a backup is a crucial process that can help you recover lost files and folders or even restore the entire system to its previous state. Understanding how to properly restore from a backup can provide you with peace of mind, knowing that your important data can easily be retrieved. Below, we will explore two methods for restoring your Macbook, depending on your specific needs: recovering files and folders, or restoring the entire system.
Recovering Files And Folders
If you have accidentally deleted or lost specific files or folders on your Macbook, don’t fret! Restoring them from your backup is a simple process. Follow these steps:
- Connect your backup device, such as an external hard drive or Time Machine, to your Macbook.
- Open the Finder on your Macbook.
- Navigate to the backup location where your files or folders are stored.
- Select the files or folders you want to restore.
- Drag and drop the selected files or folders to their original location on your Macbook.
- Wait for the transfer to complete, and voila! Your files and folders are now restored.
By following these steps, you can quickly recover your valuable files and folders, ensuring that no data is lost in the process.
Restoring The Entire System
If you encounter major issues with your Macbook’s operating system or if you want to revert your device to a previous state completely, restoring the entire system from a backup is the way to go. Here’s how you can do it:
- Make sure your backup device is connected to your Macbook.
- Restart your Macbook.
- Press and hold the Command and R keys simultaneously until the Apple logo appears.
- You will then enter the macOS Recovery mode.
- In the macOS Utilities window, select “Restore from Time Machine Backup.”
- Click on “Continue” and select the backup source you want to restore from.
- Select the specific backup snapshot or date you wish to restore.
- Follow the on-screen instructions to initiate the restoration process.
- Wait for the process to complete, and your Macbook will restart with the restored system.
Following these steps will allow you to restore your entire Macbook system, retrieving everything from apps to settings, exactly as it was saved in your backup.
Restoring from a backup is a critical skill for every Macbook user. Whether you need to recover individual files or restore the entire system, having a reliable backup can save you from headaches and ensure the safety of your valuable data. By understanding the process and following the steps outlined above, you can confidently handle any data loss situations that may arise, keeping your Macbook running smoothly.
Credit: www.macworld.com
Using Third-party Backup Software
While the built-in Time Machine functionality is reliable, using third-party backup software can offer you additional features and flexibility when it comes to backing up your MacBook. These software solutions provide advanced options for scheduling backups, encrypting data, and even backing up to cloud storage platforms. In this section, we will explore the benefits and drawbacks of using third-party backup software for your Mac.
Exploring Alternative Backup Options
When it comes to alternative backup options, third-party software can provide a range of choices to suit your specific needs. Some popular options include:
| Software | Features |
| Carbon Copy Cloner | Offers easy disk cloning and incremental backups. |
| SuperDuper! | Allows for bootable backups and smart updating. |
| Backblaze | Provides unlimited cloud storage backup options. |
These are just a few examples of the many third-party backup software options available for Mac users. Exploring these alternatives can help you find the solution that best fits your backup requirements and preferences.
Benefits And Drawbacks
Using third-party backup software comes with its own set of benefits and drawbacks:
Benefits:
- Enhanced features and customization options
- Ability to schedule backups at your preferred time
- Support for encryption to ensure data security
- Flexibility in choosing backup destinations, including cloud storage
Drawbacks:
- Cost: Some third-party software may come with a price tag
- Learning curve: Using new software may require some time to get used to
- Potential compatibility issues with future macOS updates
Considering these benefits and drawbacks will help you make an informed decision about whether or not to use third-party backup software for your MacBook.
Best Practices For Data Backups
Backing up your MacBook is crucial to ensuring your data’s safety. Understanding the best practices for data backups and implementing them will provide you with peace of mind. Let’s explore some essential best practices for data backups to help you safeguard your valuable information.
Keeping Multiple Backups
Create redundant backups by storing copies of your data in multiple locations. This approach helps mitigate the risk of data loss due to hardware failure, theft, or disasters. Utilize a combination of local external drives, cloud storage, and network-attached storage (NAS) to keep your data secure and accessible from different sources.
Verifying Backups For Integrity
Regularly verify the integrity of your backups to ensure they are complete and free of errors. Perform test restores to confirm that your backup files are functional and contain the expected data. By routinely verifying your backups, you can proactively address any issues and maintain the reliability of your backup strategy.
Credit: www.macworld.com
Creating A Disaster Recovery Plan
Documenting your backup strategy:
- Keep a detailed record of your backup schedule
- Note down which files are being backed up and how often
- Include steps to restore data in case of an emergency
Preparing for worst-case scenarios:
- Create multiple backups on different storage devices
- Verify that your backups are working correctly
- Store a copy of your backup off-site for added security
Credit: www.imobie.com
Frequently Asked Questions On How Do You Backup A Macbook
How Do You Backup A Macbook Using Time Machine?
To backup a MacBook using Time Machine, connect an external hard drive, go to System Preferences, select Time Machine, click on “Select Backup Disk,” choose the external drive, and click “Use Disk. ” Time Machine will automatically backup your files at regular intervals.
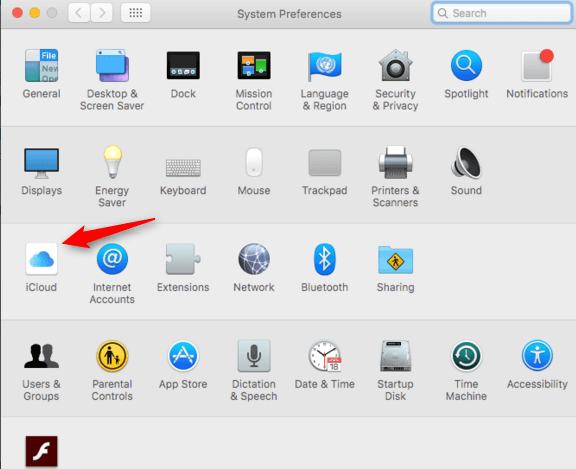
Can I Backup My Macbook To Icloud?
Yes, you can backup your MacBook to iCloud. Go to System Preferences, select Apple ID, click on iCloud, and check the box next to “iCloud Drive. ” This will automatically backup your files, documents, and desktop to iCloud, keeping them safe and accessible from other devices.
How Do I Backup My Macbook Without An External Hard Drive?
To backup your MacBook without an external hard drive, you can use cloud storage services like iCloud, Google Drive, or Dropbox. Alternatively, you can transfer your files to a different computer or use an online backup service to keep your data secure in the cloud.
What Is The Best Way To Backup A Macbook?
The best way to backup a MacBook is to use both Time Machine and cloud storage. Time Machine allows for easy recovery of files while cloud storage provides an offsite backup option. By using both methods, you ensure that your data is protected from hardware failures, accidents, or loss.
Conclusion
Backing up your MacBook is crucial for protecting your valuable data. By following the simple steps outlined in this guide, you can ensure that your files are safe and secure. With reliable backup methods in place, you can have peace of mind and continue using your MacBook with confidence.
0 comments