
To change language on MacBook, go to System Preferences, then Language & Region, and select preferred language. Changing the language settings on your MacBook can improve your user experience and make it more accessible.
Whether you’re learning a new language or prefer using your device in a different language, adjusting the settings is simple and straightforward. By following a few quick steps, you can seamlessly switch the language to meet your requirements. This guide will walk you through the process of changing the language on your MacBook, ensuring that you can navigate through the system easily and efficiently.
Let’s delve into the details of how to customize the language settings on your MacBook for enhanced usability.
Method 1: System Preferences
When it comes to changing the language on your MacBook, there are a few methods you can use. One of the simplest ways is through the System Preferences. This method allows you to easily customize the language settings to suit your preferences.
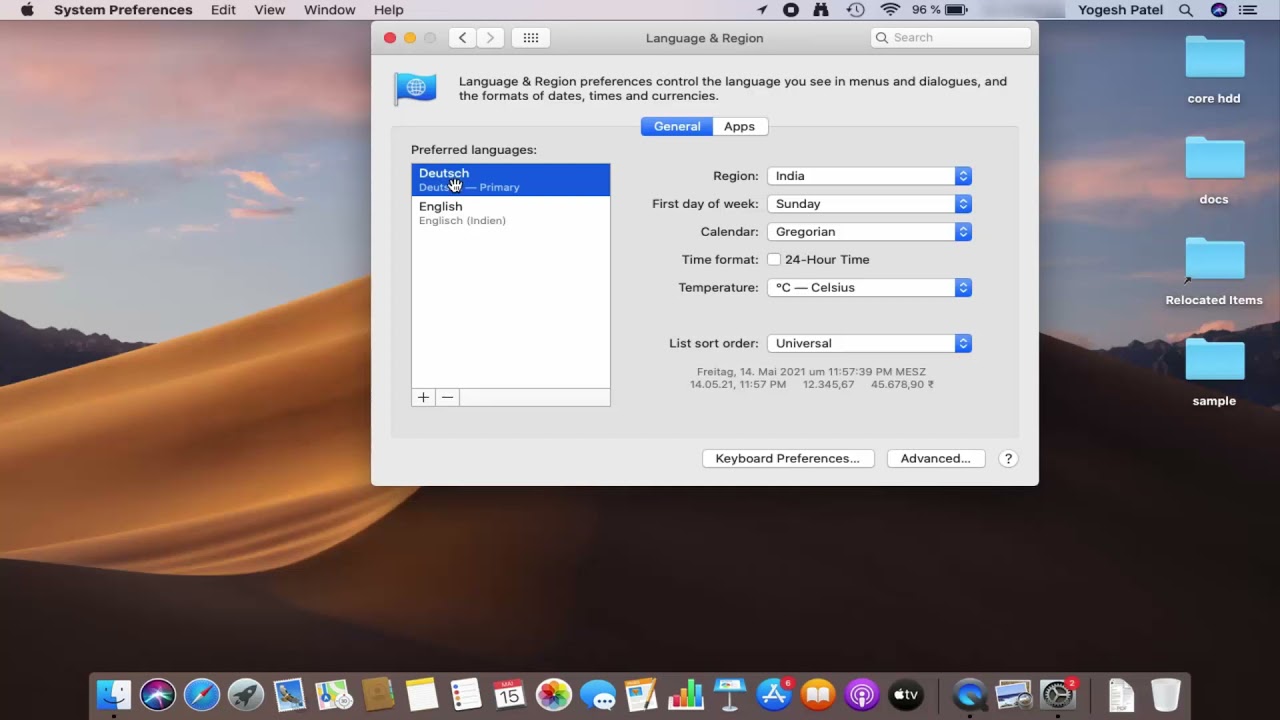
Step 1: Open System Preferences
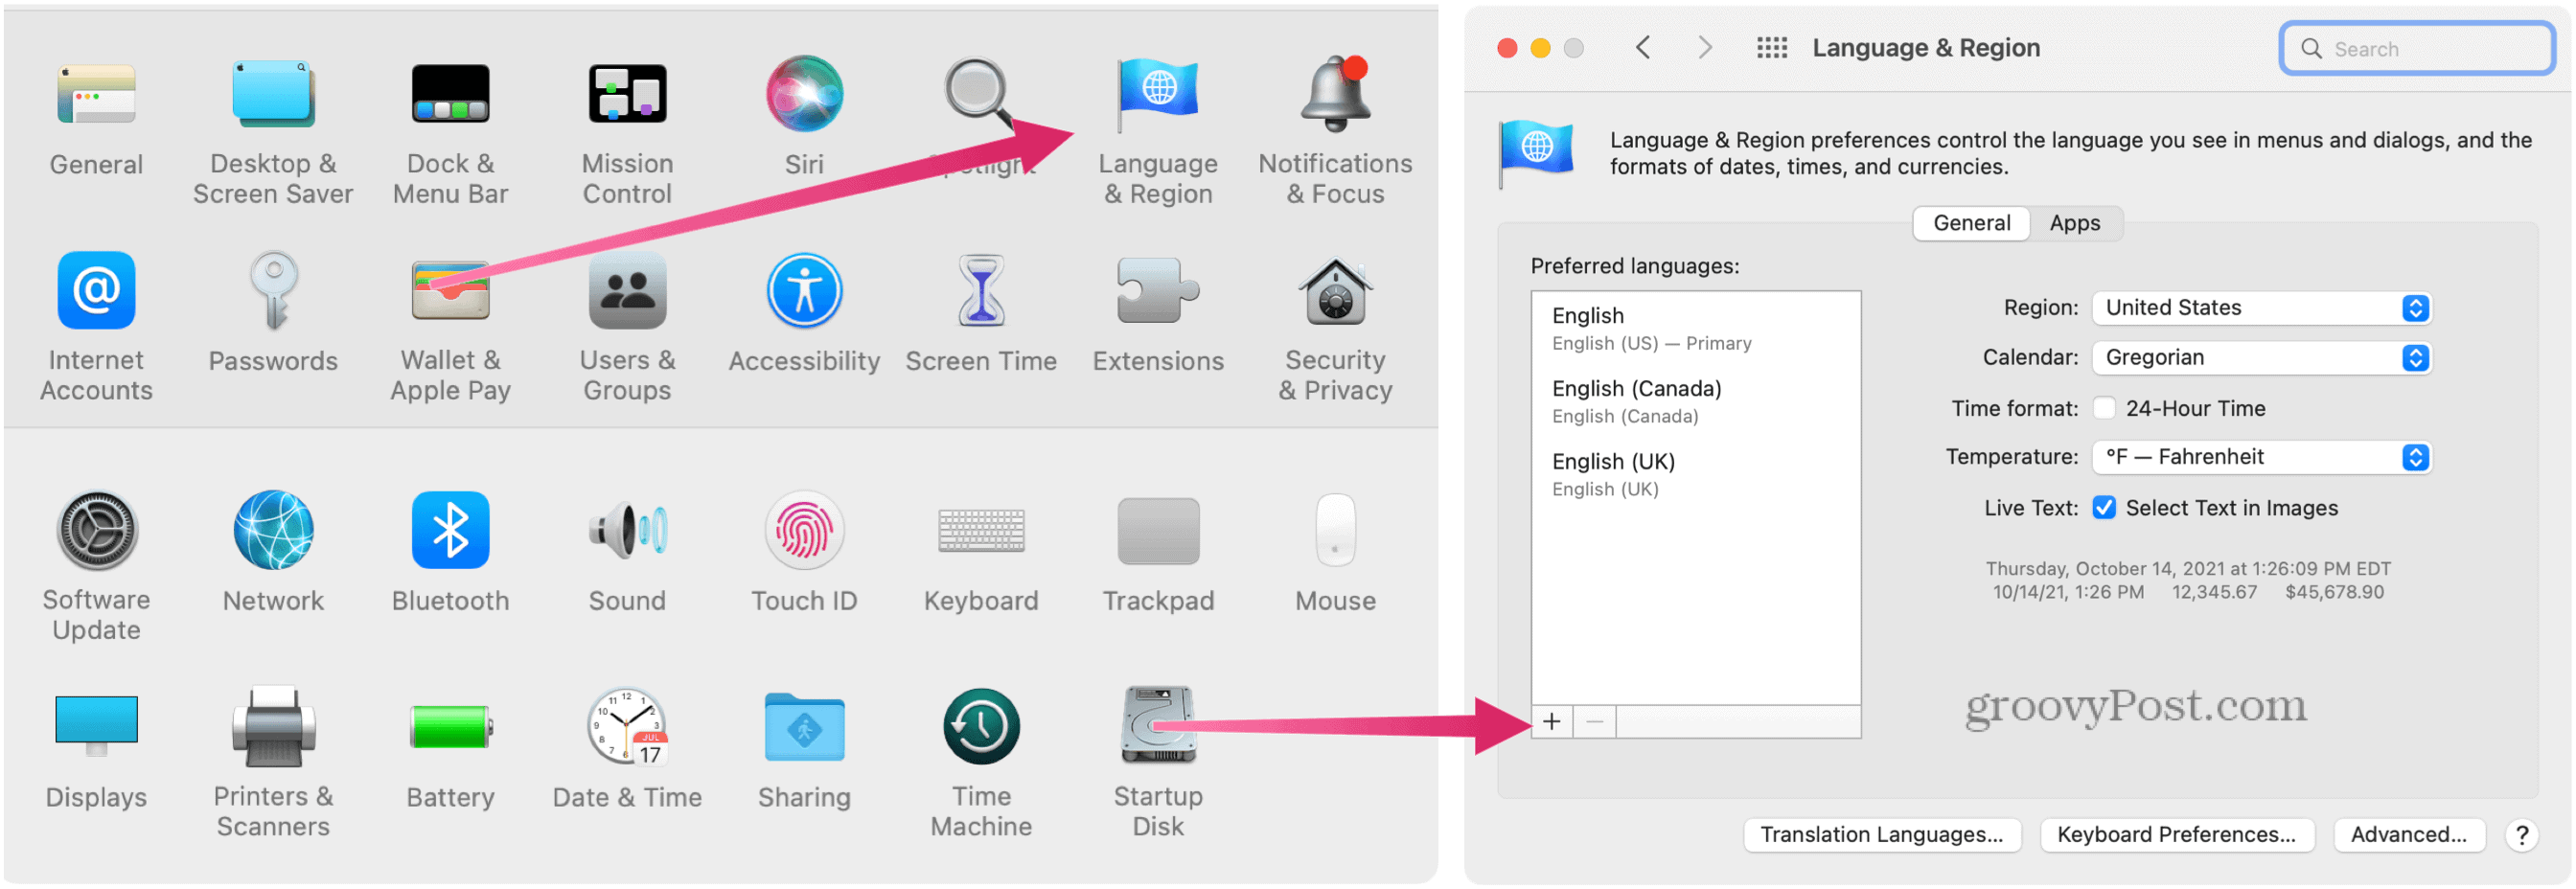
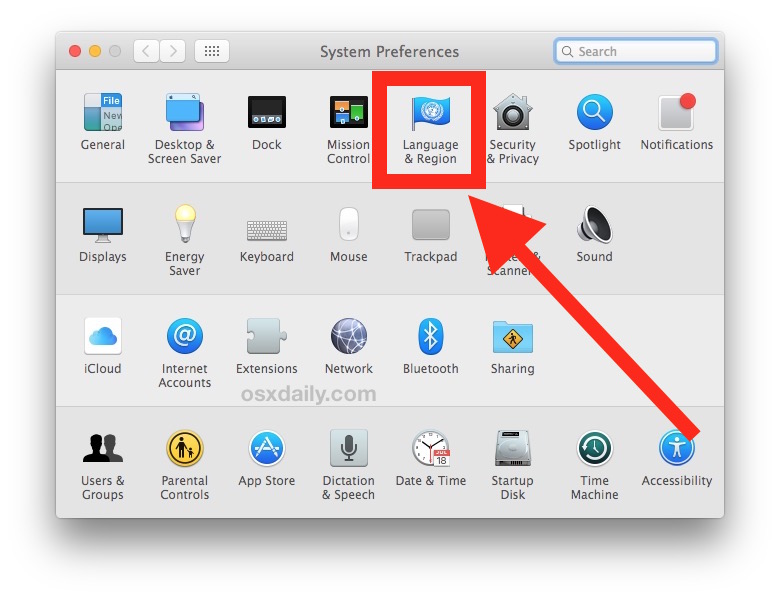
Firstly, open your MacBook’s System Preferences. You can do this by clicking on the Apple logo in the top-left corner of the screen and selecting “System Preferences” from the dropdown menu.
Step 2: Click On ‘language & Region’
Once in System Preferences, locate and click on the “Language & Region” option. This will open a new window with language settings for your MacBook.
Step 3: Click The ‘+’ Button
In the Language & Region window, look for the “+” button and click on it to add a new language to your MacBook.
Step 4: Select Desired Language
A pop-up window will appear, allowing you to select your desired language from a list. Scroll through the options and choose the language you want to add.
Step 5: Drag The New Language To The Top
Once you’ve selected the new language, you can drag it to the top of the list in the Language & Region window. This ensures that your MacBook uses the new language as the primary option.
Credit: www.groovypost.com
Method 2: App Preferences
To change the language on your MacBook, navigate to “System Preferences” in the Apple menu. Open the “Language & Region” settings, click the “+” button, and select your preferred language. Drag it to the top of the list to set it as the primary language.
In this method, you can change the language on your Macbook by accessing the app preferences. Follow these simple steps to customize the language settings within specific apps.Step 1: Open The Desired App
Firstly, launch the app in which you want to change the language settings to make sure the changes apply to that particular application.Step 2: Go To ‘preferences’
Locate the ‘Preferences’ option within the app’s menu bar. This is usually found under the name of the app on the top left side of your screen.Step 3: Click On ‘language’
Navigate to the ‘Language’ tab within the Preferences menu. This is where you can adjust the language settings to suit your preferences.Step 4: Select Desired Language
Choose the language you wish to switch to from the dropdown menu provided. Make sure to select the desired language for the app to display content in that language. By following these straightforward steps, you can easily modify the language settings within your Macbook applications. Enjoy using your favorite apps in the language of your choice!Method 3: Terminal
Changing the language on your Macbook using the Terminal involves a straightforward process. Follow the simple steps below to switch languages effortlessly.
Step 1: Open Terminal
Open the Terminal application on your Macbook. You can locate this by searching for it in Spotlight or finding it in the Applications folder.
Step 2: Type ‘defaults Write .globalpreferences Applelanguages ‘(desired Language Code)’
In the Terminal window, input the command ‘defaults write .GlobalPreferences AppleLanguages’ followed by the desired language code enclosed in single quotes. For example, if you want to change to Spanish, the code could be ‘es’.
Press Enter to execute the command. You may need to restart your Macbook for the changes to take effect.
Credit: www.youtube.com
Method 4: Keyboard Shortcut
When it comes to changing the language on your MacBook, using a keyboard shortcut can be a quick and convenient method. By following a few simple steps, you can easily navigate through the system preferences and select your desired language without the need for extensive searching through menus.
Step 1: Press ‘command + Space’ To Open Spotlight
By pressing ‘Command + Space’, you activate the Spotlight search feature on your MacBook. This allows for quick access to various functions and applications.
Step 2: Type ‘system Preferences’ And Press ‘enter’
In the Spotlight search bar, type ‘System Preferences’ and press ‘Enter’ to open the System Preferences window.
Step 3: Press ‘command + F’, Type ‘language & Region’, And Press ‘enter’
Within the System Preferences window, pressing ‘Command + F’ activates the search function. Type ‘Language & Region’ and press ‘Enter’ to quickly navigate to the Language & Region settings.
Step 4: Press ‘command + ,’
After locating the Language & Region settings, press ‘Command + ,’ to directly access the Language preferences.
Step 5: Select Desired Language
Once the Language preferences are open, select your desired language from the list of available options.
Step 6: Press ‘command + ,’ Again To Close The Preferences
After selecting your preferred language, press ‘Command + ,’ again to swiftly close the Language preferences window.
Method 5: Siri
Changing the language on your Macbook is a breeze when you harness the power of Siri. The voice-enabled virtual assistant can not only help you complete tasks but also assist in language settings. Simply follow the steps below to change the language on your Macbook using Siri.
Step 1: Activate Siri By Saying ‘hey Siri’ Or Clicking On The Siri Icon
To get started, make sure Siri is activated on your Macbook. You can either say ‘Hey Siri’ or click on the Siri icon located in the menu bar. Siri will then be ready to assist you in changing the language settings.
Step 2: Say ‘change Mac Language To (desired Language)’
Once Siri is activated, simply speak out the command ‘Change Mac language to (desired language)’. Replace ‘(desired language)’ with the language you want to switch to. Siri will process your request and initiate the language change process.
In just two simple steps, Siri can help you change the language on your Macbook. It’s an easy and efficient way to ensure your Mac is set up in your preferred language.
Whether you prefer to use the ‘Hey Siri’ voice command or click on the Siri icon, activating Siri is the first step towards changing the language on your Macbook. Once your virtual assistant is ready, just speak the command ‘Change Mac language to (desired language)’ to start the language change process. Take advantage of Siri’s convenience and let it handle your language preferences effortlessly.
Method 6: Boot In Different Language
Changing the language on your Macbook can be incredibly useful, especially if you are multilingual or need to use a different language for a specific task. One method to change the language on your Macbook is by booting in a different language. This method allows you to start up your Macbook in a language of your choice and proceed with the installation process in that language. In this article, we will guide you through the step-by-step process to successfully boot in a different language on your Macbook.
Step 1: Restart Your Mac
In order to start the process of booting in a different language on your Macbook, you will need to restart your device. This can be easily done by clicking on the Apple logo in the top left corner of your screen and then selecting “Restart” from the dropdown menu.
Step 2: Hold Down The ‘option’ Key
As your Macbook is restarting, hold down the ‘Option’ key on your keyboard. This will bring up the Startup Manager, which allows you to choose the language you want to boot in.
Step 3: Select The Desired Language
Using your keyboard, navigate to the desired language by pressing the arrow keys. Once you have selected the language, press the Enter key to confirm your selection.
Step 4: Proceed With The Installation Process In The Selected Language
After selecting the desired language, your Macbook will start up in the chosen language. You can now proceed with the installation process or any other tasks you need to perform in the selected language. Simply follow the on-screen instructions to complete the installation process and enjoy using your Macbook in a different language!
By following these easy steps, you can easily boot your Macbook in a different language and enjoy using it in a language of your choice. Whether you need to change the language for work purposes or simply want to explore a different language, this method allows you to do so seamlessly. Give it a try and experience the convenience of using your Macbook in a language that suits you best.
Faqs
Frequently Asked Questions (FAQs) about changing the language on your Macbook.
How Many Languages Does The Mac Support?
The Mac supports a wide range of languages, covering over 30 different languages. You can easily select your preferred language from the list provided.
Can I Change The Language Back To English?
Yes, you can switch the language back to English or any other supported language at any time. It’s a simple process that can be done from the System Preferences.
Will Changing The Language Affect My Files?
No, changing the language on your Mac will not affect your files. Your documents, photos, and other data will remain unchanged regardless of the language settings.
Do I Need To Restart My Mac After Changing The Language?
Usually, it’s not necessary to restart your Mac after changing the language. The new language settings should take effect immediately without requiring a restart.
Credit: osxdaily.com
Frequently Asked Questions Of How To Change Language On Macbook
How Can I Change The Language On My Macbook?
To change the language on your Macbook, go to the “System Preferences” menu, then select “Language & Region. ” From there, click on the “Add Language” button and choose the language you want. Drag your desired language to the top of the list to set it as the default language.
Restart your Macbook for the changes to take effect.
Can I Change The Language On My Macbook To A Language I Do Not Speak?
Yes, you can change the language on your Macbook to any language, even if you do not speak it. Simply follow the steps mentioned earlier to add the desired language. However, be aware that once changed, the entire system will be in the selected language, including the user interface, menus, and settings.
How Do I Switch Between Languages On My Macbook?
To switch between languages on your Macbook, you can use the “Input Sources” menu. In the “System Preferences” menu, select “Keyboard” and then choose the “Input Sources” tab. Enable the “Show Input menu in menu bar” option. A language icon will now appear in your menu bar, allowing you to easily switch between languages while typing.
Can I Change The Language For Specific Applications On My Macbook?
Yes, you can change the language for specific applications on your Macbook. Open the application you want to change the language for and go to its preferences or settings. Look for an option related to the language or localization, and select your desired language.
Keep in mind that not all applications may support multiple languages, so this option might not be available in all cases.
Conclusion
Changing the language on your Macbook is a simple process. By following these easy steps, you can customize your language settings to suit your preferences. With a few clicks, your Macbook can be tailored to your language needs, making your experience more user-friendly and accessible.
Embrace the convenience of using your Macbook in your preferred language and enjoy seamless navigation and communication.
0 comments