
To clone a Steam Deck SSD, use a cloning software like Clonezilla or Macrium Reflect. Connect the SSD and follow software instructions.
Cloning a Steam Deck SSD is a straightforward process that can be done using reliable cloning software. By following simple steps and using the right tools, you can efficiently clone your SSD to upgrade storage capacity or ensure data backup.
In this guide, we will explore the necessary steps to clone a Steam Deck SSD seamlessly. Whether you are a tech enthusiast or a novice user, this guide will provide you with a clear understanding of the cloning process and equip you with the knowledge to replicate your SSD successfully. Let’s dive into the details of how to clone a Steam Deck SSD and enhance your gaming experience effortlessly.

Credit: www.pcgamer.com
Understanding The Steam Deck Ssd
Clone a Steam Deck SSD by creating a duplicate of the original drive, ensuring a seamless transition. Use a reliable SSD cloning software to transfer data, preserving the system’s functionality and performance. Prioritize backing up crucial files before initiating the cloning process to avoid data loss.
Understanding the Steam Deck SSD The Steam Deck SSD is a crucial component of Valve’s innovative handheld gaming device, offering high-speed storage and enhancing the overall gaming experience. As understanding its significance is pivotal, let’s delve into what the Steam Deck SSD is and why it’s valuable to clone it. What is the Steam Deck SSD? The Steam Deck SSD is a solid-state drive specifically designed to store game installations, system files, and other critical data for the Steam Deck. It utilizes NVMe technology, providing rapid read and write speeds, which is essential for seamless gaming performance on a portable device. The SSD capacity ranges from 64GB to 512GB, allowing users to store a substantial collection of games for on-the-go entertainment. Why would you want to clone the Steam Deck SSD? Cloning the Steam Deck SSD can be advantageous for several reasons. Firstly, it serves as a backup solution, ensuring that users can quickly restore their game library and system configurations in the event of SSD failure. Furthermore, cloning the SSD enables users to upgrade to a larger capacity drive, accommodating more games and applications without losing existing data. Overall, cloning the Steam Deck SSD offers security, flexibility, and enhanced storage capabilities. In conclusion, understanding the Steam Deck SSD is essential for maximizing the gaming potential of Valve’s handheld console. Whether it’s comprehending its role or recognizing the benefits of cloning, the SSD remains a critical element in the Steam Deck’s functionality.Preparing For Cloning
To prepare for cloning a Steam Deck SSD, start by backing up all data from the existing drive. Next, create a bootable USB drive with cloning software. Then, follow the software instructions to clone the SSD to the new drive.
Be sure to double-check the cloned data for accuracy before use.
Gathering The Necessary Tools
Make sure you have all tools ready:
- Screwdriver set
- External SSD enclosure
- Compatible cloning software
Creating A Backup Of Your Data
Steps to back up your data:
- Connect an external drive
- Select “Backup” in settings
- Follow on-screen instructions
Remember to save all important data before proceeding!
Choosing The Cloning Method
When it comes to choosing the cloning method for your Steam Deck SSD, you have two main options: using software for cloning or using a physical adapter for cloning.
Using Software For Cloning
Software-based cloning involves using dedicated programs to transfer data from one drive to another, making it a popular choice for its ease and convenience.
- Ensure to download a reliable cloning software like EaseUS Todo Backup or Acronis True Image.
- Connect both your source and destination drives to your computer.
- Open the cloning software and follow the prompts to select your source and target drives.
- Initiate the cloning process and wait for it to complete.
Using A Physical Adapter For Cloning
Physical adapter cloning requires a hardware device to connect both SSDs externally, providing a straightforward method for transferring data.
- Purchase a SATA to USB adapter or a USB cloning cable.
- Connect the source and target SSDs to the adapter or cable.
- Follow the manufacturer’s instructions for initiating the cloning process.
- Wait for the cloning to finish, then safely disconnect the drives.

Credit: www.reddit.com
Cloning The Steam Deck Ssd
If you’re looking to upgrade or replace the SSD on your Steam Deck, cloning it to transfer the data from the old SSD to the new one can save you considerable time and effort. Cloning the Steam Deck SSD can be done through software or physical adapter methods. Below we provide step-by-step guides for both methods.
Step-by-step Guide For Software Cloning
Software cloning offers a convenient way to clone the Steam Deck SSD without needing extra hardware. Follow the steps below to complete the process:
- Before initiating the cloning process, ensure that you have a suitable software tool such as Macrium Reflect or Acronis True Image installed on your computer.
- Connect the new SSD to your computer using a compatible adapter or enclosure.
- Launch the cloning software and select the option to clone a disk or drive.
- Choose the Steam Deck SSD as the source disk and the new SSD as the destination disk.
- Follow the on-screen prompts to confirm the cloning settings and initiate the process.
- Once the cloning is complete, safely disconnect the new SSD from your computer and proceed to install it into your Steam Deck.
Step-by-step Guide For Physical Adapter Cloning
If you prefer a physical adapter method for cloning the Steam Deck SSD, follow these steps:
- Obtain a compatible physical adapter or enclosure that allows you to connect both the old and new SSDs to your computer via USB.
- Install the old Steam Deck SSD into one slot of the physical adapter and the new SSD into the other slot.
- Connect the physical adapter to your computer’s USB port.
- Using disk cloning software such as Clonezilla or EaseUS Todo Backup, initiate the cloning process from the source Steam Deck SSD to the new SSD.
- After the cloning process is complete, safely disconnect the new SSD from your computer and proceed to install it into your Steam Deck.
Verifying The Cloned Ssd
Once you have successfully cloned the SSD on your Steam Deck, it is crucial to verify the integrity of the cloned data to ensure a flawless transfer of your files and settings. In this section, we will guide you through the process of checking the integrity of the cloned data and testing the cloned SSD.
Checking The Integrity Of The Cloned Data
To ensure that the cloned data is accurate and error-free, you can compare the original SSD with the cloned SSD using a data verification tool. Here’s how you can do it:
- Connect both the original SSD and the cloned SSD to your computer.
- Open the data verification tool of your choice and select both the original and cloned SSDs as the source and destination.
- Initiate the data verification process, which will compare each file and folder in the original SSD with the cloned SSD.
- Once the process is complete, carefully review the verification results for any discrepancies or errors.
- If the verification results show any inconsistencies, it is recommended to repeat the cloning process to ensure a complete and accurate transfer of data.
Testing The Cloned Ssd
After verifying the cloned data, it is essential to test the functionality and performance of the cloned SSD to guarantee a seamless experience on your Steam Deck. Follow these steps to test the cloned SSD:
- Disconnect the original SSD from your computer and connect the cloned SSD.
- Ensure that the cloned SSD is set as the primary boot option in your computer’s BIOS settings.
- Restart your computer and check if it boots up successfully using the cloned SSD.
- Open various applications and files stored on the cloned SSD to ensure they are functioning correctly.
- Pay close attention to the system’s responsiveness and performance. If you notice any significant differences or issues, it may indicate a problem with the cloning process.
By following these steps and verifying the cloned SSD, you can ensure the smooth operation of your Steam Deck with all your files and settings transferred seamlessly. Once you have successfully verified the data and tested the cloned SSD, you can confidently enjoy gaming on your Steam Deck without any worries about data loss or compatibility issues.
Replacing The Steam Deck Ssd
Learn how to seamlessly clone your Steam Deck SSD for quick and efficient replacement. Easily duplicate data for a hassle-free process.
Removing The Old Ssd
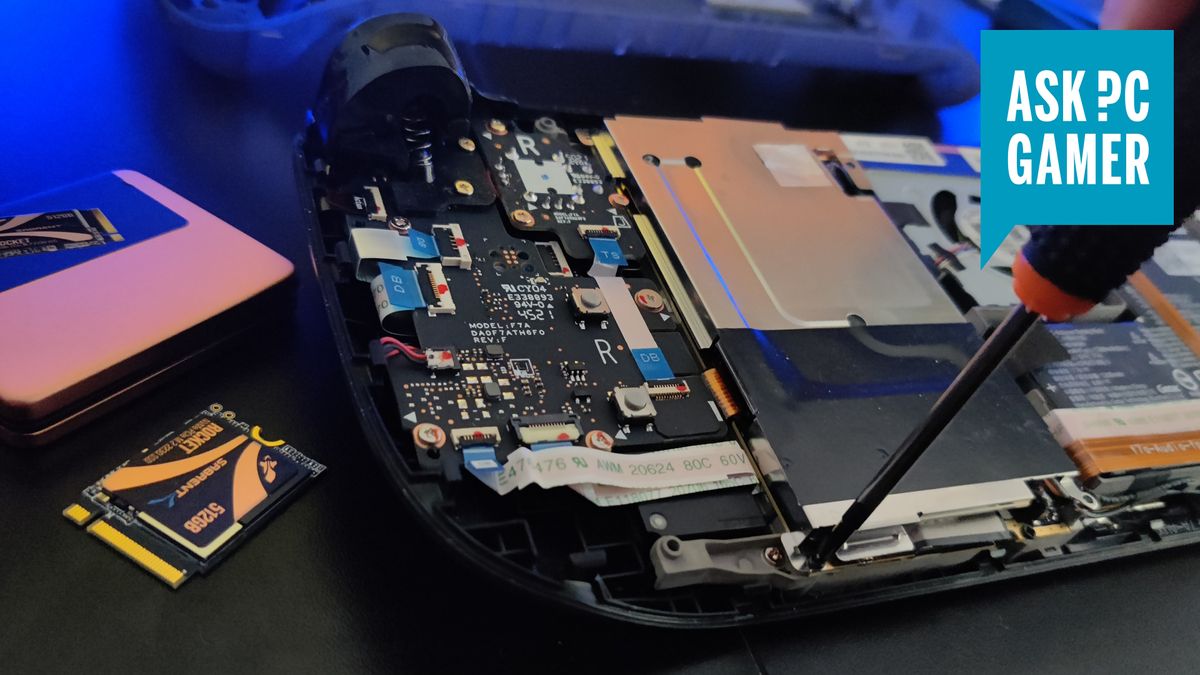
Replacing the SSD in your Steam Deck is a relatively simple process that can greatly enhance your storage capacity. Here’s a step-by-step guide on how to remove the old SSD:
- Power off your Steam Deck by holding down the power button.
- Flip the Steam Deck upside down so the bottom panel is facing up.
- Locate the eight small screws that secure the bottom panel.
- Using a screwdriver, carefully unscrew each of the eight screws.
- Gently pry open the bottom panel to reveal the internal components.
- Locate the SSD, which is a small rectangular chip plugged into the motherboard.
- With your fingers, gently disconnect the SSD from the motherboard by pulling it straight up.
Installing The Cloned Ssd
Once you have successfully removed the old SSD, it’s time to install the cloned SSD. Follow these steps:
- Align the new SSD with the slot on the motherboard.
- With gentle pressure, push the SSD down into the slot until it’s securely connected.
- Replace the bottom panel on your Steam Deck and fasten the eight screws to secure it in place.
- Flip your Steam Deck back over so it’s in the upright position.
- Power on your Steam Deck and verify that the new SSD is recognized by the system.
- Format and configure the new SSD according to your preferences.
By following these steps, you can easily replace the SSD in your Steam Deck with a cloned one, expanding your storage capabilities and ensuring smooth performance for all your gaming needs. With proper care and attention, you can enjoy the benefits of a larger SSD in no time!
Credit: www.reddit.com
Frequently Asked Questions Of How To Clone A Steam Deck Ssd
How Do I Clone The Ssd On My Steam Deck?
To clone the SSD on your Steam Deck, you will need to connect the device to your computer and use cloning software such as Clonezilla or Macrium Reflect. Follow the software instructions to select the source and target drives, and the software will copy all data from the source SSD to the target SSD.
What Software Can I Use To Clone The Steam Deck Ssd?
You can use cloning software such as Clonezilla or Macrium Reflect to clone the Steam Deck SSD. These tools provide an easy-to-use interface and step-by-step instructions on how to clone the SSD. Make sure to download the software from their official websites and follow the software’s guidelines for the cloning process.
Can I Clone The Steam Deck Ssd To A Larger Drive?
Yes, you can clone the Steam Deck SSD to a larger drive. When using cloning software, you can choose the larger drive as the target drive for the cloning process. The cloning software will copy all the data from the Steam Deck SSD to the larger drive, ensuring that all your files and settings remain intact on the new drive.
Is It Possible To Clone The Steam Deck Ssd Without A Computer?
No, it is not possible to clone the Steam Deck SSD without a computer. Cloning requires the use of cloning software, which is typically installed on a computer. You will need to connect the Steam Deck to your computer via USB or another suitable connection and use the cloning software to perform the cloning process.
Conclusion
To sum up, cloning a Steam Deck SSD can greatly enhance your gaming experience. By following the steps outlined in this guide, you can easily transfer and duplicate your data to a new SSD. With this knowledge, you can upgrade your storage and keep your favorite games and files safe.
Take the plunge and give your Steam Deck a boost today!
0 comments