
To connect a Brother printer to a laptop, download and install the printer drivers from the official Brother website. Then, connect the printer to the laptop via USB or network connection.
Effortlessly setting up your Brother printer with your laptop is crucial for seamless printing tasks at home or in the office. Ensuring a smooth connection between the printer and laptop is essential to maximize the printer’s performance. By following simple steps, you can establish a reliable link to effortlessly print documents and images with ease.
This guide will walk you through the process of connecting your Brother printer to your laptop efficiently. Let’s dive into the straightforward steps to achieve a successful setup for printing convenience.
Check Compatibility
Printer And Laptop Compatibility
Before connecting your Brother printer to your laptop, it’s crucial to ensure that they are compatible. Check if your printer model is compatible with your laptop. Also, verify the requirements for the connection, such as USB or wireless connectivity, to ensure a seamless setup process.
Operating System Compatibility
Another essential aspect to consider is the operating system compatibility between your Brother printer and your laptop. Take into account the operating system installed on your laptop, such as Windows, macOS, or Linux, and ensure it is compatible with your printer model. This compatibility is vital for the smooth functioning of the printing process.
Connect Via Usb Cable
Power Off Printer And Laptop
If the printer and laptop are turned on, power them off before connecting the USB cable.
Connect Usb Cable
Take a USB cable compatible with your Brother printer and laptop. Connect one end to the printer and the other end to the laptop firmly.
Power On Printer And Laptop
Now, power on both the printer and the laptop to establish the connection. Your Brother printer should now be connected to your laptop via the USB cable.
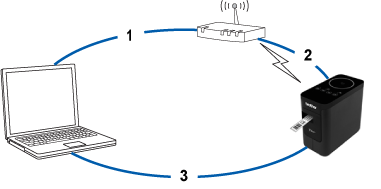
Connect Via Wi-fi
Easily connect your Brother printer to your laptop via Wi-Fi for seamless printing. Simply navigate to the settings on your laptop, select the Wi-Fi network, and follow the prompts to connect your printer. This hassle-free process ensures convenient and efficient printing from your laptop.
Ensure Printer Has Wi-fi Capability
Before connecting your Brother printer to your laptop via Wi-Fi, make sure your printer is equipped with built-in Wi-Fi capability.
Connect Printer To Wi-fi Network
To connect your Brother printer to your Wi-Fi network, navigate to the printer’s settings and select the network settings option.
Add Printer On Laptop
On your laptop, access the Control Panel and click on ‘Devices and Printers.’ Select ‘Add a Printer’ and choose the wireless or network option to locate your Brother printer.
Install Printer Software
Installing the printer software is a crucial step in connecting your Brother printer to your laptop. This allows your laptop to communicate with the printer, enabling you to print documents and images seamlessly. Follow the below steps to install the printer software and set up the connection effortlessly.
Download And Install Printer Software
To begin, download the printer software from the official Brother website. Ensure that you choose the correct software compatible with your printer model and your laptop’s operating system. Once downloaded, run the installation file and follow the on-screen prompts to install the software on your laptop. This step is essential for establishing a successful connection between the printer and your laptop.
Run Printer Software Installation
After downloading the software, locate the installation file on your laptop and double-click to run it. This will initiate the installation process. Wait for the installation wizard to appear on your screen, guiding you through the setup. Make sure to complete the installation without interruptions to avoid any issues in connecting the printer to your laptop.
Follow On-screen Instructions
As the installation wizard launches, carefully follow the on-screen instructions. Pay attention to any prompts or dialog boxes that appear during the installation process. Click on the next button when required and accept the terms and conditions presented. This will ensure that the printer software is installed correctly, setting the stage for a smooth connection between your Brother printer and your laptop.
Configure Printer Settings
Besides connecting your Brother printer to your laptop, it is also essential to configure the printer settings to ensure optimal performance. By accessing the printer settings on your laptop, you can make adjustments to the print quality and paper settings, giving you more control over your printing tasks. In this section, we will guide you on how to access the printer settings on your laptop and how to adjust the print quality and paper settings effectively.
Access Printer Settings On Laptop
To access the printer settings on your laptop, follow these simple steps:
- Click on the ‘Start’ menu on your laptop and select ‘Settings’.
- In the ‘Settings’ window, click on ‘Devices’.
- From the left-hand side menu, select ‘Printers & scanners’.
- Choose your Brother printer from the list of installed printers.
- Click on ‘Manage’ and then select ‘Printer properties’.
- A new window will open, displaying various printer settings that you can configure according to your preferences.
Adjust Print Quality And Paper Settings
Once you have accessed the printer settings on your laptop, you can now adjust the print quality and paper settings effectively. Here’s how:
Print Quality Settings
Adjusting the print quality settings allows you to control the sharpness and clarity of the printed documents. To make changes, follow these steps:
- In the printer settings window, click on the ‘Quality’ or ‘Print Quality’ tab.
- Choose the desired print quality option from the available settings, such as ‘Draft’, ‘Normal’, or ‘Best’.
- Click on ‘Apply’ to save the changes.
Paper Settings
Configuring the paper settings is crucial to ensure that the printed documents are compatible with the type of paper you are using. To adjust the paper settings, follow these steps:
- In the printer settings window, click on the ‘Paper’ or ‘Paper/Quality’ tab.
- Select the appropriate paper size from the drop-down menu.
- If necessary, adjust the paper type to match the paper you are using.
- Click on ‘Apply’ to save the changes.
By accessing the printer settings on your laptop and making the necessary adjustments to the print quality and paper settings, you can ensure that your Brother printer delivers outstanding print results for all your documents. Now that you have learned how to configure the printer settings let’s move on to the next step of our guide.

Credit: www.drivereasy.com
Perform Test Print
Performing a test print is an essential step to ensure that your Brother printer is correctly connected to your laptop. This step helps you verify if the printer is functioning properly and if the connection has been established successfully. To perform the test print, follow the simple steps mentioned below:
Load Paper In Printer
Before you proceed with the test print, make sure to load the appropriate paper in your Brother printer. Here’s what you need to do:
- Open the paper tray and check for any existing paper.
- If there is any paper, remove it gently.
- Take a stack of plain, white paper and align the edges carefully.
- Insert the paper stack into the paper tray, ensuring it is snugly fit.
- Adjust the paper guides to hold the paper in place and prevent any misalignment.
Print Test Page
Now that you have loaded the paper, you can proceed to print a test page. Follow these steps:
- Go to the “Start” menu on your laptop.
- Select “Devices and Printers” or “Printers and Scanners.”
- Locate your Brother printer from the list of available printers.
- Right-click on the printer icon and select “Properties” or “Printer Properties.”
- In the printer properties window, find the “Print Test Page” button and click on it.
Congratulations! You have successfully performed a test print on your Brother printer. If the test page prints without any issues, it indicates that your printer has been correctly connected to your laptop. However, if you encounter any problems during the test print, ensure that the printer and laptop are properly connected, and troubleshoot accordingly.
Troubleshoot Connection Issues
When trying to set up your Brother printer with your laptop, you may encounter some connection issues that can be frustrating to troubleshoot. Here are some simple steps to follow to resolve any potential connection issues and get your printer up and running smoothly.
Check Wi-fi Signal Strength
One: Check the Wi-Fi signal strength on your laptop to ensure it’s strong enough to connect to your printer. Ideally, you want at least two bars of signal strength for a stable connection.
Two: If the signal is weak, consider moving your printer and laptop closer to the Wi-Fi router to improve the signal strength.
Restart Devices
One: Turn off both your printer and laptop, then unplug the power cords for a few minutes before restarting them.
Two: After restarting, attempt to reconnect your printer to your laptop to see if the issue has been resolved.
Reset Network Settings
One: Access the network settings on your laptop and look for the option to reset the network connections. This will clear any potential glitches that may be causing the connection problem.
Two: Once the network settings are reset, attempt to reconnect your printer to your laptop and see if the issue has been resolved.
Credit: m.youtube.com
Update Printer Firmware
Keeping your Brother Printer up to date is crucial for optimal performance. One key step in maintaining your printer is updating its firmware regularly. Firmware updates improve functionality and fix any bugs or issues. Here’s a simple guide on how to update your Brother Printer’s firmware:
Check For Firmware Updates
Before updating, always ensure to check for any available firmware updates for your Brother Printer. Stay informed of the latest improvements and bug fixes.
Download And Install Firmware Updates
Download the latest firmware update compatible with your printer model from the official Brother website. Follow the instructions to install the firmware update on your printer.
Contact Brother Support
If you are facing issues connecting your Brother printer to your laptop, reaching out to Brother Support can offer quick solutions. Here’s how you can easily contact Brother Support for assistance:
Visit Brother’s Website
When a direct solution is needed, visiting Brother’s official website can provide valuable resources, guides, and software downloads for your specific printer model.
Contact Brother Customer Support
For personalized assistance, contacting Brother Customer Support can help resolve any technical difficulties you may encounter during the connection process.
Credit: support.brother.com
Frequently Asked Questions For How To Connect Brother Printer To Laptop
How Do I Connect My Brother Printer To My Laptop?
To connect your Brother printer to your laptop, you need to follow these steps:
1. Ensure your Brother printer is powered on and connected to the same wireless network as your laptop. 2. On your laptop, go to the Control Panel and open the Devices and Printers settings. 3. Click on “Add a Printer” and select your Brother printer from the list of available printers. 4. Follow the on-screen instructions to complete the installation process.
Can I Connect My Brother Printer To My Laptop With A Usb Cable?
Yes, you can connect your Brother printer to your laptop using a USB cable. Here’s what you need to do:
1. Make sure your Brother printer is powered on and connect it to your laptop using a USB cable. 2. On your laptop, go to the Control Panel and open the Devices and Printers settings. 3. Click on “Add a Printer” and select the option for a USB-connected printer. 4. Follow the on-screen instructions to complete the installation process.
How Do I Connect My Wireless Brother Printer Without The Cd?
If you don’t have the installation CD for your Brother printer, you can still connect it to your wireless network. Here’s how:
1. Ensure your Brother printer is powered on and within range of your wireless network. 2. On your laptop, go to the Brother support website and download the appropriate printer driver for your model. 3. Run the downloaded driver file and follow the on-screen instructions to install the printer software. 4. Once installed, open the Control Panel on your laptop, go to Devices and Printers, and add your Brother printer.
Conclusion
Connecting your Brother printer to your laptop is an essential task that can enhance your printing experience. By following the simple steps outlined in this guide, you can ensure a seamless connection, enabling you to print efficiently and effectively. With this new knowledge, you can now enjoy hassle-free printing from your laptop to your Brother printer.
0 comments