
To connect a laptop to a projector, use an HDMI or VGA cable for display. Ensure both devices are turned on.
In today’s digital age, presentations are a common part of business and educational settings. Connecting your laptop to a projector allows you to share content with a larger audience for better visibility and engagement. By following a few simple steps, you can seamlessly connect your devices and showcase your work effectively.
Whether you are giving a lecture in a classroom or delivering a pitch in a boardroom, knowing how to connect your laptop to a projector is an essential skill. This guide will walk you through the process so you can easily set up your presentation equipment and focus on delivering a successful presentation.
Credit: m.youtube.com
Choosing The Right Cable
When connecting your laptop to a projector, choosing the right cable is crucial for a seamless and high-quality connection. Different projectors require different cables, so it’s essential to understand the options available and determine the most suitable one for your setup.
Hdmi Cable
An HDMI cable is an ideal choice for connecting modern laptops to projectors. It supports high-definition video and audio signals, providing excellent image and sound quality. HDMI cables are widely compatible, making them a versatile option for various projector models. Ensure that both your laptop and projector have HDMI ports for a successful connection.
Vga Cable
For older projectors and laptops, a VGA cable is a reliable choice. While it may not support high-definition resolutions, VGA cables can still deliver decent image quality for presentations and basic media playback. Many projectors feature VGA ports, making it a common connection option for legacy devices.
Displayport Cable
DisplayPort cables are a modern alternative to HDMI and VGA connections. They offer high-resolution and high-refresh-rate support, catering to the needs of professional presentations and multimedia content. If your laptop and projector feature DisplayPort technology, using a DisplayPort cable can result in a seamless and visually impressive connection.

Credit: dcs.rutgers.edu
Setting Up The Projector
Setting up the projector is crucial for a successful presentation or movie night. Follow these steps to ensure a seamless connection between your laptop and the projector.
Powering On The Projector
1. Locate the power button on the projector and turn it on.
2. Wait for a few moments for the projector to warm up and initialize.
3. Ensure that the projector is displaying the initial start-up screen.
Adjusting The Projector Settings
1. Connect the projector to your laptop using the appropriate cable (HDMI, VGA, etc.).
2. Press the ‘Source’ button on the projector remote control to select the input source as the connected laptop.
3. Use the projector’s remote or control panel buttons to adjust settings like brightness, contrast, and keystone correction as needed.
4. Test the display by projecting a sample image or slide from your laptop to ensure proper alignment and clarity.
Connecting The Cable To Your Laptop
Connecting your laptop to a projector is a straightforward process that can greatly enhance your presentations or movie nights. Here’s how to connect the cable to your laptop:
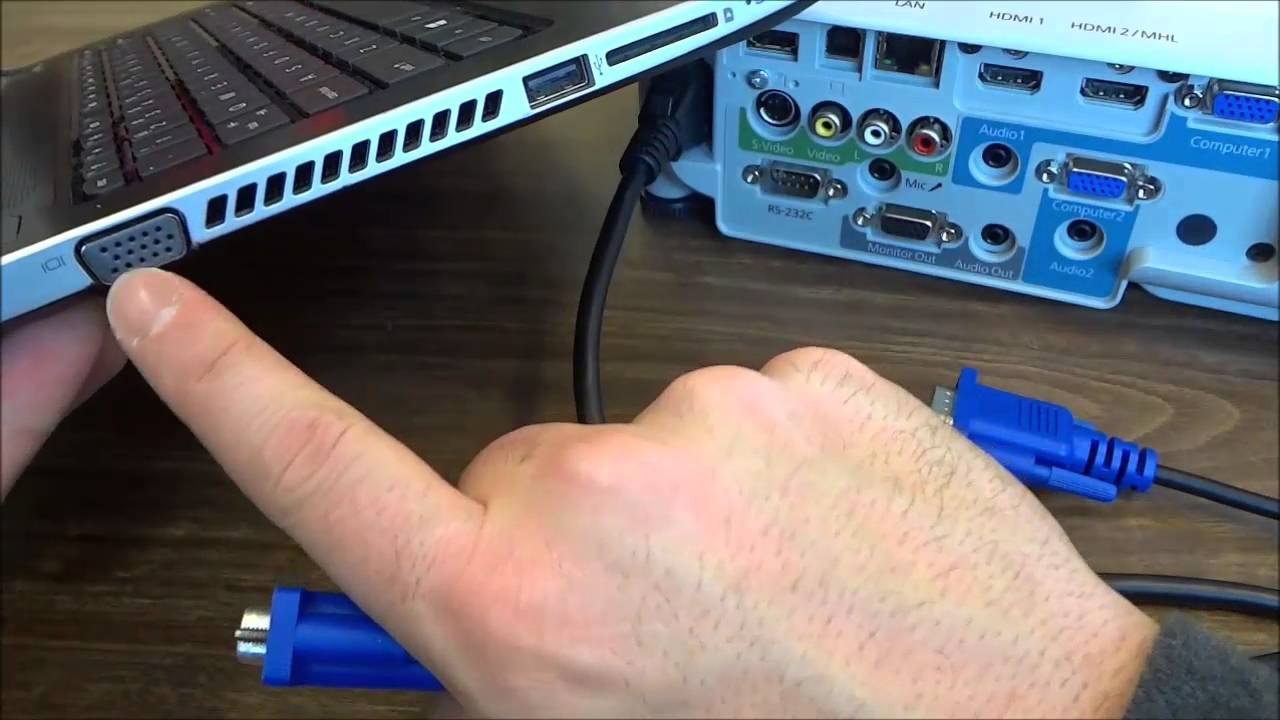
Locating The Video Output Port
Locate the video output port on your laptop, usually denoted by an icon of a monitor or screen.
Checking The Laptop’s Display Settings
Access your laptop’s display settings by right-clicking on the desktop and selecting ‘Display Settings.’
Choose the appropriate display mode (duplicate, extend, or second screen only) for the projector connection.
Connecting The Cable To The Projector
When it comes to presenting a slideshow or video, connecting your laptop to a projector is key. One of the critical steps in this process is connecting the cable to the projector. In this guide, we will walk through the necessary steps to successfully connect your laptop to a projector by focusing on the subheading: Connecting the Cable to the Projector.
Locating The Video Input Port On The Projector
An essential first step in connecting your laptop to a projector is locating the video input port on the projector. Depending on the model and make of the projector, this port is typically labeled as “Video In”, “HDMI In”, or “VGA In”. Look for this port on the back or side of the projector. It might be located near other ports such as audio inputs or USB ports. Once you have identified the video input port, you are ready to move on to the next step.
Inserting The Cable Into The Projector
With the video input port located, it’s time to insert the cable into the projector. If you are using an HDMI cable, ensure that the HDMI end of the cable is securely inserted into the HDMI input port on the projector, taking note of the orientation of the connector to avoid any potential damages. If you are using a VGA cable, insert the VGA connector into the VGA input port and fasten the screws to secure it in place. Once the cable is inserted, ensure it is firmly connected to provide a stable and clear connection between the laptop and the projector.
Adjusting The Display Settings
When connecting your laptop to a projector, one important step is to adjust the display settings to ensure that your content appears correctly on the projected screen. There are two primary display settings that you may need to modify: extending or mirroring the display, and changing the screen resolution.
Extending Or Mirroring The Display
To give your audience the best visual experience, it’s crucial to make sure the laptop and projector are set up properly. In some cases, you might want the display to extend across both the laptop screen and the projected screen, allowing you to have separate content on each. Other times, you may prefer to mirror the display so that anything you see on your laptop screen is identical to what your audience sees on the projector.
To extend or mirror the display, follow these steps:
- Connect your laptop to the projector using the appropriate cable.
- Press the Windows key + P on your keyboard to open the display settings.
- In the display settings menu, select either “Extend” or “Duplicate” to choose your desired display option.
- Once you’ve made your selection, click “Apply” to save the changes.
Changing The Screen Resolution
Another essential aspect of adjusting the display settings is changing the screen resolution. This setting determines the number of pixels on the screen, affecting the clarity and size of the projected image. To ensure your content appears sharp and well-defined, you may need to modify the screen resolution.
To change the screen resolution, follow these steps:
- Right-click on your desktop and select “Display settings” from the menu.
- In the display settings window, scroll down to the “Display resolution” section.
- Click on the drop-down menu next to “Resolution” and select the desired resolution.
- Click “Apply” to save the changes.
By adjusting the display settings, you can optimize your laptop and projector setup to ensure a seamless and visually appealing presentation experience. Whether it’s extending or mirroring the display, or changing the screen resolution, taking these steps will help you deliver your message effectively.
Testing The Connection
To test the connection between a laptop and a projector, start by ensuring both devices are powered on. Connect the appropriate cable from the laptop to the projector, then select the correct input source on the projector. Adjust the laptop’s display settings to extend or duplicate the screen to the projector.
Displaying A Test Image
Once you have successfully connected your laptop to the projector, the next step is to test the connection. One simple way to do this is by displaying a test image on the projector screen.
To display a test image, follow these steps:
- Open the start menu and search for “Display Settings.”
- In the display settings window, you will see a section called “Multiple Displays.” Select the option that says “Extend these displays.”
- Click on the “Apply” button to save the changes.
- Now, you can right-click on your desktop and select “Display settings” from the dropdown menu.
- In the display settings window, you will see two screens labeled as “1” and “2.” The number “1” represents your laptop screen, and the number “2” represents the projector screen.
- Click on the “Identify” button to see which screen corresponds to your laptop and which one corresponds to the projector.
- Once you have identified the projector screen, click on it and scroll down to the “Resolution” section.
- Select a suitable resolution from the dropdown menu. If you’re unsure, choose the recommended resolution for your projector.
- Click on the “Apply” button to save the changes. You should now see the test image displayed on the projector screen.
Playing A Video Or Slideshow
Another way to test the connection is by playing a video or slideshow on the projector. This will help you ensure that not only the image but also the audio is being transmitted correctly.
To play a video or slideshow, follow these steps:
- Open the media file that you want to play on your laptop.
- Drag the media player window to the side of your screen, allowing it to extend onto the projector screen.
- Click on the play button to start the video or slideshow. You should now see and hear the content being displayed on the projector screen.
- Adjust the volume settings on your laptop as well as the projector to ensure the audio is clear and audible.
- If the video or slideshow is not displaying properly, you may need to adjust the screen resolution or other display settings as mentioned earlier.
- Continue testing different media files and adjusting settings as necessary until you are satisfied with the connection.
Troubleshooting Common Issues
When connecting a laptop to a projector, you may encounter common issues that can disrupt your presentation. Troubleshooting these problems promptly is essential to ensure a seamless connection and a successful event.
No Signal
If you’re experiencing a “No Signal” message when trying to connect your laptop to a projector, there are several potential causes. Check the following steps:
- Verify that both the laptop and the projector are powered on and properly connected with the correct cables.
- Press the correct input button on the projector’s remote control to ensure it’s set to receive the signal from your laptop.
- Adjust the display settings on your laptop to extend or duplicate the screen to the projector.
Blurry Or Distorted Image
An unclear or distorted image on the projector screen can detract from your presentation. To resolve this issue, consider the following troubleshooting tips:
- Clean the projector lens and ensure it’s free from any smudges or dirt that may affect the image quality.
- Change the display resolution on your laptop to match the optimal resolution supported by the projector.
- Ensure that the projector is positioned at an appropriate distance and angle from the screen to avoid image distortion.
If you’ve followed these troubleshooting steps and are still encountering issues, consider consulting the user manuals for your laptop and projector or seeking assistance from technical support.
“`Disconnecting The Laptop From The Projector
Once you have finished your presentation or movie, it’s important to disconnect your laptop from the projector properly to avoid any damage. Follow these steps to safely disconnect:
Shutting Down The Projector
Power off the projector by using the remote or the physical power button on the device.
Removing The Cable Safely
- Wait for a few seconds to allow the projector to cool down before unplugging.
- Gently remove the cable connecting the laptop to the projector.
- Avoid yanking the cable to prevent any harm to the ports.
Tips For A Successful Presentation
When connecting your laptop to a projector, following these tips for a successful presentation can make a significant difference.
Arrive Early To Set Up
Arriving early allows you ample time to ensure smooth compatibility between your laptop and the projector.
- Check the projector’s connectivity ports and ensure you have the right cable.
- Set up your laptop and run a test presentation to avoid last-minute technical glitches.
Have Backup Options
In case of any unexpected issues, having backups in place can save your presentation:
- Carry an extra VGA or HDMI cable as a backup in case the primary one fails.
- Save your presentation on a USB drive as an alternative way to access your files.
Credit: meetingtomorrow.com
Frequently Asked Questions On How To Connect Laptop To Projector
How Do I Connect My Laptop To A Projector?
To connect your laptop to a projector, start by ensuring that both devices are turned off. Then, connect the VGA or HDMI cable from the laptop to the projector. Turn on the projector first, followed by your laptop. Adjust the display settings on your laptop if necessary, and your laptop will be connected to the projector.
What Cables Do I Need To Connect My Laptop To A Projector?
The cables you will need to connect your laptop to a projector depend on the ports available on both devices. Most commonly, a VGA or HDMI cable is used. VGA is an older standard, while HDMI provides better quality. Check the ports available on your laptop and the projector, and choose the appropriate cable accordingly.
Do I Need Special Software To Connect My Laptop To A Projector?
No, you do not need special software to connect your laptop to a projector. Once you have connected the cables between the two devices, your laptop should automatically detect the projector. However, you may need to adjust the display settings on your laptop to ensure that it is correctly mirroring or extending the display to the projector.
Can I Connect A Macbook To A Projector?
Yes, you can connect a MacBook to a projector. MacBook laptops typically have a Thunderbolt or USB-C port, so you will need a cable or adapter that connects from Thunderbolt or USB-C to the appropriate port on the projector. Make sure to choose a cable or adapter that is compatible with your MacBook model and the projector’s ports.
Conclusion
Connecting your laptop to a projector doesn’t have to be a daunting task. By following these simple steps, you can easily set up your devices to deliver a seamless presentation or entertainment experience. Whether you’re in a boardroom or a classroom, knowing how to connect your laptop to a projector is a valuable skill that can enhance your professional and personal endeavors.
So, grab your cables and get ready to impress your audience with a flawless projection setup!
0 comments