
To connect a MacBook to WiFi, click on the WiFi icon in the menu bar, select the network, and enter the password. Ensuring a strong and stable internet connection on your MacBook is crucial for productivity and seamless online activities.
Whether you need to work, study, stream content, or simply browse the web, connecting your MacBook to WiFi is a simple process. By following a few easy steps, you can quickly establish a secure connection and enjoy uninterrupted access to the internet.
In this guide, we will walk you through the steps to connect your MacBook to WiFi effortlessly, allowing you to stay connected and productive wherever you go.

Credit: www.wikihow.com
Checking Wifi Connection On Macbook
Ensuring a solid WiFi connection on your MacBook is essential for smooth internet access. Checking the signal strength and ensuring that WiFi is turned on are crucial steps in troubleshooting any connectivity issues.
Checking Wifi Signal Strength
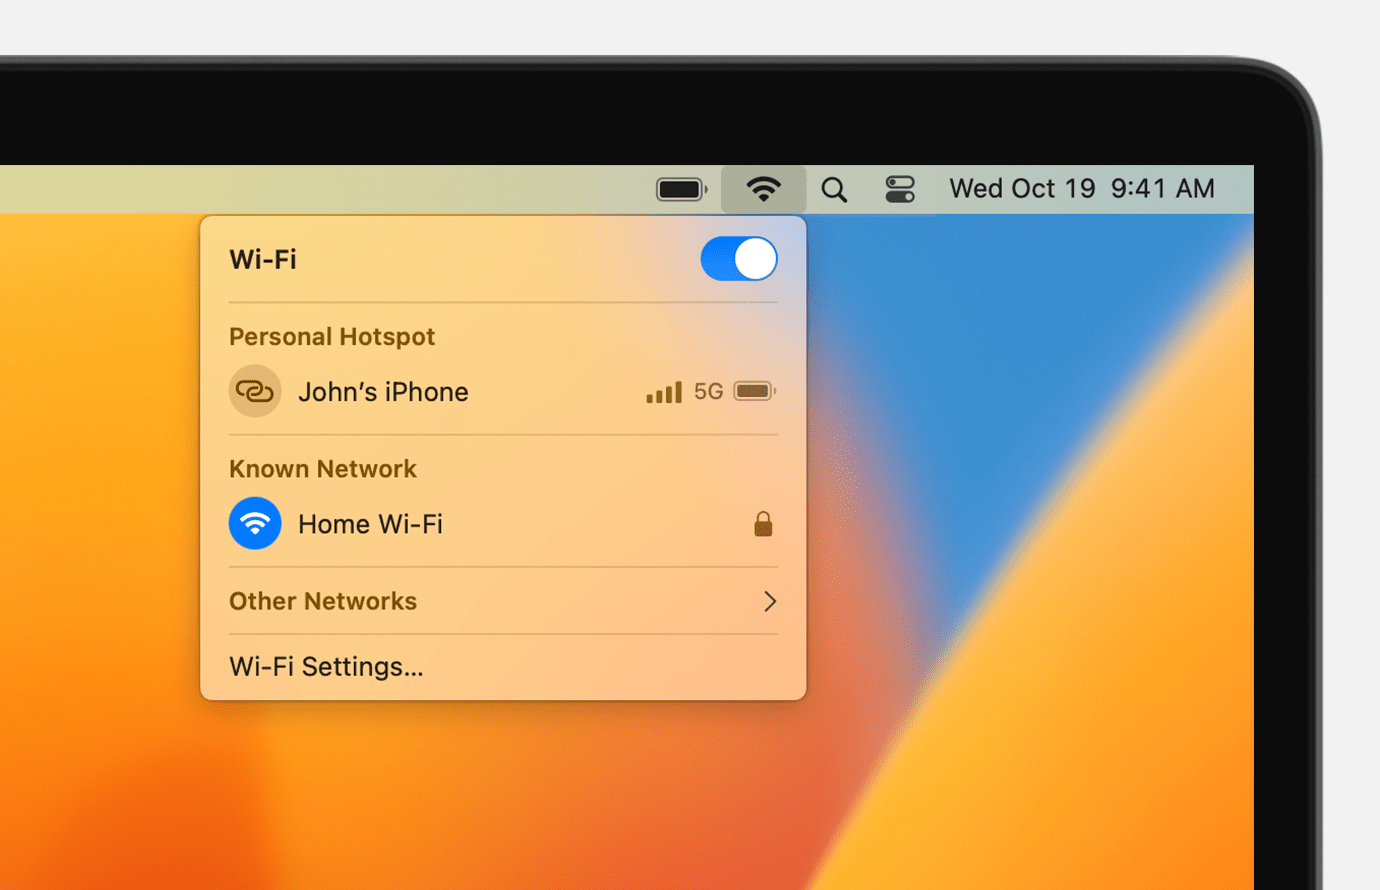
To check the WiFi signal strength on your MacBook, click on the WiFi icon located at the top right corner of the screen. The signal strength will be represented by the number of bars, with a higher number indicating a stronger connection.
Ensuring WiFi is Turned OnIf you are experiencing connectivity problems, it’s important to verify that the WiFi on your MacBook is turned on. Navigate to the top right corner of the screen and click on the WiFi icon. Ensure that the “Turn WiFi On” option is selected. If it appears to be off, simply click on it to enable the WiFi connection.

Credit: support.apple.com
Connecting To A Wifi Network
Connecting your Macbook to a Wi-Fi network is a simple process that allows you to access the internet. Below are the basic steps to connect your Macbook to a Wi-Fi network:
Scanning For Available Networks
To scan for available Wi-Fi networks on your Macbook, click on the Wi-Fi icon in the top right corner of the screen.
Selecting The Network
- Once you have clicked on the Wi-Fi icon, a list of available networks will appear. Select the network you want to connect to by clicking on it.
Entering Password (if Required)
- If the network is password-protected, a pop-up window will prompt you to enter the password. Type in the password and click ‘Join’ to connect to the network.
Troubleshooting Wifi Connection Issues
When it comes to troubleshooting WiFi connection issues on your MacBook, there are several simple steps you can take to get your device back online swiftly. Below are some common solutions that can help you resolve WiFi connectivity problems effectively.
Restarting The Macbook
If your MacBook is experiencing WiFi connection issues, a quick fix is to restart the device to reset the network settings.
Resetting The Wifi Router
Another effective solution is to reset the WiFi router by powering it off and on again, which can often resolve connectivity problems.
Checking Wifi Settings
It’s essential to verify that your WiFi settings on the MacBook are correctly configured, including ensuring that the network name and password are accurate.
Updating Wifi Drivers
Regularly updating the WiFi drivers on your MacBook can improve compatibility and performance, potentially resolving any connection issues.
Using Airport Utility App
Using the Airport Utility App is an efficient way to connect your MacBook to WiFi. It provides a user-friendly interface that allows you to install and configure WiFi settings with ease. In this guide, we will walk you through the process of installing the Airport Utility App and configuring the WiFi settings on your MacBook.
Installing Airport Utility App
To get started, follow these steps to install the Airport Utility App on your MacBook:
- Open the App Store on your MacBook.
- Search for “Airport Utility” in the search bar.
- Click on the “Get” button next to the Airport Utility App to download and install it.
Configuring Wifi Settings
Once you have installed the Airport Utility App, you can proceed to configure the WiFi settings using the following steps:
- Open the Airport Utility App from the Applications folder or the Launchpad.
- Select your WiFi network from the list of available networks.
- Enter the network password if prompted to do so.
- Click on the “Edit” button to modify the WiFi settings.
- Adjust the WiFi settings according to your preferences, such as network name, security type, and password.
- Click “Save” to apply the changes to your WiFi network.
Using Network Diagnostics
Learn how to connect your MacBook to wifi with the help of network diagnostics, ensuring a seamless and reliable internet connection for your device. By following a few simple steps, you can troubleshoot any connection issues and get your MacBook online in no time.
Accessing Network Diagnostics
macOS provides a handy feature called Network Diagnostics that can help troubleshoot and resolve connectivity issues with your Wi-Fi connection. It is the go-to tool when you are experiencing problems while trying to connect your MacBook to a Wi-Fi network. By accessing Network Diagnostics, you can identify any potential problems with your network settings, DNS configuration, and more, and take appropriate steps to fix them.
Running Network Diagnostics
To start using Network Diagnostics, follow these simple steps:
- Click on the Wi-Fi icon located in your menu bar at the top right corner of your screen.
- From the drop-down menu that appears, select “Open Network Preferences”.
- In the Network Preferences window, you will see a list of available network connections on the left-hand side. Make sure that the Wi-Fi option is selected.
- Next, click on the “Advanced” button at the bottom right of the window.
- In the new window that opens, navigate to the “TCP/IP” tab.
- Once on the TCP/IP tab, you will find a button labeled “Renew DHCP Lease”. Click on it to refresh your network configuration.
- Close the Advanced window by clicking on the “OK” button.
- Now, click on the “Assist me” button located at the bottom of the Network Preferences window.
- From the menu that appears, select “Diagnosis…” to launch Network Diagnostics.
The Network Diagnostics tool will now run a series of tests to check your network connection and identify the root cause of any issues. It will perform tests related to Wi-Fi, DHCP, DNS, and more, providing you with detailed information about any potential problems encountered. Pay close attention to the results displayed, as they will help you understand the reason behind your Wi-Fi connectivity problems.
Once the tool has finished running the diagnostics, you can proceed with the suggested solutions to resolve the connectivity issues. Follow any instructions provided by Network Diagnostics to reconfigure your network settings or troubleshoot specific problems.
By using Network Diagnostics, you can quickly and efficiently diagnose and fix connectivity issues, ensuring a seamless Wi-Fi experience on your MacBook.

Credit: www.youtube.com
Frequently Asked Questions For How To Connect Macbook To Wifi
How Do I Connect My Macbook To Wi-fi?
To connect your Macbook to Wi-Fi, click on the Wi-Fi icon in the menu bar and select your network from the list. Enter your password if prompted and click “Connect”. Your Macbook will automatically connect to the Wi-Fi network.
Why Is My Macbook Not Connecting To Wi-fi?
If your Macbook is not connecting to Wi-Fi, try restarting your router and Macbook. Check if the Wi-Fi network is available and within range. Ensure that your Wi-Fi is turned on and you’ve entered the correct password. If the issue persists, contact your internet service provider.
How Can I Improve Wi-fi Connection On My Macbook?
To improve Wi-Fi connection on your Macbook, move closer to the router, minimize interference from other devices, update your Macbook’s software and router firmware, and consider using a Wi-Fi extender or upgrading to a newer router. You can also try resetting your network settings or contacting your internet service provider for assistance.
Conclusion
Connecting your MacBook to WiFi is a straightforward process that can be done in a few simple steps. By following the steps outlined in this guide, you can easily establish a secure and stable internet connection for your device. Now, you can enjoy seamless browsing and access to online resources with ease.
0 comments