
To connect speakers to a receiver, match speaker wire to terminals and insert securely. Ensure polarity alignment.
When setting up your home audio system, connecting speakers to a receiver is a crucial step to achieve optimal sound quality. By following simple steps to properly connect your speakers, you can enjoy immersive sound experience for your movies, music, and TV shows.
Understanding how to connect your speakers to a receiver will enhance your overall audio setup and ensure a seamless entertainment experience in your home. Whether you’re a music enthusiast, movie buff, or just looking to upgrade your audio system, connecting speakers to a receiver is an essential skill to achieve great sound performance. Let’s delve into the details of how you can easily connect your speakers to a receiver for an immersive audio experience.
Choosing The Right Speakers And Receiver
Consider Speaker And Receiver Compatibility
Before you start connecting your speakers to the receiver, it’s important to ensure that they are compatible with each other. Check the power and impedance ratings of both your speakers and your receiver to make sure they are a good match. Mismatched components can lead to poor sound quality or even damage to your equipment.
Determine Speaker And Room Size
Consider the size of your speakers and the room they will be used in. Larger rooms may require more powerful speakers to fill the space with sound, while smaller rooms may be better suited to smaller speakers. Match the power and size of your speakers to the dimensions of your room to ensure optimal audio quality.
Preparing The Speaker Wires
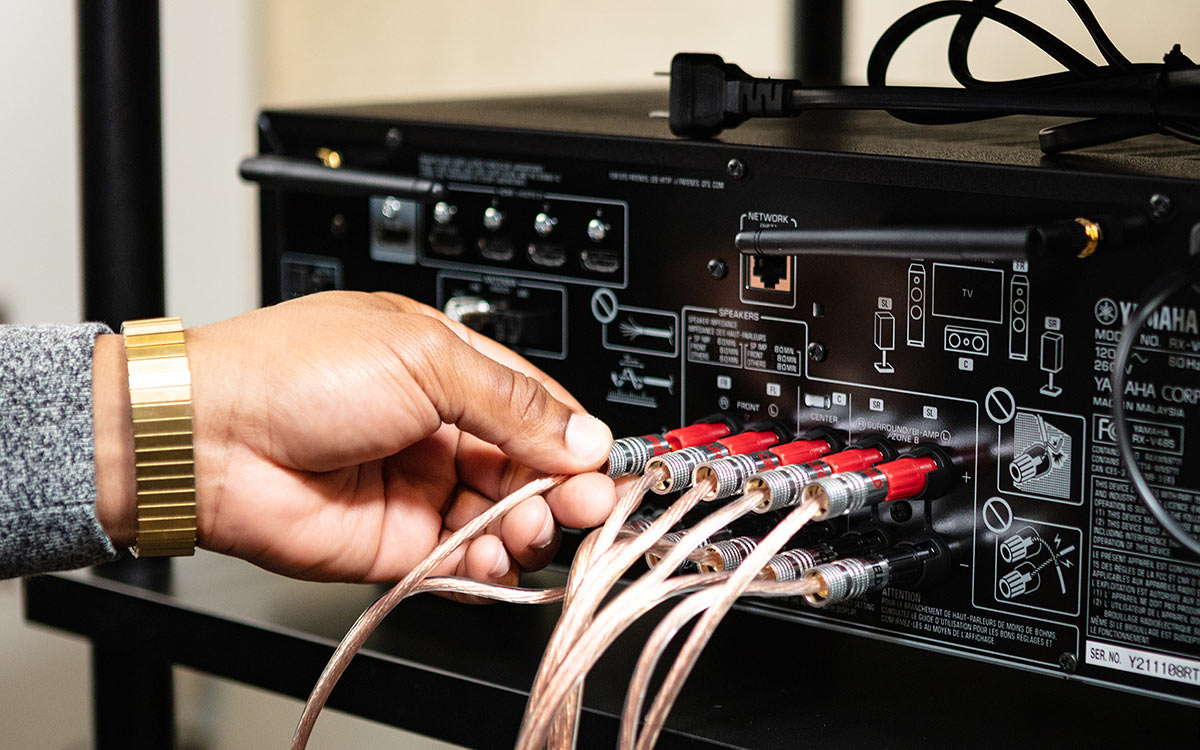
To prepare the speaker wires for connecting to the receiver, start by stripping off the insulation at the ends. Twist the exposed wires to prevent fraying, and then connect them to the corresponding terminals on the receiver. Make sure the connections are secure before powering up the system.
Measure The Required Speaker Wire Length
Before you begin connecting your speakers to the receiver, measure the distance between them to determine the length of speaker wire needed.
Strip The Ends Of The Speaker Wire
Strip about half an inch of insulation from each end of the speaker wire using wire strippers to expose the bare wire.
Connect The Speaker Wire To The Receiver And Speakers
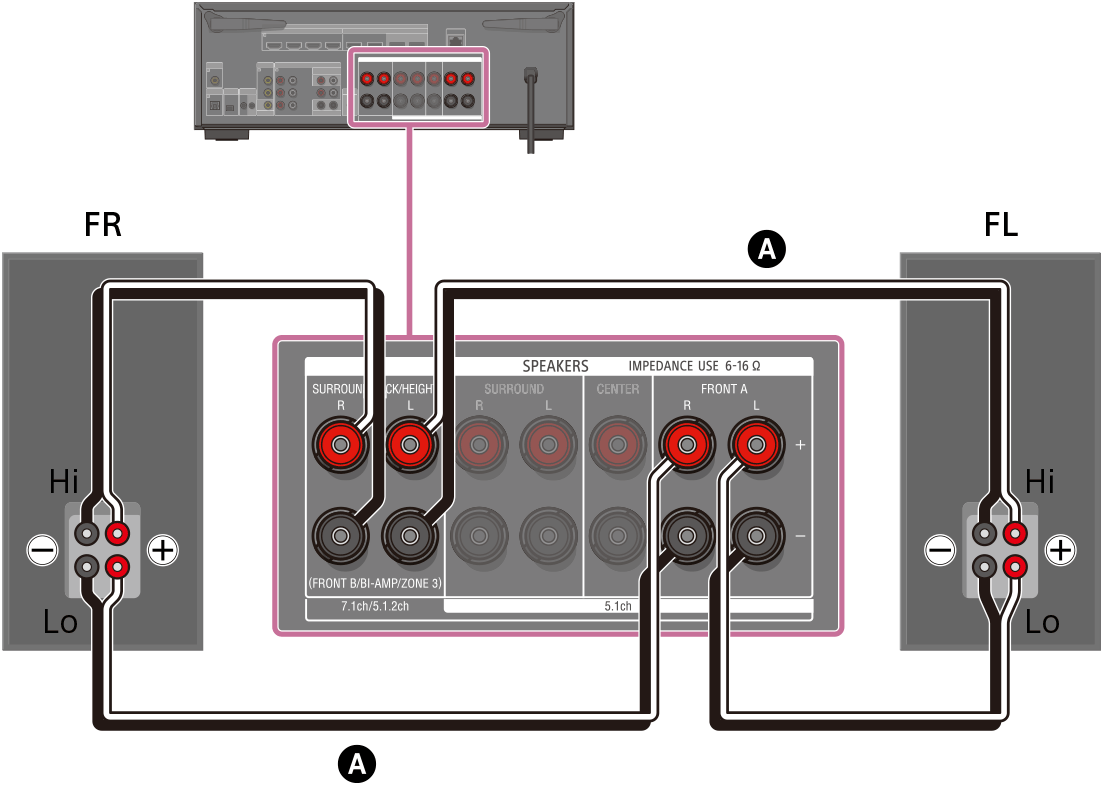
Identify the positive (+) and negative (-) terminals on both the receiver and speakers, then attach the stripped ends of the wire accordingly.
Connecting The Receiver To Power
When setting up your home entertainment system, correctly connecting the receiver to power is crucial for optimal performance. Follow these steps to ensure proper power connection:
Locate The Power Cord Of The Receiver
First, locate the power cord that comes with your receiver. It is usually a thick, insulated cable with a plug that connects to the back of the receiver.
Connect The Power Cord To A Power Outlet
Next, plug the power cord into a power outlet near where you plan to place the receiver. Make sure the outlet is easily accessible and has sufficient power capacity for your receiver.
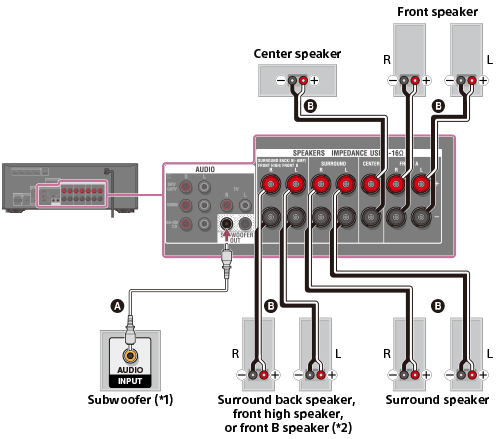
Credit: helpguide.sony.net
Positioning And Placing The Speakers
When setting up your speakers, the positioning and placement plays a crucial role in ensuring optimum audio quality and surround sound experience. Properly positioning your speakers not only enhances the overall audio distribution but also creates an immersive entertainment setting in your home. Let’s walk through the steps to position and place your speakers for an exceptional audio experience.
Determine Speaker Placement
Before setting up your speakers, it’s important to determine the optimal placement for each speaker in your entertainment area. The ideal placement will depend on the layout of your room, the seating arrangement, and the specifications of your speakers.
Set Up The Front And Center Speakers
When positioning your front and center speakers, it’s important to place them equidistant from the primary listening area to ensure balanced sound distribution. Generally, the front speakers should be positioned at an equal distance from the center of the room and angled towards the listening area for optimal sound projection.
Place The Surround Speakers
For surround speakers, proper placement is crucial to create an immersive audio experience. Ideally, they should be positioned slightly behind and above the primary listening area, angled towards the center of the room. This placement helps in creating a surround sound effect that envelops the audience.
Adjust Speaker Position And Angle
Once the initial placement is done, it’s essential to fine-tune the speaker positions and angles to achieve the best audio performance. You can experiment with slight adjustments to find the optimal position for each speaker, ensuring they are angled and directed towards the listening area to maximize their impact.
Setting Up The Receiver
Setting up your receiver correctly is essential to ensure a seamless audio experience. By following these steps, you can easily connect your speakers to the receiver and configure the necessary audio settings.
Locate The Audio Inputs And Outputs
Before connecting your speakers to the receiver, it’s important to familiarize yourself with the location of the audio inputs and outputs. These are usually located on the back of the receiver and are labeled accordingly.
To locate the audio inputs:
- Look for the section labeled “audio inputs”.
- Find the corresponding inputs for each audio source you intend to connect.
- Take note of the input labels, such as “CD”, “DVD”, or “TV”.
To locate the audio outputs:
- Locate the section labeled “audio outputs”.
- Identify the output labeled “speakers” or similar.
Connect The Receiver To The Audio Source
Once you have identified the audio inputs and outputs, you can connect the receiver to your audio source. Follow these steps:
- Take the audio cable with the appropriate connectors for your audio source.
- Insert one end of the cable into the audio output of your audio source.
- Insert the other end of the cable into the corresponding audio input on the receiver.
- Repeat this process for each audio source you wish to connect.
Configure Audio Settings On The Receiver
After connecting the receiver to the audio source, it’s necessary to configure the audio settings to optimize the sound output. Here’s how:
- Turn on your receiver and access the settings menu.
- Navigate to the audio settings options. This may be labeled as “audio setup” or similar.
- Adjust the speaker settings to match the number and type of speakers you have connected.
- Set the audio input preferences, such as selecting the input source for each audio input.
- Save the changes and exit the settings menu.
By following these steps, you can easily connect your speakers to the receiver and ensure optimal audio performance. Now you’re ready to enjoy your favorite music, movies, or games with an immersive sound experience!
Calibrating The Speaker System
Calibrating your speaker system is an essential step to ensure optimal sound quality and performance. By accessing the receiver’s calibration menu, running the automatic speaker calibration, and fine-tuning the speaker settings manually, you can achieve a well-balanced audio experience. Follow these steps to calibrate your speakers and make the most out of your sound system.
Access The Receiver’s Calibration Menu
To begin the calibration process, locate and access the calibration menu on your receiver. This menu can typically be found in the audio settings or setup options. Look for the specific setting related to speaker calibration, which may be labeled as “Auto Setup,” “Speaker Configuration,” or similar terms. Ensure that your receiver is connected to power and turned on before proceeding.
Run The Automatic Speaker Calibration
Once inside the receiver’s calibration menu, look for the option to run an automatic speaker calibration. This feature is designed to analyze and optimize the audio output of each speaker in your system. When you select this option, the receiver will emit a series of test tones that will be measured by a built-in microphone or an external microphone connected to the receiver. The receiver will then adjust the speaker settings based on the captured data to achieve optimal sound reproduction.
Fine-tune The Speaker Settings Manually
While automatic calibration provides a good starting point, manually fine-tuning the speaker settings allows you to customize the sound according to your preferences and your room’s acoustics. In the calibration menu, you’ll find controls for adjusting various parameters such as speaker levels, equalization, and crossover frequencies. Take advantage of these options to optimize the sound output of each speaker in your setup.
Start by adjusting the speaker levels. This allows you to balance the volume of each speaker relative to one another. Experiment with the levels until you reach a point where all speakers contribute equally to the overall soundstage. In some cases, you may need to increase the level for smaller speakers or decrease it for larger ones to achieve a harmonious balance.
Next, adjust the equalization settings, if available. Equalization allows you to fine-tune the frequency response of each speaker. Increasing or decreasing specific frequency ranges can help compensate for any room resonances or speaker characteristics. Remember that minor adjustments can make a significant difference, so take your time and trust your ears while making these changes.
Lastly, you may also find settings for crossover frequencies. Crossover frequencies determine the range of frequencies that each speaker reproduces. By setting appropriate crossover frequencies, you can ensure that different speakers handle the appropriate frequencies, resulting in a smoother transition between them.
By following these steps and taking advantage of your receiver’s calibration features, you can achieve an optimized speaker system that delivers high-quality audio tailored to your preferences. Remember to change the settings as needed if you rearrange your speakers or make any other significant changes to your audio setup.
Testing The Speaker System
Once you have connected the speakers to the receiver, it’s crucial to ensure that the system is functioning properly. Testing the speaker system will help you identify any issues and optimize the audio output.
Play Audio From Different Sources
To test the speaker system, play audio from various sources such as CDs, MP3 players, or streaming services. This will allow you to evaluate the sound quality across different formats and identify any inconsistencies.
Check The Sound Balance And Clarity
Assess the sound balance and clarity by adjusting the volume levels for each speaker. Listen for any distortions, static, or imbalance in sound distribution. Ensuring a balanced and clear sound is essential for an optimal listening experience.
Ensure All Speakers Are Working Properly
Test each individual speaker to ensure they are all working properly. You can do this by playing audio with specific channel outputs, allowing you to verify that each speaker is emitting sound as intended.
Troubleshooting Common Speaker Connection Issues
If you are experiencing problems with connecting your speakers to your receiver, don’t worry. Here are some common troubleshooting tips to help you resolve the issues.
No Sound Coming From Speakers
- Check the speaker connections and ensure they are plugged in correctly.
- Verify that the receiver is set to the correct input source for the speakers.
- Ensure the volume on the receiver and speakers is turned up.
Low Sound Levels
- Adjust the volume level on the receiver and speakers to a higher setting.
- Inspect the speaker cables for any damage or loose connections.
- Consider upgrading to higher quality speaker cables for better sound quality.
Intermittent Sound Or Audio Dropouts
- Check for any wireless interference that may be affecting the speaker connection.
- Move the receiver and speakers away from electronic devices that could be causing interference.
- Ensure all connections are secure and there are no loose cables causing interruptions.
Additional Tips And Considerations
Here are some additional tips and considerations to help you optimize your speaker setup:
Hide Speaker Wires With Cable Management
Use cable management solutions to neatly conceal speaker wires and prevent trip hazards.
Use Quality Cables And Connectors
Invest in high-quality cables and connectors to enhance audio performance and prevent signal interference.
Consider A Wireless Speaker System
Opt for a wireless speaker system for a clutter-free setup and greater flexibility in speaker placement.
Ensure to clean your receiver and speakers regularly to maintain optimal audio quality.
Credit: www.audioholics.com
Credit: www.crutchfield.com
Frequently Asked Questions On How To Connect Speakers To Receiver
How Do I Connect Speakers To A Receiver?
To connect speakers to a receiver, start by identifying the speaker outputs on the receiver. Then, make sure the receiver is turned off. Connect the positive wire from each speaker to the corresponding positive terminal on the receiver and repeat with the negative wires.
Finally, turn on the receiver and enjoy your audio experience.
Can I Connect Wireless Speakers To A Receiver?
Yes, you can connect wireless speakers to a receiver. Look for a receiver that has Bluetooth or Wi-Fi capabilities. Pair your wireless speakers with the receiver by following the manufacturer’s instructions. Once paired, you can stream audio wirelessly from your receiver to the connected wireless speakers.
How Do I Match Speaker Impedance To A Receiver?
To match speaker impedance to a receiver, check the speaker’s impedance rating (usually in ohms) and the receiver’s minimum impedance rating. Make sure the speaker’s impedance rating falls within the limits specified by the receiver. For example, if the receiver’s minimum impedance is 8 ohms, use speakers with an impedance of 8 ohms or higher.
What Is The Difference Between Bi-wiring And Bi-amping Speakers?
Bi-wiring involves using separate cables for the speaker’s low-frequency (woofer) and high-frequency (tweeter) inputs, while bi-amping involves using separate amplifiers for these frequency ranges. Bi-wiring can help reduce interference between the frequencies, while bi-amping allows for greater control and power distribution to each frequency range.
Conclusion
Connecting speakers to a receiver is a simple process that can greatly enhance your audio experience. By following the steps outlined in this guide, you can seamlessly set up your system and enjoy high-quality sound in your home. Take the time to ensure proper connections for optimal results.
0 comments