
To connect WiFi on a Lenovo laptop, click on the Network icon and select your network, then enter the password. In today’s digital age, connecting to WiFi is essential for staying connected to the internet on your Lenovo laptop.
By following a few simple steps, you can easily establish a secure and reliable WiFi connection to access online resources, browse the web, and communicate with others. Whether you are at home, in the office, or on the go, understanding how to connect your Lenovo laptop to WiFi will help you make the most of your device’s capabilities.
Let’s explore the straightforward process of setting up WiFi on your Lenovo laptop to ensure smooth and seamless internet connectivity.
Check If The Wi-fi Is Enabled
Before connecting to Wi-Fi on your Lenovo laptop, you need to ensure that the Wi-Fi is enabled. Here are the steps to check if the Wi-Fi is enabled:
Using The Wi-fi Toggle Switch
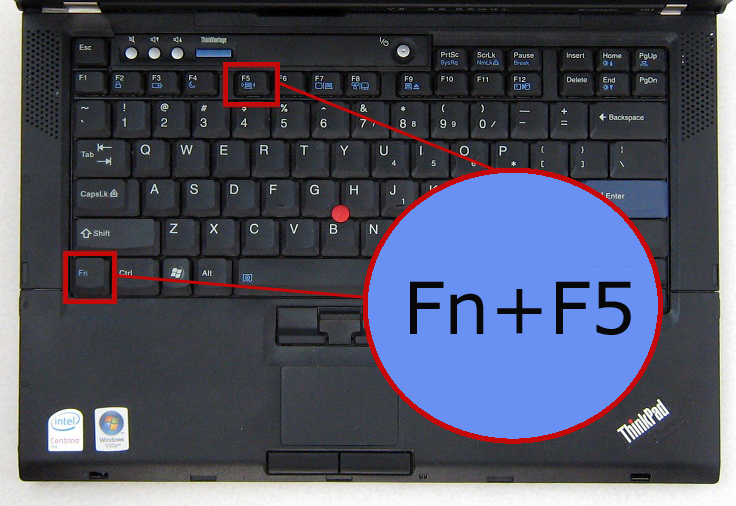
To check if Wi-Fi is enabled using the toggle switch, look for the physical switch or button on your Lenovo laptop. The switch’s location may vary depending on your laptop model. Slide the switch to the ON position to enable Wi-Fi.
Using The Windows Settings
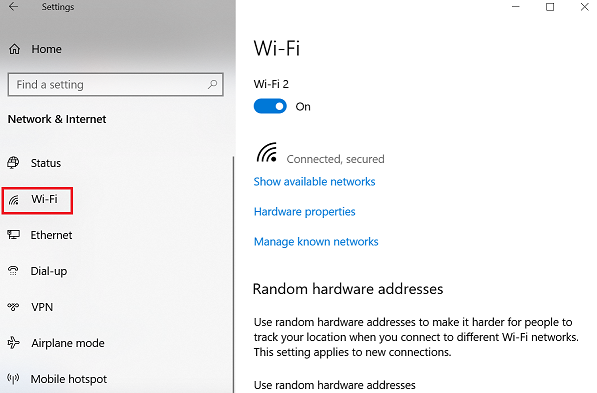
If your laptop does not have a physical Wi-Fi toggle switch, you can check and enable Wi-Fi through the Windows settings. Follow these steps:
- Click on the Start menu and select Settings.
- Go to Network & Internet.
- Click on Wi-Fi from the left-hand menu.
- Toggle the switch under Wi-Fi to turn it ON.
Ensure The Wi-fi Adapter Is Installed And Working Properly
Ensure the Wi-Fi adapter is installed and working properly.
Checking The Device Manager
1. Press the Windows logo key + X on your keyboard.
2. Select Device Manager from the list that appears.
Updating Or Reinstalling The Driver
1. Go to the Device Manager as previous steps.
2. Right-click on the Wi-Fi adapter and select Update driver.
3. Follow the on-screen instructions to update the driver.
4. If issues persist, right-click the adapter and choose Uninstall device.
5. Reboot your laptop and let Windows reinstall the driver.
Search For Available Wi-fi Networks
Using The Taskbar
Click on the Wi-Fi icon on the taskbar to view all available networks.
Select the network you want to connect to and enter the password if required.
Using The Windows Settings
Go to Settings > Network & Internet > Wi-Fi to see available networks.
- Click on the network you wish to connect.
- Input the password if prompted and click on Connect.
Using The Lenovo Vantage Software
Open Lenovo Vantage and navigate to the Connectivity tab.
Choose Wi-Fi settings to search and connect to available networks.
Connect To A Wi-fi Network
Connecting your Lenovo laptop to a Wi-Fi network is a straightforward process that can be achieved in just a few simple steps. Whether you’re connecting to a network for the first time or troubleshooting connection issues, this guide will walk you through the process seamlessly.
Entering The Network Password
To connect your Lenovo laptop to a Wi-Fi network, you will need to enter the network password. Ensure that the password you enter is correct, as any typographical errors can cause the connection to fail.
Using Automatic Connection
Lenovo laptops have a feature that allows for automatic connection to known Wi-Fi networks. Once you’ve connected to a network for the first time and saved the credentials, your laptop will automatically connect whenever that network is in range.
Troubleshooting Connection Issues
Encountering issues when trying to connect to a Wi-Fi network can be frustrating, but with a few troubleshooting steps, you can often pinpoint and resolve the problem. Some common troubleshooting steps include checking the Wi-Fi signal strength, resetting the router, or restarting your laptop.
Configure Wi-fi Network Settings
When it comes to connecting Wi-Fi on your Lenovo laptop, configuring the network settings is essential to ensure a smooth and secure internet experience. In this section, we will walk you through three crucial aspects of configuring Wi-Fi network settings on your Lenovo laptop: changing the network name, configuring network security, and managing saved networks.
Changing The Network Name
Changing the network name, also known as the SSID (Service Set Identifier), can be helpful when you want to personalize your Wi-Fi network or differentiate it from others in your vicinity. Follow these simple steps to change the network name:
- Click on the Wi-Fi icon in the system tray located on the taskbar.
- Select “Open Network & Internet settings.”
- Under the Wi-Fi section, click on “Change adapter options.”
- Right-click on your Wi-Fi network, and select “Properties.”
- In the “Network name” field, enter your desired name.
- Click “OK” to save the changes.
Configuring Network Security
Protecting your Wi-Fi network is vital to prevent unauthorized access and potential security breaches. Here’s how you can configure network security settings:
- Access the “Properties” of your Wi-Fi network as mentioned in the previous section.
- Click on the “Security” tab.
- Choose the type of security encryption you prefer from the drop-down menu (e.g., WPA2-PSK).
- Enter a strong password in the “Network security key” field.
- Consider enabling the “Hide characters” option for added security.
- Click “OK” to save the changes.
Managing Saved Networks
Over time, your Lenovo laptop might accumulate a list of saved Wi-Fi networks. Managing these saved networks can help to declutter and prioritize your preferred connections. Follow these steps to manage your saved networks:
- Go to the Wi-Fi settings section as mentioned earlier.
- Click on “Manage known networks.”
- A list of saved networks will appear.
- To remove a network, click on it and select “Forget.”
- To prioritize networks, click on a network and use the “Move up” or “Move down” buttons.
- Click “Close” when you have finished managing your networks.
By following these steps, you can easily configure Wi-Fi network settings on your Lenovo laptop. Whether you want to change the network name, enhance network security, or manage saved networks, taking control of these settings ensures a reliable and personalized internet experience.
Credit: support.lenovo.com
Optimize Wi-fi Performance
Want to optimize Wi-Fi performance on your Lenovo laptop? Follow these quick steps to connect your laptop to a faster, more reliable Wi-Fi network. Simply adjust the settings on your laptop to ensure a stable and improved Wi-Fi connection, enhancing your overall browsing and streaming experience.
Positioning The Laptop
If you’re experiencing weak Wi-Fi signal or frequent disconnections on your Lenovo laptop, it’s time to optimize the positioning. Inadequate laptop placement can hamper the overall Wi-Fi performance, leading to frustrating internet experiences. By following a few simple steps, you can ensure better signal strength and stable connectivity.
Firstly, place your Lenovo laptop within a reasonable distance from the router. Ideally, it should be within 30 feet of the router for optimal performance. Avoid placing it behind walls, large obstacles, or metal objects that may interfere with the Wi-Fi signal. Keep in mind that the closer your laptop is to the router, the better the signal strength will be.
Furthermore, try positioning your laptop away from other electronic devices that may cause signal interference. Devices such as cordless phones, microwave ovens, and baby monitors operate on similar frequencies as Wi-Fi, which can disrupt the network signal. By creating distance between your laptop and these devices, you can minimize potential interference and improve the Wi-Fi connection.
Updating Router Firmware
Outdated router firmware can negatively impact the Wi-Fi performance on your Lenovo laptop. Firmware updates often include bug fixes, security patches, and performance enhancements that can significantly improve your Wi-Fi experience. Therefore, it’s crucial to regularly update your router’s firmware to ensure optimum connectivity.
To update the firmware on your router, access the router’s admin panel by entering its IP address into your web browser. Once logged in, navigate to the firmware update section, which is usually located under the settings or maintenance tab. Check the manufacturer’s website for the latest firmware version available for your router model and follow the provided instructions to complete the update. Remember to always back up your router settings before performing a firmware update.
Changing Channel Settings
Another effective way to optimize Wi-Fi performance on your Lenovo laptop is by changing the channel settings on your router. Since Wi-Fi signals operate on various channels, changing the channel can help reduce interference and improve overall network performance.
To change the channel settings, access your router’s admin panel as mentioned earlier. Look for the wireless settings option and locate the channel section. Switch to a different channel that has the least amount of interference. You can use Wi-Fi analyzer apps or software to identify the least crowded channel in your area. Don’t forget to save the changes after selecting the new channel.
By following these steps to optimize Wi-Fi performance on your Lenovo laptop, you can ensure a smoother and more reliable internet experience. Properly positioning your laptop, updating the router firmware, and changing the channel settings will help maximize signal strength and minimize interference, resulting in faster and more stable Wi-Fi connectivity.
Resolve Common Wi-fi Connection Problems
Experience seamless Wi-Fi connection on your Lenovo Laptop with our easy-to-follow guide that helps you troubleshoot and solve common connectivity issues. Stay connected without any hassle.
< p >Having trouble connecting to Wi-Fi on your Lenovo laptop? No need to worry, we’ve got you covered. In this article, we’ll address some common Wi-Fi connection problems and provide simple solutions to get you back online in no time. < p >If your Lenovo laptop is having trouble connecting to Wi-Fi, it may be due to a glitch in the network adapter. To resolve this, you can try resetting the network adapter. Here’s how: < ol > < li >Press the Windows key + X on your keyboard and select “Device Manager” from the menu. < li >Locate the “Network Adapters” section, right-click on your Wi-Fi adapter, and select “Disable” from the dropdown menu. < li >After a few seconds, right-click on the adapter again and select “Enable”. < p >Sometimes, the issue may not be with your laptop but rather with the router. One simple solution is to power cycle the router. Follow these steps to do so: < ol > < li >Unplug the power cable from the back of the router. < li >Wait for 30 seconds, then plug the power cable back in. < li >Allow the router to power up and establish a connection. < p >Your Lenovo laptop may be experiencing Wi-Fi connectivity issues due to the power saving mode. To resolve this, you can disable power saving mode by following these steps: < ol > < li >Navigate to the “Control Panel” and select “Power Options”. < li >Click on “Change plan settings” next to the selected power plan. < li >Select “Change advanced power settings” and expand the “Wireless Adapter Settings”. < li >Set both “On battery” and “Plugged in” settings to “Maximum Performance”. < p >By following these simple steps, you can troubleshoot and resolve common Wi-Fi connection problems on your Lenovo laptop, ensuring a seamless browsing experience.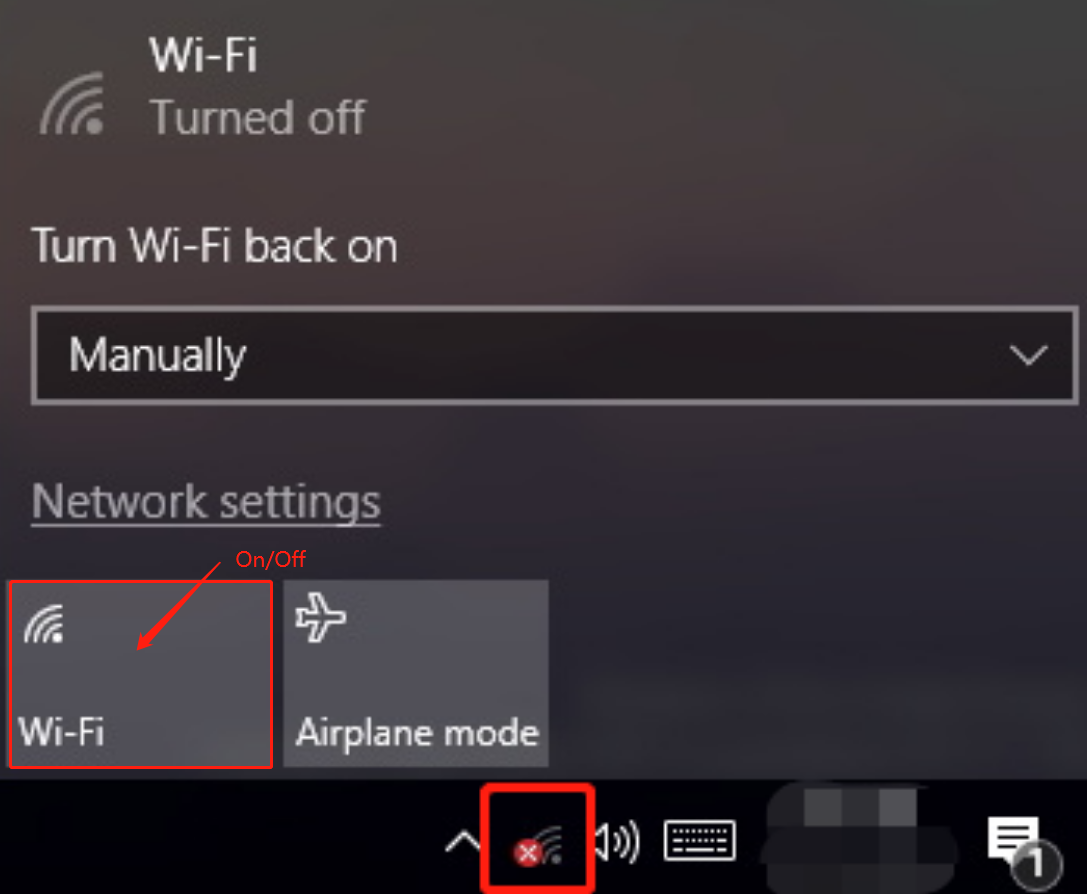
Credit: support.lenovo.com
Connect To A Hidden Wi-fi Network
Connecting to a hidden Wi-Fi network on your Lenovo laptop requires a few extra steps but is easy to accomplish.
Manually Entering The Network Details
- Access the Wi-Fi settings on your Lenovo laptop.
- Click on “Add a network” or a similar option.
- Enter the SSID (network name) and security type of the hidden network.
- Input the network password or encryption key.
- Click “Connect” to join the hidden Wi-Fi network.
Using The Windows Settings
- Go to the Windows taskbar and select the Wi-Fi network icon.
- Choose “Network & Internet settings.”
- Click on “Wi-Fi” and then “Manage known networks.”
- Select “Add a new network” and input the hidden network details.
- Save the settings and connect to the hidden Wi-Fi network.
Use A Wireless Range Extender
When dealing with weak Wi-Fi signals, using a wireless range extender can be a practical solution to boost connectivity on your Lenovo laptop.
Setting Up The Range Extender
Here are the steps to set up your wireless range extender:
- Plug the range extender into a power outlet. Ensure it’s within the range of your current Wi-Fi signal.
- Access the extender’s settings through a web browser using a provided URL or the device’s IP address.
- Follow the on-screen instructions to configure the extender’s network settings, such as SSID and password.
Connecting The Laptop To The Extender
To connect your Lenovo laptop to the range extender, follow these steps:
- Access the network settings on your laptop and search for available Wi-Fi networks.
- Locate and select the network name of the extender from the list of available networks.
- Enter the password for the extender’s network to establish a connection.

Credit: ccit.college.columbia.edu
Frequently Asked Questions Of How To Connect Wifi On Lenovo Laptop
How Do I Connect Wifi On My Lenovo Laptop?
To connect Wifi on your Lenovo Laptop, click on the Wifi icon in the taskbar, select the network you want to connect to, enter the password if required, and click Connect. The laptop will automatically connect to the Wifi network.
Make sure your Wifi is turned on and in range.
Can’t Connect To Wifi On Lenovo Laptop, What Should I Do?
If you can’t connect to Wifi on your Lenovo Laptop, try restarting the laptop, resetting the Wifi router, or checking if the password you entered is correct. Also, ensure that the Wifi adapter drivers are up to date. If the problem persists, contact your internet service provider for further assistance.
What Are The Possible Reasons For Wifi Connection Issues On Lenovo Laptop?
Wifi connection issues on Lenovo Laptop may be caused by outdated drivers, incorrect network configuration, interference from other devices, or hardware problems. It is also possible that the Wifi network itself is experiencing problems. Troubleshoot by restarting devices, checking settings, or contacting your ISP for guidance.
Conclusion
In this quick guide, you learned how to connect WiFi on your Lenovo laptop effortlessly. By following these simple steps, you can stay connected and make the most of your device’s capabilities. Now, go ahead and enjoy the seamless internet connectivity on your Lenovo laptop, empowering your digital experience.
0 comments