

To extend WiFi range outside, use a WiFi extender or install an outdoor access point. Increasing signal strength outdoors is crucial for seamless connectivity.
When looking to enhance your WiFi coverage outside, consider your specific needs and the placement of your router or access point. Factors such as obstacles, distance, and interference from other devices can affect signal strength. By strategically positioning your equipment and choosing the right solution for extending your WiFi range, you can enjoy strong and reliable WiFi connectivity in your outdoor spaces.
This guide will explore various methods to help you extend your WiFi range outside effectively.

Credit: www.radiolabs.com
Choosing The Right Wifi Router
When extending your Wi-Fi range outdoors, one of the most crucial factors to consider is choosing the right Wi-Fi router. The right router will enable you to enjoy seamless internet connectivity in your backyard, garden or outdoor areas.
Understanding The Different Types Of Wifi Routers
Before diving into the selection process, it’s important to understand the different types of Wi-Fi routers available. Standard, Wireless-AC, and mesh routers are the most common types. Each type has its unique strength and features, making it suitable for specific outdoor Wi-Fi range extension needs.
Factors To Consider When Selecting A Router
With a plethora of options available, you should consider several factors to ensure you choose the most suitable router for extending your Wi-Fi range outdoors. Factors such as range, speed, weather resistance, and ease of installation can significantly impact the performance of the router in an outdoor environment.
Optimizing Placement Of The Wifi Router
To extend the Wifi range outside, optimize the placement of the Wifi router by positioning it in a central location and away from obstructions. Also, consider using a Wifi extender or repeater to boost the signal strength in outdoor areas, ensuring consistent and reliable coverage.
Identifying The Ideal Location For The Router
To optimize your wifi range outside, choose an optimal spot for the router.
- Place the router in a central location for even coverage.
- Avoid corners or behind furniture that can block signals.
- Elevate the router to improve signal distribution.
- Position the router away from thick walls or metal objects.
Minimizing Interference From Other Devices
Reduce signal disruptions from other devices by following these tips.
- Keep the router away from electronic appliances like microwaves.
- Adjust the channel settings to avoid overlapping frequencies.
- Use a dual-band router to switch between 2.4 GHz and 5GHz bands.
- Update router firmware regularly to improve performance.
Upgrading Wifi Antennas
Upgrading WiFi antennas is a practical solution to extend your WiFi range outside your home. Enhancing antenna performance can significantly boost signal strength and coverage. By exploring different types of antennas and following a step-by-step guide, you can optimize your outdoor WiFi experience.
Exploring Different Antenna Types
Various antenna types cater to specific needs and environments. Omni-directional antennas provide 360-degree coverage ideal for broad outdoor areas. Directional antennas, on the other hand, focus signals in a specific direction, perfect for targeting distant locations.
Step-by-step Guide To Replacing Antennas
- Identify existing antennas: Locate current antennas on your router or access point.
- Research compatible antennas: Ensure new antennas match your device’s specifications.
- Power off devices: Disconnect power sources before replacing antennas.
- Unscrew existing antennas: Gently remove old antennas by turning them counterclockwise.
- Attach new antennas: Securely fasten new antennas by twisting them clockwise.
- Power on devices: Reconnect power and monitor signal strength improvements.
Using Wifi Range Extenders
Using Wifi Range Extenders is a great way to amplify your Wi-Fi signal and extend its range to the outdoor areas of your home or office. This technology can help eliminate dead zones and ensure a strong connection, allowing you to enjoy seamless internet access in your outdoor spaces.
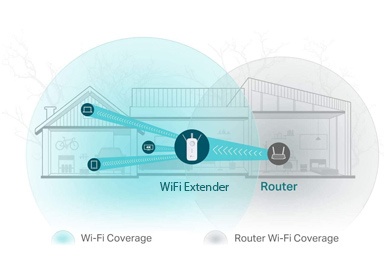
How Wifi Range Extenders Work
Wifi range extenders, also known as wifi boosters, work by capturing the wireless signal from your router and rebroadcasting it to areas where the signal is weak or non-existent. Essentially, they act as a middleman between your router and devices, extending the coverage area of your wireless network.
Installing And Configuring A Range Extender
Installing and configuring a wifi range extender is relatively straightforward. Here are the general steps to get you started:
- Place the extender within the range of your existing Wi-Fi network.
- Plug in the extender and wait for it to power up.
- Follow the manufacturer’s instructions to connect the extender to your existing network.
- Configure the extender’s settings using a web browser or a dedicated mobile app.
- Place the extender in an optimal location to ensure maximum coverage.
Creating A Mesh Wifi Network
Extend your WiFi range outside effortlessly with a mesh WiFi network. Boost signal coverage, eliminate dead zones, and enjoy seamless connectivity in your outdoor space. Experience the benefits of a reliable and stable internet connection wherever you go.
Creating a Mesh Wifi Network In order to extend your Wifi range outside, one option you may consider is creating a mesh Wifi network. Mesh networks have gained popularity in recent years due to their ability to provide seamless coverage throughout a large area, making them ideal for outdoor spaces. In this section, we will delve into the benefits of a mesh network and walk you through the process of setting one up. So, let’s get started!Understanding The Benefits Of A Mesh Network
A mesh network offers several advantages over traditional Wifi extenders or repeaters. Let’s take a closer look at some of the key benefits:- Expanded Coverage: One of the main advantages of a mesh network is its ability to extend the Wifi coverage to distant corners of your outdoor space. By placing multiple mesh nodes strategically, you can eliminate dead zones and ensure a strong and stable Wifi signal throughout the entire area.
- Seamless Roaming: With a mesh network, you can move freely between different areas without experiencing any lag or drop in the Wifi connection. Mesh nodes work together to create a seamless network, allowing your devices to switch between nodes seamlessly, without any interruption in connectivity.
- Improved Speed and Performance: Mesh networks use dedicated backhaul channels, which help minimize congestion and optimize the network’s performance. This means you can enjoy fast and reliable internet speeds even outdoors, allowing you to stream videos, play online games, or connect multiple devices without any lag.
- Easy Setup and Management: Setting up a mesh network is relatively straightforward, especially when compared to traditional Wifi extenders. Most mesh systems come with user-friendly apps that guide you through the installation process step by step. Additionally, these apps allow you to manage and monitor your network, making it easy to add new nodes or troubleshoot any issues that may arise.
Setting Up A Mesh Network
Now that you have a better understanding of the benefits of a mesh network, let’s walk through the steps to set one up:- Choose a Mesh System: Start by selecting a mesh system that suits your needs and budget. Look for a system that offers outdoor mesh nodes or is designed to withstand outdoor conditions.
- Find an Ideal Location for Each Node: Next, determine the best placement for each mesh node. Ideally, you’ll want to position the primary node near your existing router and strategically place additional nodes throughout your outdoor space to ensure optimal coverage.
- Connect the Primary Node: Begin by connecting the primary node to your existing router using an Ethernet cable. Follow the manufacturer’s instructions for a seamless setup process.
- Add Additional Nodes: Once the primary node is set up, you can add additional nodes to expand your network’s coverage. Each node should be placed within range of the primary node while still enhancing coverage in the desired outdoor areas.
- Configure the Network: Use the mesh system’s app or web interface to set up and configure your network. This usually involves naming your network, creating a password, and personalizing other settings according to your preferences.
- Test the Coverage: After completing the setup, it’s crucial to test the coverage to ensure that all outdoor areas are adequately covered. If you find any weak spots, consider moving or adding nodes to improve the signal strength.
Utilizing Powerline Adapters
Extend your WiFi range outside effortlessly by harnessing the power of Powerline adapters, without the hassle of laying extra cables or drilling holes. Enjoy seamless connectivity for all your outdoor activities.
Understanding Powerline Adapters And How They Work
Powerline adapters are a nifty solution when it comes to extending your WiFi range outside. They are designed to utilize your existing electrical wiring to transmit data signals, converting your power outlets into network connections. This means that you can conveniently enjoy WiFi connectivity in areas that are far away from your router without the need for running extra Ethernet cables or investing in additional networking equipment.
Powerline adapters work by using your home’s electrical wiring as a communication medium. They come in pairs: one connected to your router, and the other plugged into an outlet near the area where you want to extend your WiFi range. The adapters use your electrical wiring as a data highway, allowing the signal to pass through your home’s power lines and reach the desired location. This setup enables a stable and reliable connection without any noticeable loss in internet speed.
Installing And Configuring Powerline Adapters
Installing and configuring powerline adapters is remarkably easy, allowing you to extend your WiFi range outside in no time:
- Choose a suitable powerline adapter kit: Opt for adapters that meet your speed requirements and are compatible with your router. Look for kits that offer easy setup instructions and come with multiple adapters, allowing you to expand your network further if needed.
- Plug in the adapters: Find a power outlet near your router and connect one adapter to it using an Ethernet cable. Ensure that the adapter is securely plugged into the outlet. Similarly, plug the other adapter into an electrical socket in the desired location where you want to extend your WiFi range.
- Pair the adapters: Most powerline adapter kits come pre-paired, allowing for a seamless setup. However, if your kit requires manual pairing, follow the instructions provided to pair the adapters. Typically, this involves pressing a pairing button on each adapter.
- Connect devices: Once the adapters are paired, you can connect your devices to the adapter in the extended WiFi range area using Ethernet cables or by connecting to the network name and password provided by the powerline adapters.
- Configure settings (if necessary): Some powerline adapters offer additional settings for optimizing performance and security. Consult the user manual or manufacturer’s website for instructions on accessing and adjusting these settings if needed.
- Test the connection: After setting up the powerline adapters, test the connection by opening a web browser or using a wireless device in the extended range area. Ensure that the internet is working correctly and the WiFi signal is stable.
By following these simple steps, you can effortlessly extend your WiFi range outside using powerline adapters. Enhance your outdoor experience by ensuring a reliable and seamless connection for your devices, whether it’s for working outdoors, streaming music, or keeping up with your favorite shows.
Setting Up A Wifi Access Point
If you want to extend your WiFi range outside, setting up a WiFi access point is a great solution. By strategically placing access points, you can ensure a strong and reliable WiFi signal throughout your outdoor space. In this post, we’ll discuss the basics of WiFi access points and provide step-by-step guidance on how to configure and connect them.
What Is A Wifi Access Point?
A WiFi access point is a device that allows you to extend your wireless network beyond the range of your existing router. It creates a new wireless network, utilizing the same internet connection but with a separate network name and password. Access points are commonly used to provide WiFi coverage in larger areas or in locations where the signal is weak.
Configuring And Connecting A Wifi Access Point
Configuring and connecting a WiFi access point involves a few key steps to ensure seamless integration with your existing network. Here’s a simplified guide to the process:
- Choose the Location: Identify the areas outside where you need WiFi coverage and select strategic locations to place the access points.
- Connect the Access Point: Use an Ethernet cable to connect the access point to your router or switch. Power on the access point and wait for it to boot up.
- Access the Configuration Interface: Open a web browser and enter the access point’s IP address to access the configuration interface. Log in using the default credentials provided by the manufacturer.
- Configure Wireless Settings: Customize the wireless network settings, including the SSID (network name), security settings, and password. Ensure that the settings match those of your existing network to enable seamless roaming.
- Verify Connectivity: Once configured, test the WiFi signal strength and connectivity in the designated outdoor areas to ensure optimal coverage.
By following these steps, you can effectively extend your WiFi range outside using WiFi access points.

Credit: m.youtube.com
Using Outdoor Wifi Antennas
To extend the range of your Wi-Fi signal outdoors, consider using outdoor Wi-Fi antennas. These antennas can significantly improve signal strength and coverage, allowing you to enjoy a reliable internet connection in your outdoor spaces. With easy installation and durable design, outdoor Wi-Fi antennas are an effective solution for extending Wi-Fi range outside.
Exploring Different Types Of Outdoor Antennas
Outdoor Wifi antennas come in various types to suit different needs, such as omnidirectional and directional antennas.Installation And Positioning Of Outdoor Antennas
Proper installation and positioning of outdoor antennas are crucial for maximizing signal strength and range.Employing Wifi Repeaters
Employing Wifi Repeaters:
How Wifi Repeaters Boost Signal Strength
A wifi repeater captures the existing signal and amplifies it to extend the coverage area.
Installing And Configuring Wifi Repeaters
1. Plug in the repeater to a power source near the edge of the existing wifi network.
2. Connect to the repeater’s network and follow the setup instructions in the manual.
- Choose the network you wish to extend and enter the password.
- Allow the repeater to synchronize with your main router.
Credit: www.madebywifi.com
Frequently Asked Questions For How To Extend Wifi Range Outside
How Can I Extend My Wifi Range Outside My House?
To extend your WiFi range outside your house, you can try placing your router near a window or using a WiFi range extender. Additionally, make sure there are no obstructions, such as walls or trees, between the router and the outdoor area where you want to extend the coverage.
Is It Possible To Extend Wifi Range Without A Range Extender?
Yes, you can extend your WiFi range without a range extender by using a WiFi repeater or a powerline adapter. These devices help amplify and distribute the WiFi signal throughout your home, including the outdoor areas.
Can Weather Affect The Wifi Range Outside My House?
Yes, weather conditions such as rain, snow, and strong winds can potentially affect the WiFi range outside your house. Moisture in the air can absorb and weaken the signal, while strong winds can cause interference. Consider these factors when planning to extend your WiFi range outdoors.
Conclusion
Extending your wifi range to cover your outdoor space is crucial for seamless connectivity. With the implementation of the mentioned strategies, such as using a wifi extender or optimizing your router’s settings, you can effectively enhance your wifi signal strength outside.
This will enable you to enjoy uninterrupted internet access while relaxing in your backyard or engaging in outdoor activities.
0 comments