
To free up disk space on your MacBook, delete unnecessary files and applications. Clear the cache and empty trash regularly.
Clearing up disk space on your MacBook is essential for optimal performance and storage management. By removing unused applications, temporary files, and emptying the trash, you can create more space for new data and programs. Additionally, organizing your files into folders and utilizing cloud storage solutions can help in decluttering your device.
Regularly checking and clearing the cache also aids in maximizing your MacBook’s storage capacity. Implementing these practices will not only free up disk space but also enhance the overall efficiency of your MacBook.
Check Disk Usage
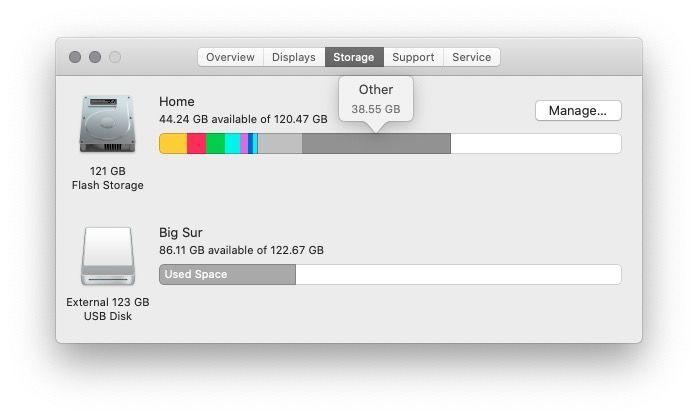
When it comes to optimizing your Macbook’s storage, checking disk usage is the first step in identifying areas where you can free up space. By evaluating the storage usage, you can gain insights into which files and applications are consuming the most space on your device. Here’s how you can efficiently check disk usage on your Macbook.
Use Storage Management
To begin, utilize the built-in Storage Management tool on your Macbook. This feature provides a comprehensive overview of your disk usage, including specific details about the largest files, space-hogging applications, and recommendations for optimizing storage. Access Storage Management by following these steps:
- Click on the Apple logo in the top-left corner of your screen.
- Select “About This Mac.”
- Click on the “Storage” tab and then “Manage.”
Check Individual Folders
Alternatively, you can manually check individual folders to identify files and applications that may be consuming excessive space. Follow these steps:
- Open a new Finder window and navigate to the “Applications” folder.
- Review the contents of each subfolder within “Applications” to identify large applications or unnecessary ones that can be removed.
- Repeat the process for other key folders such as “Documents,” “Downloads,” and “Desktop.”
In conclusion, regularly monitoring your Macbook’s disk usage is vital for maintaining optimal performance and ensuring that you have sufficient storage space for essential tasks.
Credit: colab.research.google.com
Clean Up System Junk
When it comes to free up disk space on your Macbook, cleaning up system junk is essential. This includes removing unnecessary files that take up valuable storage.
Empty Trash
- Delete files permanently by emptying the trash on your Macbook.
Remove Temporary Files
- Locate and delete temporary files stored in various locations on your Macbook.
Delete Unnecessary Applications
To free up disk space on your MacBook, one effective method is to delete unnecessary applications that are taking up valuable storage. Uninstall Unused Apps and Remove Language Files can significantly help in this process.
Uninstall Unused Apps
- Go to the Applications folder in Finder.
- Look for apps you no longer use.
- Click and drag the app to the Trash bin.
- Remember to empty the Trash to completely remove the app.
Remove Language Files
- Use a third-party app like Monolingual to remove unnecessary language files.
- These files can be for languages you don’t need.
- This process can free up significant disk space.
Optimize Storage Settings
When it comes to keeping your MacBook running smoothly, optimizing your storage settings is key. By leveraging the built-in features of macOS, you can efficiently manage your disk space, ensuring your device performs at its best. One of the most effective ways to achieve this is by utilizing the Optimize Storage settings. Let’s dive into how you can free up disk space on your MacBook by optimizing your storage settings.
Enable Optimized Storage
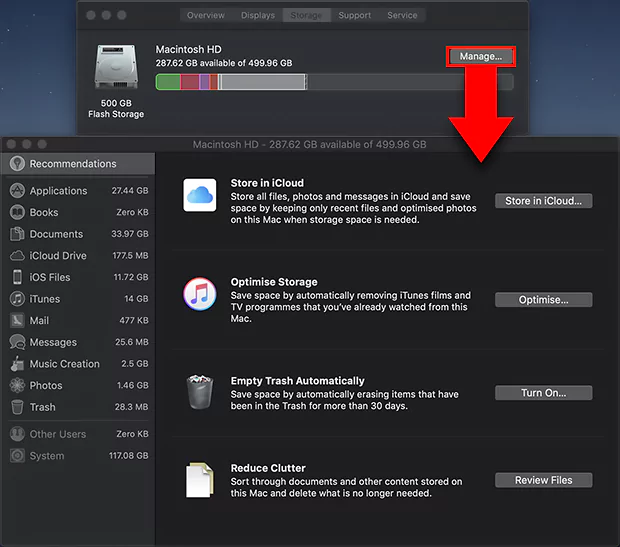
To begin, enable optimized storage on your MacBook. This feature automatically frees up space by storing infrequently used items in iCloud while retaining easy access to them. Here’s how to activate this setting:
- Go to the Apple menu and select “About This Mac.”
- Click on the “Storage” tab, then select “Manage.”
- Choose “Optimize Storage” to enable this feature. Your MacBook will start automatically storing older documents and files in iCloud while keeping recent items on your local storage.
Store In Icloud
By choosing to store in iCloud, you can maximize your MacBook’s storage capacity and keep it clutter-free. When you store files in iCloud, your device will efficiently manage available space. Follow these steps to store files in iCloud:
- Access the Apple menu and select “System Preferences.”
- Click on iCloud, then choose “Options” next to iCloud Drive.
- Select “Optimize Mac Storage” to allow your MacBook to store files in iCloud and only keep recent ones locally.
Optimizing storage settings not only helps you free up valuable disk space on your MacBook but also ensures a seamless computing experience. By storing infrequently used items in iCloud and activating the optimized storage feature, you can keep your device running efficiently without worrying about running out of space.
Manage Downloads
Managing your downloads is an essential step in freeing up disk space on your Macbook. Cluttered download folders can quickly eat up valuable storage space, hindering your device’s performance. By clearing Safari downloads and deleting unwanted files, you can reclaim that precious disk space and optimize your Macbook’s efficiency. In this article, we’ll guide you through these simple yet effective methods.
Clear Safari Downloads
Clearing your Safari downloads is an excellent place to start when it comes to managing your downloads and freeing up disk space on your Macbook. Over time, the Downloads folder can become a repository of forgotten and unnecessary files that take up valuable storage. To clear Safari downloads:
- Launch Safari and click on the “Window” menu in the menu bar.
- Select “Downloads” from the drop-down list to open the Downloads window.
- In the Downloads window, locate the files you want to remove.
- Click on the file to select it.
- Press the “Delete” key or right-click on the file and select “Move to Trash” from the context menu.
- Repeat these steps for each file you want to delete.
- Empty the Trash to permanently delete the files and instantly free up disk space.
Delete Unwanted Files
Deleting unwanted files is another practical method to reclaim disk space on your Macbook. These files could be duplicates, old documents, or large files that you no longer need. Follow these steps to delete unwanted files:
- Open a new Finder window by clicking on the Finder icon in the Dock.
- Click on the “Go” menu in the menu bar and select “Home” to go to your Home folder.
- In your Home folder, navigate to the directories that might contain unwanted files, such as Documents, Downloads, Desktop, and Pictures.
- Search for files that you no longer need by scanning through each directory.
- Once you find an unwanted file, click on it to select it.
- Press the “Delete” key or right-click on the file and select “Move to Trash” from the context menu.
- Repeat these steps for each unwanted file you wish to delete.
- Finally, empty the Trash to permanently remove the files from your disk and create more space.
By managing your downloads and deleting unwanted files, you can ensure that your Macbook has sufficient disk space for smooth performance and efficient storage usage. Following these simple steps at regular intervals will go a long way in maintaining your device’s optimal functionality.

Credit: www.freecodecamp.org
Move Files To External Storage
To free up disk space on your Macbook, consider moving files to an external storage device. This simple step can help declutter your system, making it run more efficiently and effectively. Simply connect the external storage, transfer files, and enjoy a faster, more organized device.
Copy Files To External Drive
One effective way to free up disk space on your Macbook is by moving files to an external drive. This method allows you to store large files or folders that you don’t frequently access, such as videos, photos, or documents, on an external storage device, freeing up valuable space on your computer’s internal hard drive. By following a few simple steps, you can quickly transfer your files to an external drive and create more room for your essential files and applications.
Move Files To Cloud
Another option to consider when freeing up disk space on your Macbook is moving files to the cloud. Cloud storage services provide a convenient and secure way to store your files on remote servers accessible from any device with an internet connection. By uploading your files to services like Google Drive, Dropbox, or iCloud, you can access them whenever you need them while still freeing up space on your Macbook’s hard drive. Additionally, most cloud storage providers offer automatic syncing and backup features, ensuring your files are safe and easily retrievable.
To copy files to an external drive, follow these steps:
- Connect your external drive to your Macbook using a USB cable or other compatible connection method.
- Open a Finder window by clicking on the Finder icon in your dock or by selecting “File” and then “New Finder Window” from the menu bar.
- Locate the files or folders you want to move to the external drive. You can either select individual files by holding the Command key while clicking on each file, or you can choose multiple files or folders by clicking and dragging a selection box around them.
- With the files or folders selected, right-click on one of them and choose “Copy” from the context menu. Alternatively, you can press the Command+C keys on your keyboard to copy the selected files.
- In the Finder window, navigate to the external drive. It should appear in the sidebar under the “Devices” section. Click on the external drive to open it.
- Right-click inside the external drive’s window and choose “Paste” from the context menu. Alternatively, you can press the Command+V keys on your keyboard to paste the copied files to the external drive.
- Wait for the files to finish copying. This may take some time, depending on the size and number of files being transferred.
- Once the copying process is complete, you can safely eject the external drive by right-clicking on its icon and selecting “Eject” from the context menu. You can also use the Eject button next to the drive’s name in the Finder sidebar.
- Disconnect the external drive from your Macbook.
To move files to the cloud, follow these steps:
- Sign in to your preferred cloud storage service, such as Google Drive, Dropbox, or iCloud, using your account credentials. If you don’t have an account, you may need to create one.
- Find the upload button or option within the chosen cloud storage service. This is typically represented by an icon that looks like a cloud with an arrow pointing upward.
- Click on the upload button and select the files or folders you want to move to the cloud. You can choose individual files by holding the Command key while clicking on each file, or you can select multiple files or folders by clicking and dragging a selection box around them.
- Once you have selected the files or folders, click on the “Upload” or “Open” button to begin the upload process. The time it takes to upload will depend on the size and number of files being transferred, as well as your internet connection speed.
- Once the upload process is complete, your files will be accessible via the cloud storage service’s website or app on any device with internet access.
Delete Duplicate Files
If your MacBook is running low on disk space, one effective way to free up space is to delete duplicate files. Duplicate files take up unnecessary space and clutter your system. This can hinder performance and slow down your device. By removing duplicate files, you can optimize your disk space and improve the overall functionality of your MacBook.
Use Duplicate File Finder
If you want to efficiently identify and delete duplicate files, using a duplicate file finder tool is a great option. These tools are specifically designed to scan your system for duplicate files and assist in eliminating them. One popular tool for Mac is the “Duplicate File Finder” app, which can quickly locate and remove duplicate files, freeing up valuable disk space.
Manually Remove Duplicates
Manually removing duplicates is another way to free up disk space on your MacBook. This method involves manually searching for duplicate files and deleting them. While it may take more time and effort, it can be an effective way to thoroughly review and manage your files. Begin by organizing your files and then manually compare and delete duplicate items to reclaim valuable disk space on your MacBook.
Credit: osxdaily.com
Clean Up Desktop And Downloads
To free up disk space on your MacBook, a key area to address is cleaning up your Desktop and Downloads.
Organize Desktop Files
Redirect scattered files to organized folders to declutter your Desktop.
- Group similar files together.
- Label folders clearly for easy identification.
- Regularly review and delete unnecessary files.
Remove Unused Downloads
Clear out your Downloads folder to free up valuable disk space.
- Delete files you no longer need.
- Move important files to appropriate folders.
- Regularly empty the Downloads folder.
Monitor Disk Usage Regularly
Monitor Disk Usage Regularly:
Regularly monitoring your MacBook’s disk usage is crucial in maintaining optimal performance and preventing system slowdowns.
Use Third-party Tools:
Third-party tools like Disk Inventory X or GrandPerspective can help you visually identify and remove large files taking up unnecessary space.
Set Up Notifications:
Configure notifications on your Mac to alert you when your disk space reaches a critical level, ensuring you can take action promptly.
Frequently Asked Questions Of How To Free Up Disk Space Macbook
How Can I Free Up Disk Space On My Macbook?
To free up disk space on your Macbook, you can start by deleting unnecessary files and applications. You can also clear your browser cache, empty the trash regularly, and use the built-in storage manager to optimize storage. Additionally, consider using an external hard drive or cloud storage to offload infrequently used files.
What Is The Best Way To Remove Duplicate Files On A Macbook?
To remove duplicate files on your Macbook, you can use specialized software such as Gemini or Cisdem Duplicate Finder. These tools scan your system for duplicate files and allow you to review and delete them safely. Remember to review the duplicate files before deleting to avoid accidental removal of important data.
Why Is My Macbook Running Out Of Storage Space?
There are several reasons why your Macbook may be running out of storage space. Some common causes include the accumulation of unnecessary files, large media files taking up space, and the installation of too many applications. Regularly cleaning out your system and managing your storage can help prevent this issue.
How Can I Optimize Storage On My Macbook?
To optimize storage on your Macbook, you can enable the built-in storage management feature. This allows you to automatically remove downloaded files and clear the trash after 30 days. You can also store your files in iCloud Drive, optimize storage for photos, and choose to automatically remove watched TV shows and movies to free up space.
Conclusion
Managing your Macbook’s disk space is essential for smooth functioning. By following the tips and techniques mentioned you can effectively free up valuable disk space. Regular maintenance and utilizing the built-in tools can help optimize storage and enhance the performance of your Macbook.
0 comments