
To install Windows on a new SSD, create a bootable USB drive and install Windows via the installation wizard. When upgrading or replacing your system’s SSD, ensuring a smooth installation process is crucial for optimal performance.
Windows installation on a new SSD involves a few key steps that should be carried out meticulously. By following the proper procedures, you can avoid potential issues and improve the overall efficiency of your system. This guide will provide you with clear instructions on how to successfully install Windows on your new SSD, enhancing the speed and performance of your computer.
Let’s delve into the essential steps to set up Windows on your newly acquired SSD seamlessly.
Preparing For Installation
Get ready to install Windows on a new SSD by first preparing the necessary tools and resources. Ensure that you have a valid Windows license and a bootable USB drive with the installation files. Back up any important data from your old hard drive, as the installation process will erase all existing data.
It’s also recommended to update your system BIOS and configure the SSD settings for optimal performance and longevity.
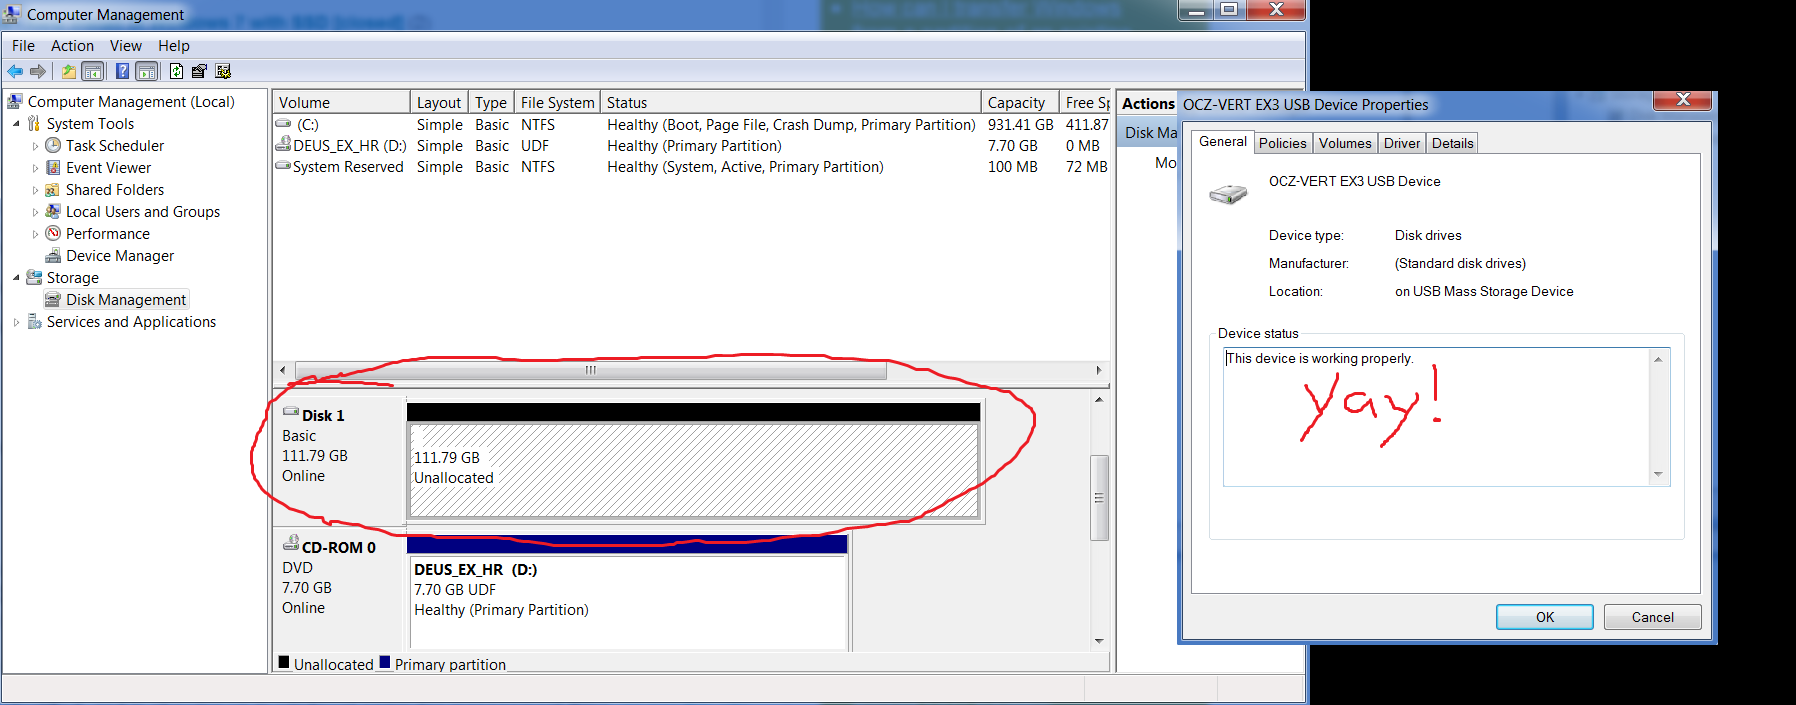
Preparing for Installation Before installing Windows on a new SSD, it’s crucial to adequately prepare for the process. This involves checking system requirements and gathering the necessary tools and files to ensure a seamless installation experience. Checking System Requirements It’s essential to verify that your system meets the minimum requirements for installing Windows on the new SSD. Ensure that your computer meets the necessary hardware specifications, such as processor speed, RAM, and available disk space. You can easily check the system requirements on the official Microsoft website. Gathering Necessary Tools and Files To proceed with the installation, gather all the required tools and files. You will need a USB drive with at least 8 GB of storage capacity to create a bootable media for installing Windows. Additionally, make sure to have the product key for your copy of Windows and download the media creation tool from the Microsoft website. This tool will help you create a bootable USB drive for the installation process. With the system requirements verified and all the necessary tools and files at hand, you’re now ready to proceed with the installation of Windows on your new SSD.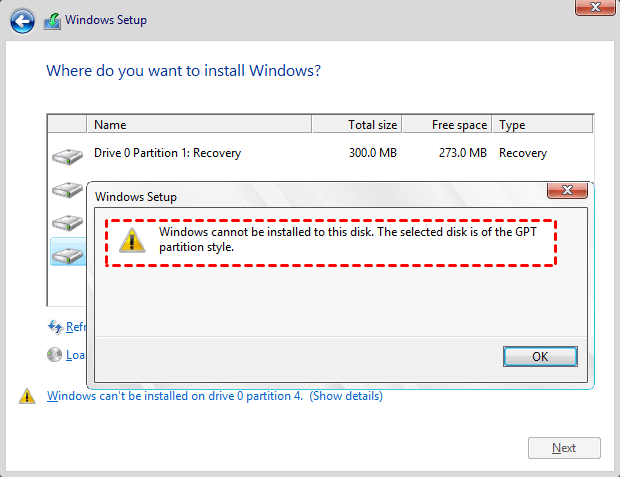
Credit: www.ubackup.com
Creating Windows Installation Media
Easily install Windows on a new SSD by creating Windows installation media. Step-by-step instructions make the process straightforward and hassle-free. Get started with your new SSD in no time.
Creating Windows Installation Media involves Choosing a Windows version, Downloading the Windows ISO, and Creating a Bootable USB Drive.Choosing A Windows Version
To start, research and select a compatible Windows version for your system.Downloading The Windows Iso
Visit the official Microsoft website to download the Windows ISO file.Creating A Bootable Usb Drive
Insert a blank USB drive, download a USB creation tool, and follow the prompts to create a bootable drive.Backing Up Important Data
As you prepare to install Windows on a new SSD, it’s crucial to take the necessary step of backing up your important data to avoid any loss. Remember that during the installation process, data loss can occur, so it’s better to be safe than sorry.
Identifying And Backing Up Important Files
- Locate important files like documents, photos, and videos.
- Transfer them to an external hard drive or cloud storage.
Creating A System Image
- Access the Backup and Restore feature in Windows.
- Select “Create a system image” and follow the prompts.
Physically Installing The Ssd
When upgrading or custom-building a computer, installing the operating system on a new SSD can significantly improve system performance. Physically installing the SSD is the first step in this process.
Shutting Down And Opening The Computer Case
To begin, shut down the computer and disconnect all power sources. Then, open the computer case by removing the screws or latches on the side panel. Carefully slide the panel to ensure safe access to the internal components.
Locating And Preparing The Ssd Slot
Next, locate the SSD slot within the computer case. Consult the motherboard manual or the internet for specific guidance on the location of the slot. Once located, touch a metal part of the computer case to discharge any static electricity and prepare the SSD slot by removing any covers or mounting brackets.
Installing The Ssd
Now it’s time to install the SSD. Carefully align the connectors on the SSD with the slot in the computer case. Gently slide the SSD into place and secure it using the appropriate screws or fasteners. Ensure the SSD is firmly seated and level within the slot.
Enabling The Ssd In Bios
To enable the SSD in the BIOS and install Windows on a new SSD, follow these steps to ensure a smooth process. Access the BIOS settings, navigate to the storage section, and locate the SSD. Enable it as the primary boot device and save the changes.
Finally, proceed to installing Windows on the new SSD.
Restarting The Computer And Accessing Bios
To enable the SSD in the BIOS, you’ll first need to restart your computer and access the BIOS settings. This can be done in a few simple steps:- Begin by saving any open files on your computer and shutting it down.
- Once the computer is turned off, press the power button to switch it back on.
- As soon as you see the manufacturer’s logo appear on the screen, quickly press the designated key to access the BIOS. Most commonly, this key is Del, F2, or F10, but it can vary depending on your computer’s manufacturer.
- If you’re unsure which key to press, refer to your computer’s manual or perform a quick online search using your computer’s make and model.
Navigating To The Storage Or Boot Options
Once you’ve successfully accessed the BIOS, it’s time to navigate to the Storage or Boot Options menu. Follow these steps:- Look for a tab or menu labeled Storage, Boot, or Boot Options within the BIOS interface.
- Use the arrow keys on your keyboard to navigate through the available options.
- Some BIOS interfaces may require you to highlight the desired tab and press Enter to access its sub-menu.
- If you’re unable to locate the Storage or Boot Options menu, refer to your computer’s manual or manufacturer’s website for specific instructions.
Enabling The Ssd
After accessing the appropriate menu in the BIOS settings, it’s time to enable the SSD.- Find the option related to your SSD within the Storage or Boot Options menu.
- It may be labeled as SATA Configuration, Storage Configuration, or similar.
- Highlight the SSD option and press Enter.
- Within the SSD settings, look for an option to enable it. It might be called Enabled or AHCI (Advanced Host Controller Interface).
- Select the option to enable the SSD and save the changes made to the BIOS settings. This is typically done by pressing the F10 key, followed by Enter to confirm.
- Your computer will now restart with the SSD enabled and ready for Windows installation.
Installing Windows On The Ssd
Congratulations on your brand new SSD! Installing Windows on it is a crucial step to enjoy a faster and more efficient computing experience. In this guide, you’ll learn how to install Windows on your new SSD, ensuring a smooth and successful installation process. Let’s get started!
Inserting The Installation Media
Before you can install Windows on your SSD, you need to insert the installation media, such as a USB flash drive or DVD, into your computer. Make sure the installation media is bootable and contains the necessary Windows setup files. To insert the installation media, follow these steps:
- Locate the USB port or DVD drive on your computer.
- Insert the USB flash drive or DVD into the appropriate slot.
Booting From The Installation Media
Once the installation media is inserted, you need to boot your computer from it. This will allow you to access the Windows setup wizard and begin the installation process. To boot from the installation media, follow these steps:
- Restart your computer.
- During the startup process, look for a message that prompts you to press a key to enter the boot menu.
- Press the designated key to access the boot menu.
- In the boot menu, select the installation media as the boot device.
- Save the changes and exit the boot menu.
Following The Windows Setup Wizard
With your computer now booting from the installation media, you’re ready to follow the Windows Setup Wizard. This wizard will guide you through the installation process and allow you to configure various settings. To install Windows on your SSD, proceed with the following steps:
- Select your preferred language, time and currency format, and keyboard layout.
- Click “Next” to begin the installation process.
- Read and accept the license terms.
- Choose the installation type. Generally, selecting the “Custom” option is recommended for a fresh installation on a new SSD.
- Select your SSD as the installation location.
- Click “Next” to start the installation.
- Wait for the installation process to complete. Your computer may restart multiple times.
- Follow any additional prompts or instructions provided by the Windows Setup Wizard.
- Once the installation is finished, your computer will boot into Windows on your new SSD!
By following these steps, you’ll successfully install Windows on your new SSD. Enjoy the improved performance and speed that your SSD brings to your computing experience!
Configuring Windows Settings
Once you have successfully completed the installation of Windows on your new SSD, it’s time to configure the settings to personalize and optimize your user experience. Below are the essential steps to follow for configuring Windows settings.
Setting Up User Accounts
When you first start Windows, you’ll be prompted to create a user account. This enables you to personalize your experience and keep your files and settings separate from others who might use the computer. The user account also allows you to customize your desktop and manage your settings.
Choosing Language, Time, And Region
Selecting the right language, time, and region settings is crucial as it ensures that your Windows interface and system settings are aligned with your preferences. This step can also impact how certain applications function and display information.
Customizing Privacy And Security Settings
It’s important to customize privacy and security settings to ensure your data and personal information are protected. You can customize settings related to Windows updates, firewall, antivirus, and user account control to optimize the security of your system.

Credit: www.ubackup.com
Updating Drivers And Software
When setting up Windows on a new SSD, it is crucial to ensure that all your hardware drivers and essential software are up to date for optimal performance. Below, we will guide you through the necessary steps to check for hardware driver updates and install software updates.
Checking For Hardware Driver Updates
To begin, you must check and update your hardware drivers to avoid compatibility issues. Follow these simple steps:
- Access Device Manager by right-clicking on the Start menu and selecting it.
- Look for any devices with a yellow exclamation mark, indicating outdated drivers.
- Right-click on the device and choose ‘Update driver’ to search for the latest driver software online.
- Alternatively, visit the manufacturer’s website to download and install the most recent drivers.
Installing Software And Updates
In addition to hardware drivers, keeping your software updated is equally important to maintain system stability and security. Follow these steps:
- Access the Windows Settings by clicking on the Start menu and selecting the gear icon.
- Navigate to ‘Update & Security’ and click on ‘Check for updates’ to install the latest Windows updates.
- For third-party software, open each application and check for updates within the settings menu.
- Consider installing a reputable software updater tool to streamline the process and ensure all software is up to date.
Transferring Data To The Ssd
To install Windows on a new SSD, start by connecting the SSD to your computer and then transferring the data from the old hard drive using a data migration tool or by reinstalling Windows from scratch. This process ensures that your operating system and all your data are now stored on the faster SSD, improving overall system performance.
Transferring Data to the SSD Transferring data to the SSD is a crucial step after installing Windows on a new SSD. Properly moving your files, folders, programs, and games ensures a seamless transition to your faster storage device. Moving Files and Folders To move files and folders to your SSD, simply drag and drop them from your old storage drive to the new SSD. Migrating Programs and Games When migrating programs and games to your SSD, consider using specialized software like a disk cloning tool for a smooth transfer. Using a combination of manual file movement and dedicated migration tools will help you efficiently transfer your data to the new SSD.
Credit: www.youtube.com
Frequently Asked Questions Of How To Install Windows On A New Ssd
How Do I Install Windows Operating System On A New Ssd?
To install Windows on a new SSD, you’ll need a Windows installation disk or USB drive. Connect the SSD and boot from the installation media. Follow the prompts to install Windows on the new SSD, ensuring that you select the SSD as the destination drive for the installation.
Can I Install Windows On Ssd Without Losing Data?
Yes, it is possible to install Windows on an SSD without losing data. However, it is highly recommended to back up your data before proceeding with the installation process. You can either create a disk image or transfer your important files to an external storage device to ensure they are safely preserved.
What Are The Advantages Of Installing Windows On An Ssd?
Installing Windows on an SSD can significantly improve your computer’s performance. SSDs offer faster boot times, quicker program launches, and faster file transfers compared to traditional mechanical hard drives. Additionally, SSDs have no moving parts, making them more durable and less prone to physical damage.
Conclusion
To sum up, installing Windows on a new SSD is a straightforward process that offers improved speed and performance for your computer. By following the steps outlined in this guide, you can enjoy the benefits of a faster, more efficient system.
Keep in mind the importance of backing up your data before beginning the installation process. With these tips in mind, you’ll be well on your way to a smoother, more responsive computing experience.
0 comments