
To mount a projector to the ceiling, locate the ceiling studs using a stud finder. Next, use a projector ceiling mount kit to securely attach the projector to the ceiling.
This ensures the projector is safely and securely mounted overhead for optimal viewing. Enhance your home theater experience with a professionally installed projector that frees up space in the room and provides a clean, clutter-free setup. Installing a projector to the ceiling not only creates a sleek and modern entertainment area but also allows for adjustable angles and positions for versatile viewing options.
With the proper tools and guidance, mounting a projector to the ceiling can be a straightforward and rewarding task.

Credit: www.wikihow.com
Choosing The Right Location
Consider The Room Layout
Before mounting your projector to the ceiling, carefully evaluate the layout of the room. Take note of any obstacles that may obstruct the projector’s light, such as ceiling fans, light fixtures, or HVAC vents. Ensure that the location you choose allows for a clear line of sight from the projector to the screen without any hindrances.
Identify The Ideal Position
Once you have assessed the room layout, identify the ideal position for the projector. This position should provide optimal viewing angles for all individuals in the room. Consider factors such as the distance from the screen, the projector’s throw distance, and the angle of projection to ensure a crisp, clear image.

Credit: gosforthhandyman.com
Preparing The Ceiling
When mounting a projector to the ceiling, the first step is to prepare the ceiling. Start by finding the ideal location and determining the proper distance and angle for the projector. Use a stud finder to locate the ceiling joists and mark the mounting holes.
Then, carefully secure the mounting bracket to the ceiling to ensure stability for the projector installation.
Locating Ceiling Joists
Cleaning The Mounting Area
“` Introductory paragraph: “`htmlBefore mounting a projector to the ceiling, it’s crucial to prepare the ceiling properly. This involves ensuring the ceiling is strong enough to support the weight, locating joists for secure installation, and cleaning the mounting area for a stable setup.
“` Checking Ceiling Strength: “`htmlChecking Ceiling Strength: Take necessary steps to verify the ceiling’s ability to support the projector.
“` Locating Ceiling Joists: “`htmlLocating Ceiling Joists: Identify the joists to provide a solid anchor point for the projector mount.
“` Cleaning the Mounting Area: “`htmlCleaning the Mounting Area: Ensure the ceiling surface is clean to promote proper adhesion and stability of the projector mount.
“`Gathering The Necessary Tools And Equipment
When it comes to mounting a projector to the ceiling, the first step is gathering the necessary tools and equipment. This ensures a smooth installation process with no interruptions. Proper preparation is key to successful projector mounting. Below, we outline the required tools and essential equipment you’ll need for this task.
Required Tools
Making sure you have the right tools is crucial for a successful projector ceiling mount. The following tools are essential:
- Electric drill
- Level
- Screwdriver
- Tape measure
- Pencil
Essential Equipment
Aside from tools, having the necessary equipment is equally important. Here’s what you’ll need:
- Projector ceiling mount kit
- Ladder or step stool
- Ceiling anchors
- Cable management system
- HDMI cable
Installing The Mounting Plate
When it comes to installing a projector on the ceiling, one of the crucial steps is to properly mount the mounting plate. The mounting plate serves as the anchor for the projector, ensuring it is securely attached to the ceiling. In this guide, we will go through the process of installing the mounting plate, from measuring and marking the mounting points to securing the plate in place.
Measuring And Marking The Mounting Points
Before you begin the installation, make sure to identify the ideal location for mounting the projector. Use a measuring tape to determine the exact placement of the mounting plate on the ceiling. Mark the mounting points with a pencil, ensuring they align with the projector’s throw distance and the desired screen size.
Verify the alignment several times to ensure accuracy before proceeding to the next step. It’s important to use a level to ensure the mounting points are perfectly aligned. This step is crucial in preventing any misalignment issues when installing the mounting plate.
Securing The Mounting Plate
Once the mounting points are accurately marked, it’s time to secure the mounting plate onto the ceiling. Use a power drill to create pilot holes at the marked points to accommodate the screws. Ensure the pilot holes are of the appropriate size, matching the screws provided with the mounting plate.
Inser the screws into the pilot holes and secure the mounting plate firmly in place. Tighten the screws to ensure the mounting plate is securely attached to the ceiling. Ensure that the plate is level and parallel to the ground to avoid any issues during the projector installation.
Attaching The Projector Mount
Learn how to easily and securely mount a projector to the ceiling with these simple steps. Attaching the projector mount is a straightforward process that allows you to optimize your viewing experience. Follow these guidelines to ensure a successful installation.
Once you have selected the perfect location for your projector, it’s time to attach the projector mount to the ceiling. Attaching the mount correctly is crucial to ensure stability and proper positioning of your projector for an optimal viewing experience. Follow these steps to securely attach the projector mount:
Connecting The Mount To The Mounting Plate
To begin, locate the mounting plate that came with your projector mount. This plate will serve as the connection point between the mount and the ceiling. Place the mounting plate on the ceiling in the desired location and mark the positions of the mounting holes using a pencil or marker.
Next, use a drill to create pilot holes at the marked positions. Make sure the pilot holes are the appropriate size for the screws that came with your mount. This will help prevent any damage to the ceiling during installation.
Once the pilot holes are ready, align the mounting plate with the holes and insert the screws through the plate into the ceiling. Tighten the screws using a screwdriver or drill, ensuring that the plate is securely fastened.
Adjusting The Mounting Arms And Tilt Angle
Now that the mounting plate is in place, it’s time to attach the projector mount. Carefully align the mounting arms of the projector mount with the corresponding slots on the mounting plate. Insert the arms into the slots and tighten the screws or knobs to secure them in place.
Once the mount is securely attached to the plate, adjust the tilt angle of the mount to ensure the projected image is properly aligned. Most projector mounts offer tilt adjustment capabilities to accommodate different viewing angles. Use the provided adjustment mechanisms to tilt the mount up or down until the projected image is level.
It’s important to double-check the mount’s stability and ensure it is securely fastened to both the ceiling and the projector. Make any necessary adjustments to the mounting arms and tilt angle until you are satisfied with the positioning of the projector.
Remember to refer to your projector’s manual for specific instructions on attaching the mount and adjusting the tilt angle. This will help ensure a precise and secure installation, allowing you to enjoy your projector’s display to the fullest.
Running Cables And Wires
Mounting a projector to the ceiling? Learn how to run cables and wires seamlessly with our step-by-step guide. Ensure a professional installation without the hassle.
Determining Cable Length
To begin running cables and wires for your ceiling-mounted projector, the first step is to determine the required cable length. Measure the distance between the projector and the input source, keeping in mind any obstacles or corners that may require extra length. Ensure you account for the height of the ceiling, as cables will need to be concealed within the wall or ceiling. It’s better to purchase cables slightly longer than measured, as it allows for flexibility during installation.Hiding And Managing Cables
Once you have determined the cable length, it is important to conceal and manage the cables effectively. Untidy wires not only look unappealing but can also pose a safety hazard. To hide the cables, consider utilizing cable raceways or conduit. These options allow for a clean and professional appearance, while also ensuring cables are protected and organized. Another option is to route the cables through the ceiling or wall, allowing them to be completely hidden from view. This method provides a seamless aesthetic and eliminates any tripping hazards.Organizing Cables
To further enhance cable management, organizing the cables prior to installation is crucial. Start by separating the different types of cables, such as power cords, HDMI or VGA cables, and audio cables. Utilize zip ties or cable clips to keep each type of cable neatly bundled together and prevent tangling. Additionally, label each cable to easily identify its purpose, which can save time when troubleshooting or making adjustments in the future.Considerations For In-wall Wiring
If you decide to route the cables through the wall, it is essential to take certain factors into consideration. Firstly, ensure you comply with building codes and regulations regarding in-wall wiring. Consult a professional electrician if needed. Secondly, plan the cable route carefully to avoid interference with existing electrical wires or plumbing. Lastly, use wall plates to provide a professional finish and make cable connection points easily accessible in case of future changes or upgrades.Securing Cables
To prevent cables from becoming loose or accidentally disconnecting, secure them properly. Use cable clips or adhesive-backed hooks to attach the cables to the ceiling or wall. This will keep them in place and prevent any accidental damage during day-to-day use. Ensure the cables have enough slack to accommodate any potential adjustments or movements of the projector. By following these steps and techniques, you can successfully run and manage cables for your ceiling-mounted projector. This will not only provide a neat and organized installation but also ensure a seamless and uninterrupted viewing experience for your presentations, movies, or gaming sessions.Mounting The Projector
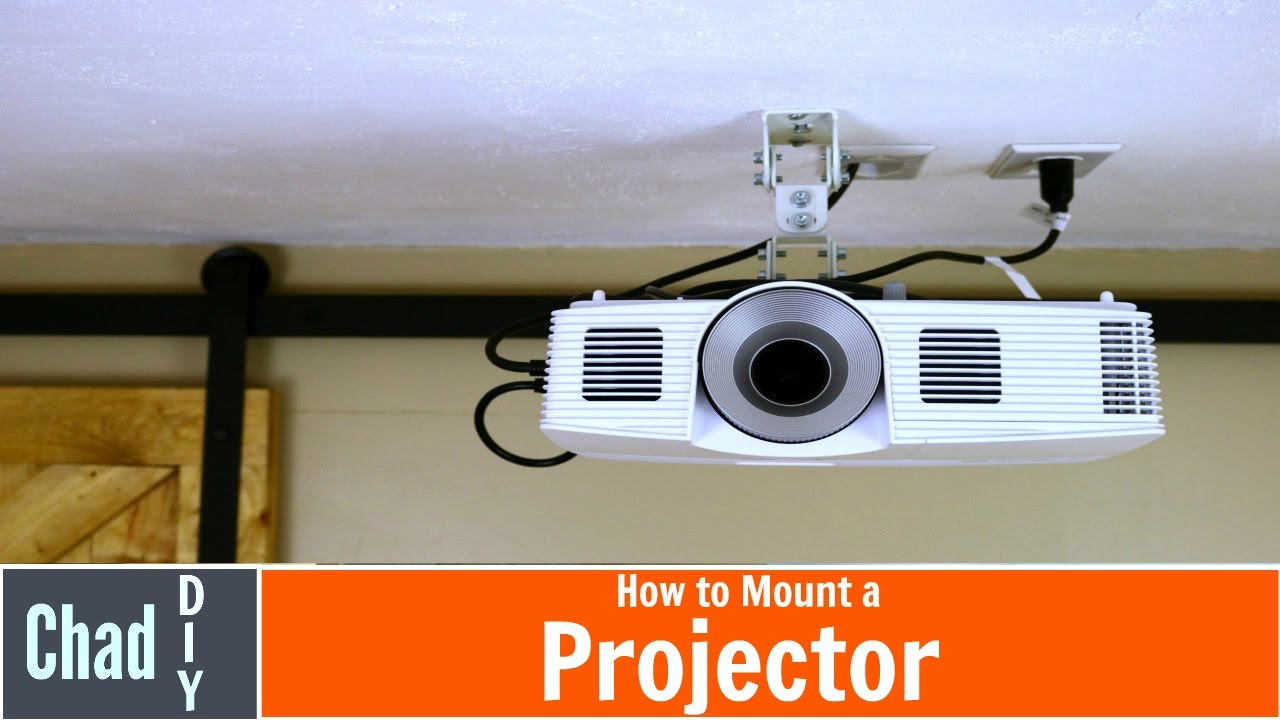
Mounting a projector to the ceiling is a great way to create a professional and space-saving setup for your home theater or office. Properly mounting the projector ensures a clear and stable image projection. In this section, we will walk through the steps to attach the projector to the mount and verify its stability.
Attaching The Projector To The Mount
When attaching the projector to the mount, it is essential to carefully follow the manufacturer’s instructions for your specific projector model. Begin by securing the universal mounting plate to the bottom of the projector using the provided screws. Ensure the plate is securely fastened to the projector, as this will support the weight of the unit.
Next, align the mounting arms of the ceiling mount with the mounting plate on the projector. Gently slide the projector onto the ceiling mount, ensuring that it is securely in place. Double-check the alignment and tighten any screws as necessary to prevent the projector from shifting.
Verifying The Stability
After attaching the projector to the mount, it is crucial to verify the stability of the setup. Check that all screws and connections are properly tightened to prevent any potential movement of the projector once it is mounted. Additionally, use a level to ensure that the projector is perfectly aligned and not angled, which can impact image quality.
Test the stability of the mounted projector by gently shaking the mount to evaluate if there is any movement. If there is any instability, recheck the connections and make necessary adjustments to secure the projector in place. It is essential to verify the stability before proceeding with the setup.
Adjusting And Aligning The Projector
Whether it’s for a home theater or a presentation room, proper alignment of your projector is key to getting the best image quality. Let’s dive into the essential steps for adjusting and aligning your projector to the ceiling.
Setting The Projection Distance And Angle
Start by determining the optimal projection distance and angle for your setup. Use a measuring tape to find the right distance from the projector to the screen.
- Measure from the center of the projector lens to the screen for accurate positioning.
- Adjust the projector’s tilt angle to ensure the image is projected squarely onto the screen.
Aligning The Image
To achieve a perfectly aligned image, follow these steps:
- Access the projector’s menu settings to fine-tune the image alignment by adjusting horizontal and vertical keystone corrections.
- Use the projector’s lens shift feature, if available, to adjust the image horizontally or vertically without distorting the image quality.
Calibrating Color And Brightness
Ensure the color and brightness settings are optimized for the viewing environment:
- Adjust the projector’s color temperature to achieve natural-looking colors.
- Fine-tune the brightness and contrast settings to suit the ambient light conditions in the room.
Testing And Final Touches
Once the projector is securely mounted to the ceiling, it’s time for testing and final touches. Adjust the settings and ensure the projector is aligned, focused, and displaying properly. Take this opportunity to tidy up any excess cables and ensure the remote control is programmed for easy access.
Powering On And Testing The Projector
Before proceeding, ensure all connections are secure. Power on the projector and allow it to warm up for a few minutes.
Turn on the projector using the remote control or the power button located on the device.
Select the appropriate input source on the projector to match the connected device, such as HDMI or VGA.
Final Adjustments And Cable Management
Adjust the projector angle and position to ensure the image is accurately centered and focused.
Use the projector’s keystone adjustment feature if the image appears distorted or skewed.
Organize and secure cables using cable ties or conduits to prevent tripping hazards and maintain a tidy installation.

Credit: www.amazon.com
Frequently Asked Questions Of How To Mount Projector To Ceiling
How Do I Mount A Projector To The Ceiling?
To mount a projector to the ceiling, first, locate the projector’s mounting holes. Then, use a ceiling mount kit to attach the projector securely. Ensure the projector is aligned properly and the cables are safely connected for optimal projection.
What Are The Benefits Of Mounting A Projector To The Ceiling?
Mounting a projector to the ceiling saves valuable space and eliminates the need for furniture or stands. It also provides an unobstructed view for all viewers, ensures the projector is at the correct height for optimal image quality, and reduces the risk of accidental damage or theft.
Can I Install A Projector Mount Myself?
Yes, you can install a projector mount yourself with the right tools and instructions. Ensure you have a ceiling mount kit compatible with your projector and follow the provided installation guidelines carefully. If you are unsure or uncomfortable with the installation process, it’s best to hire a professional.
Conclusion
Mounting a projector to the ceiling can elevate your home theater experience. With the right tools and techniques, it’s a straightforward process. Don’t be afraid to tackle this project – it’s worth the effort for an immersive viewing experience. Follow these tips, and you’ll be enjoying your new setup in no time.
0 comments