
To move files on a MacBook, simply drag and drop them to the desired location on your computer. This method allows for easy file transfer and organization.
Organizing and moving files on your MacBook is a simple yet essential task to keep your files in order and ensure easy access. By following this intuitive drag-and-drop method, you can efficiently manage your documents, photos, and other files. This process is user-friendly and can be done quickly without the need for additional software or complex steps.
Whether you are reorganizing your folders or transferring files between locations, this straightforward approach makes file management on your MacBook a breeze. Let’s explore the simple steps to move files seamlessly on your MacBook.
Preparing To Move Files
Before you start moving files on your Macbook, it’s important to ensure that you are well prepared. This involves checking available storage space and organizing your files and folders. This will help you to streamline the moving process and minimize the risk of losing important data.
Check Available Storage Space
One of the first steps in preparing to move files on your Macbook is to check the available storage space. Navigate to the Apple menu in the top left corner of your screen and select “About This Mac”. Then click on the “Storage” tab to view your Macbook’s available storage space. Ensure that you have enough storage to accommodate the files you intend to move. If your available space is limited, consider removing any unnecessary files or transferring them to an external storage device.
Organize Files And Folders
To facilitate a smooth file-moving process, take the time to organize your files and folders on your Macbook. Create specific folders for different file types such as documents, images, videos, and music. This will make it easier to locate and move files as needed. Remove any redundant or outdated files to declutter your system and make the file-moving process more efficient.

Credit: www.wikihow.com
Moving Files Within The Macbook
When it comes to organizing your files on your MacBook, it’s important to know how to move them efficiently. One key aspect is moving files within the MacBook itself.
Using The Finder To Move Files
You can easily move files within your MacBook using the Finder app. Simply locate the file you want to move, click on it, and then drag it to the destination folder within the Finder window.
Drag And Drop Method
The drag and drop method is a simple way to move files around on your MacBook. Select the file you want to move, click and hold it, then drag it to the desired location. Release the mouse to drop the file into the new folder.
Moving Files To External Storage
Moving files to external storage on your MacBook is a smart way to free up space and keep your important data secure. One way to achieve this is by connecting an external storage device.
Connecting An External Storage Device
To connect an external storage device to your MacBook, simply insert the USB or Thunderbolt cable into the corresponding port. Once connected, your MacBook will detect the external storage automatically.
Transferring Files Using Time Machine
Time Machine is a built-in feature on MacBooks that allows for easy file backups and transfers. To transfer files using Time Machine, connect your external storage device and follow the on-screen prompts to start the backup process.
Credit: osxdaily.com
Moving Files To Icloud
Learn how to effortlessly move files on your MacBook by utilizing the seamless syncing capabilities of iCloud. Easily transfer and access your important documents, pictures, and videos on the go.
Moving files to iCloud on your MacBook can provide a convenient way to back up and access your important documents, photos, and other files from anywhere. Setting up iCloud on your MacBook is a simple process that allows seamless integration with your Apple devices. Uploading files to iCloud Drive can help you free up space on your local storage and keep your files safe. Here’s how to get started.Setting Up Icloud On Your Macbook
To set up iCloud on your MacBook, start by clicking the Apple menu in the top-left corner of your screen and selecting “System Preferences.” Next, click on “Apple ID” and sign in with your Apple ID if you haven’t already. From there, select “iCloud” and choose the features you want to use, such as iCloud Drive, Photos, or iCloud Backup. Ensure that the “iCloud Drive” feature is enabled to begin using iCloud as a storage option on your MacBook.Uploading Files To Icloud Drive
Once iCloud is set up, you can easily upload files to iCloud Drive. Simply drag and drop the files you want to move into the iCloud Drive folder on your MacBook. Alternatively, you can use the “Upload” button within the iCloud Drive interface to select files from your local storage and add them to iCloud. Keep in mind that you can organize your files within iCloud Drive by creating folders to help you stay organized and easily locate your documents. In conclusion, leveraging iCloud on your MacBook is a powerful way to manage and access your files across multiple devices. By following these simple steps, you can seamlessly set up iCloud and begin uploading your files, creating a more efficient and flexible file management system for your MacBook.Moving Files To Another Macbook
When it comes to switching to a new Macbook, one of the most crucial tasks is transferring your files seamlessly. Fortunately, Apple offers various methods to help you move your files from one Macbook to another with ease. In this article, we will explore two efficient techniques: using AirDrop and transferring files via Ethernet or Thunderbolt cable.
Strongusing Airdrop To Transfer Files/strong
AirDrop is a built-in feature on Macbooks that allows you to wirelessly transfer files between devices. With just a few clicks, you can seamlessly move files from one Macbook to another without the need for any additional hardware.
Here’s how you can use AirDrop to transfer your files:
- Ensure that both Macbooks have AirDrop enabled. To do this, go to Finder and click on “AirDrop” in the sidebar. Make sure the visibility is set to “Everyone” or “Contacts Only,” depending on your preference.
- On the Macbook from which you want to transfer files (the source Macbook), open Finder and navigate to the files you wish to move.
- Select the files by holding down the “Command” key and clicking on each individual file or holding down the “Shift” key to select a range of files.
- Once the files are selected, right-click and choose the “Share” option from the dropdown menu.
- Select the destination Macbook from the AirDrop list that appears.
- On the destination Macbook, accept the file transfer by clicking “Accept” when prompted.
- The transferred files will now be available on your destination Macbook, accessible via Finder.
Strongtransferring Files Via Ethernet Or Thunderbolt Cable/strong
If you prefer a wired connection for transferring files or if AirDrop is not a suitable option for your situation, you can rely on the speed and stability of an Ethernet or Thunderbolt cable connection.
Follow these steps to transfer files using an Ethernet or Thunderbolt cable:
- Connect the Ethernet or Thunderbolt cable to both Macbooks.
- On the source Macbook, open Finder and navigate to the files you want to move.
- Select the files by holding down the “Command” key and clicking on each individual file or holding down the “Shift” key to select a range of files.
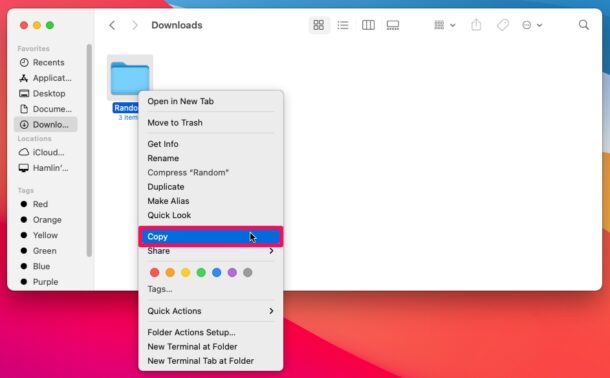
- Once the files are selected, right-click and choose the “Copy” option from the dropdown menu.
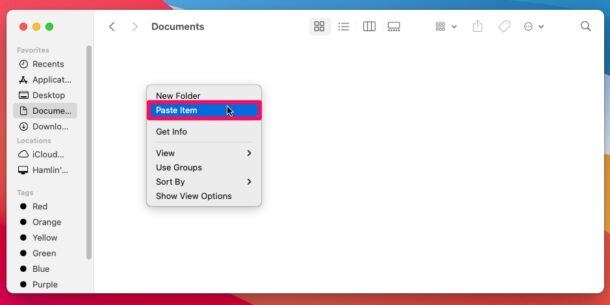
- On the destination Macbook, open Finder and navigate to the desired location where you want to transfer the files.
- Right-click and choose the “Paste” option from the dropdown menu to complete the transfer.
Remember to disconnect the Ethernet or Thunderbolt cable once the transfer is complete.
With these two methods at your disposal, you can effortlessly move your files and ensure a smooth transition to your new Macbook. Whether you prefer the convenience of AirDrop or the reliability of a wired connection, transferring files to another Macbook has never been easier.
Credit: setapp.com
Frequently Asked Questions On How To Move Files On Macbook
How Do I Move Files On My Macbook?
To move files on your Macbook, simply click and drag the file to the desired location. You can also right-click on the file, select “Cut,” go to the destination folder, and right-click and select “Paste” to move the file.
Can I Move Files Between Different Folders On My Macbook?
Yes, you can easily move files between different folders on your Macbook. Simply click and drag the file from its current location to the desired folder. You can also use the “Cut” and “Paste” options to move files between folders.
What Is The Keyboard Shortcut To Move Files On Macbook?
The keyboard shortcut to move files on a Macbook is “Command” + “C” to copy the file, then “Command” + “Option” + “V” to move the copied file to the desired destination. This shortcut saves you time compared to the traditional click and drag method.
Can I Undo A File Move On My Macbook?
Yes, if you accidentally moved a file on your Macbook, you can easily undo the action. Simply press “Command” + “Z” immediately after moving the file, and it will be restored to its previous location.
Conclusion
Moving files on your MacBook is a simple process that can be done in a few different ways, depending on your preference and needs. Whether you choose to use the Finder, drag and drop, or a third-party app, the key is to find a method that works for you and helps you stay organized.
With these options at your disposal, managing your files on your MacBook can be a seamless experience.
0 comments