

To open a private tab on your Macbook, open Safari, click File in the menu, and select New Private Tab. Ensure your browsing activity in this tab remains private.
When it comes to using Safari on your Macbook, navigating private tabs can be beneficial for protecting your privacy. Being aware of how to access this feature can enhance your browsing experience while safeguarding your sensitive data. Let’s explore a step-by-step guide on how to open a private tab on your Macbook, ensuring a secure and confidential online session.
By following these simple instructions, you can browse the web without leaving any trail of your activity, maintaining your privacy intact.
Why Use Private Tabs
When it comes to surfing the web, using private tabs on your MacBook can offer added privacy and security. Private tabs are designed to protect your browsing history, cookies, and other data from being stored locally. This can be particularly useful when you’re using a shared computer or when you want to keep your online activities private from others who may use the same device. In this post, we’ll explore the benefits of using private tabs on your MacBook and how to open one.
Enhanced Privacy
Private tabs provide an extra layer of privacy for your browsing sessions. When you use a private tab, your browsing history, cookies, and form data are not saved or stored on your device. This means that once you close the private tab, all your activity from that session is erased, providing enhanced privacy protection. It also helps prevent unauthorized access to your personal information if other individuals have access to your device.
Avoid Tracking And Targeted Ads
By using private tabs, you can avoid being tracked by websites and third-party advertisers. Private tabs limit the amount of data that can be collected about your browsing activities, which can help reduce the number of targeted ads you see across the web. This can lead to a more streamlined and less intrusive browsing experience, as your online behavior won’t be used to tailor ads specifically to you.
How To Open A Private Tab On Macbook
How to Open a Private Tab on Macbook
Using Safari
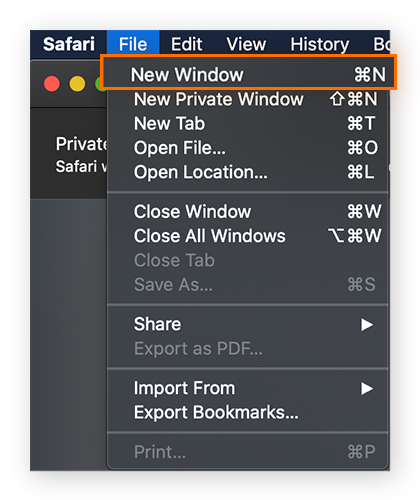
To open a private tab in Safari, click on “File” in the menu bar.
Select “New Private Window” from the dropdown menu to open a private tab.
Using Google Chrome
In Google Chrome, click on the three dots in the top right corner.
Choose “New Incognito Window” from the menu to open a private tab.
Using Mozilla Firefox
To open a private tab in Mozilla Firefox, click on the three horizontal lines.
Select “New Private Window” to open a private tab in Firefox.
Step-by-step Guide: Opening A Private Tab On Safari
‘Step-by-Step Guide: Opening a Private Tab on Safari’ offers a simple way to browse privately on your Macbook. Here’s how:
Step 1: Launch Safari
Open Safari browser on your Macbook device.
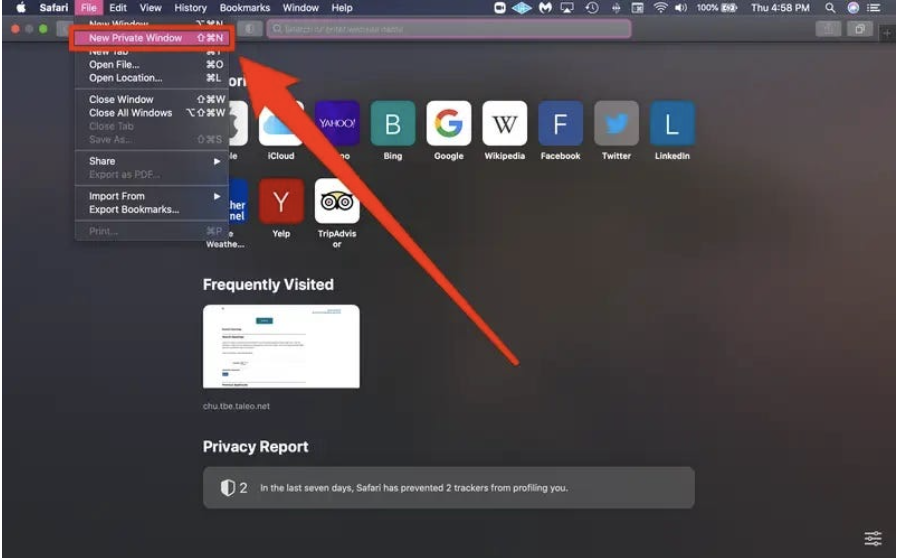
Step 2: Go To The Menu Bar
Locate and click on the ‘Safari’ option in the menu bar.
Step 3: Select ‘private Tab’
From the dropdown menu, choose ‘Private Tab’ to open a new private browsing tab.
Step 4: Start Browsing Privately
You are now in a private browsing mode where your browsing history and data are not saved.
Credit: www.avast.com
Step-by-step Guide: Opening A Private Tab On Google Chrome
Welcome to our step-by-step guide on how to open a private tab on Google Chrome. This feature allows you to browse the web without your history being saved or cookies being stored. In this guide, we’ll walk you through the simple process of opening a private tab on your Macbook using Google Chrome.
Step 1: Launch Google Chrome
To begin, ensure that Google Chrome is open on your Macbook. You can do this by clicking on the Chrome icon in your applications or by clicking on it from your dock.
Step 2: Go To The Menu Bar
Once Google Chrome is open, navigate to the top of your screen where you will find the menu bar. It is located next to the Apple logo.
Step 3: Select ‘new Incognito Window’
In the menu bar, click on “File” and then select “New Incognito Window” from the drop-down menu. This will open a new window where you can browse the web privately without your activity being saved.
Step 4: Start Browsing Privately
You are now ready to start browsing privately. The window will have a dark background with a spy character in the top corner, indicating that you are in incognito mode. You can now search and browse the web knowing that your browsing history and cookies will not be saved.
Step-by-step Guide: Opening A Private Tab On Mozilla Firefox
If you value your online privacy and want to browse the internet without leaving any traces, opening a private tab is the way to go. To help you get started, we have created this step-by-step guide on how to open a private tab on Mozilla Firefox. Follow these simple instructions and browse the web privately.
Step 1: Launch Mozilla Firefox
To begin, you need to launch Mozilla Firefox on your Macbook. Look for the Firefox icon in your applications folder or dock and click on it. If you cannot find the icon, you can use the Spotlight search by pressing Command + Space, typing “Firefox” and pressing Enter.
Step 2: Go To The Menu Bar
Once Firefox is open, you will see a menu bar at the top of the screen. Locate the menu bar and click on it to reveal a dropdown menu.
Step 3: Select ‘new Private Window’
In the dropdown menu, look for the option that says “File.” Click on it, and another menu will appear. From this menu, select “New Private Window.”
Step 4: Start Browsing Privately
After selecting “New Private Window,” a new window will open with a purple mask icon in the top right corner, indicating that you are in private browsing mode. You can now browse the internet privately, and Firefox will not save any cookies, history, or other data from this session. It’s important to note that any bookmarks or downloads you make will still be saved and accessible when you exit private browsing mode.
Tips For Using Private Tabs
When it comes to online privacy and security, using private tabs is an essential practice. Private tabs enable you to browse the web without leaving traces of your browsing history or personal information. In this section, we will explore three important tips for utilizing private tabs effectively:
Clearing Browsing History
To maintain your privacy, it is crucial to regularly clear your browsing history. Clearing your browsing history removes any record of the websites you visited during your private browsing session. Fortunately, clearing your browsing history on your Macbook is a simple process:
- Open Safari, your default browser, or the browser of your choice.
- Click on “History” in the top menu bar.
- Select “Clear History” from the drop-down menu.
- Choose the appropriate time range and click “Clear History” again.
By following these steps, you can ensure that your browsing history remains private and secure.
Managing Cookies
Cookies are small files that websites store on your computer to remember your preferences and provide a more personalized browsing experience. However, they can also be used to track your online activities. When using private tabs, it is essential to manage your cookies effectively. Here’s how you can do it:
- Open your browser’s preferences by clicking on the “Safari” or “Chrome” menu and selecting “Preferences.”
- Go to the “Privacy” tab.
- Click on “Manage Website Data” or “Clear Browsing Data.”
- Select the cookies you want to remove and click “Remove” or “Clear.”
By regularly managing cookies, you can enhance your online privacy and control the information websites store about your browsing activities.
Using Vpn For Added Privacy
While private tabs provide a certain level of privacy, using a virtual private network (VPN) can further enhance your online security and anonymity. A VPN creates an encrypted connection between your device and the internet, making it difficult for third parties to track your online activities. To use a VPN on your Macbook, follow these steps:
- Choose a reliable VPN service and sign up for an account.
- Download and install the VPN software provided by your chosen service.
- Launch the VPN software and log in with your account credentials.
- Select a server location of your choice, preferably one located outside your country for added privacy.
- Click on the “Connect” or “On” button to establish the VPN connection.
By using a VPN, you can ensure that your internet traffic is encrypted and your online activities are shielded from prying eyes.
Benefits Of Using Private Tabs
Discover the advantages of using private tabs on your Macbook to enhance online privacy and security. Opening a private tab allows you to browse without saving history or cookies, keeping your browsing activity confidential. Enjoy a worry-free online experience with the privacy features of private tabs on your Macbook.
Benefits of Using Private Tabs When it comes to browsing the internet securely, using private tabs can be highly beneficial. Protecting Personal Information, Secure Online Transactions are some of the key advantages that come with using private tabs on your Macbook.Protecting Personal Information
Using private tabs can help protect your personal information from being tracked or accessed by websites and third parties. When you open a private tab on your Macbook, your browsing history, cookies, and other website data are not stored locally, enhancing your privacy and security.Secure Online Transactions
Private tabs provide an extra layer of security when making online transactions. By using a private tab, you can minimize the risk of your sensitive financial information being stored or accessed by potential threats. This is especially important when making purchases or accessing banking services online. In addition to these benefits, private tabs can also prevent websites from tracking your browsing behavior and personalize ads based on your activity. Furthermore, using private tabs can help prevent unauthorized access to your accounts, ensuring that your online activities remain confidential and secure. By incorporating private tabs into your browsing habits, you can enhance your online privacy and security significantly.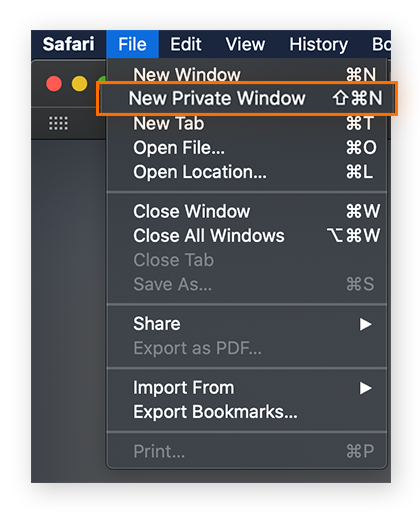
Credit: www.avast.com
Common Misconceptions About Private Tabs
Exploring the conceiving idea! Unraveling the great mystery! You may think private tabs grant anonymity, but that’s not entirely true. Let’s dispel some myths surrounding private tabs and their limitations.
Private Tabs Do Not Provide Complete Anonymity
Private tabs do not render you entirely anonymous. While your browsing history is not saved locally, your internet service provider (ISP) and websites can still track your online activity.
Private Tabs Do Not Prevent Isp Tracking
Using a private tab does not stop your ISP from tracking your browsing. They can still monitor and record the websites you visit, even in a private browsing session.
Credit: my.sdsu.edu
Frequently Asked Questions For How To Open A Private Tab On Macbook
How Do I Open A Private Tab On My Macbook?
To open a private tab on your Macbook, simply click on File in the top menu bar, then select New Private Window. This will open a new window in private browsing mode where your browsing history and cookies will not be saved.
What Is The Keyboard Shortcut To Open A Private Tab On Macbook?
To quickly open a private tab on your Macbook, you can use the keyboard shortcut Command + Shift + N. This will instantly open a new window in private browsing mode where your browsing history and cookies will not be saved.
Why Should I Use A Private Tab On My Macbook?
Using a private tab on your Macbook offers several benefits. It allows you to browse the internet without leaving a trace of your activity, keeping your browsing history, cookies, and personal information private. It also prevents websites from tracking your online behavior and can be useful when accessing sensitive information or using public computers.
Can I Use A Private Tab For Online Shopping?
Yes, you can use a private tab for online shopping. While a private tab does not provide complete security, it can help protect your personal information by not saving your browsing history, cookies, or login credentials. It’s always a good idea to ensure the website you are shopping on has a secure connection (https://) and use other security measures like strong passwords and two-factor authentication.
Conclusion
In a nutshell, opening a private tab on your MacBook is a simple way to enhance your online privacy and security. By following the steps outlined in this guide, you can easily initiate a private browsing session with ease. This ensures that your personal data and browsing history remain protected while you surf the internet.
Secure browsing made easy!
0 comments