
To open a USB on a MacBook, simply plug the USB drive into a USB port. The USB will appear on the desktop for easy access.
In today’s digital age, the ability to access and transfer data quickly is essential. Whether you are a student needing to move documents between computers, a professional sharing files with colleagues, or simply looking to store backups of important data, having a USB drive on hand is a convenient solution.
MacBooks are known for their user-friendly interface, and opening a USB is a straightforward process that can be done with just a few clicks. With these simple steps, you can effortlessly access the files stored on your USB drive and streamline your workflow.

Credit: iboysoft.com
Checking Compatibility
When it comes to opening a USB on a MacBook, it’s important to first check for compatibility. Checking compatibility ensures that your USB device can be accessed and used seamlessly on your MacBook without any issues. In this guide, we’ll delve into the key aspects of checking compatibility, including USB formats and MacBook USB ports.
Usb Formats And Compatibility
Before you can open a USB on your MacBook, you need to make sure that the USB format is compatible with macOS. The most widely compatible format is exFAT, which allows for easy read and write access on both macOS and Windows. If your USB device is formatted in a different format, such as NTFS or FAT32, you may encounter difficulties in accessing the files on your MacBook.
Checking Macbook Usb Ports
Not all USB devices are compatible with all MacBook models, so it’s essential to check the types of USB ports available on your MacBook. The MacBook may feature various USB ports, including USB-A, USB-C, or Thunderbolt. Ensure that your USB device matches the type of USB port available on your MacBook to guarantee seamless compatibility.
Credit: www.kingston.com
Preparing The Usb Drive
Before opening a USB on Macbook, you need to prepare the USB drive properly to ensure it works smoothly. This involves formatting the USB drive, removing existing files, and creating a new folder.
Formatting The Usb Drive
- Connect the USB drive to your Macbook.
- Open ‘Disk Utility’ from the Applications folder.
- Select the USB drive in the list of devices.
- Click on ‘Erase’ and choose a format (e.g., ExFAT, FAT32, or Mac OS Extended).
- Click ‘Erase’ to format the USB drive.
Removing Any Existing Files
- Open the USB drive folder on your Mac.
- Check for any existing files or folders.
- Select and delete any unwanted files to free up space.
Creating A New Folder
- Right-click within the USB drive folder.
- Select ‘New Folder’ from the context menu.
- Name the folder appropriately for easy organization.
- Your USB drive is now ready for use on your Macbook!
Connecting The Usb Drive
To open a USB drive on a MacBook, simply insert the drive into a USB port. Once connected, the USB drive will appear on the desktop as well as in the Finder window, allowing for easy access to the files stored on the drive.
Locating The Usb Port
Locating the USB port on your MacBook is important to begin the connection process.
Inserting The Usb Drive
- Gently hold your USB drive together with the MacBook for a secure connection.
- Insert the USB drive into the USB port, making sure the fit is snug and secure.
- Avoid forcing the drive in; it should slide in smoothly with minimal pressure.
- Wait for the MacBook to recognize the USB drive before accessing your files.
Accessing The Usb Drive
Accessing the USB drive on your MacBook is a simple process that allows you to easily transfer and access files. Whether you’re using a USB flash drive, external hard drive, or any other USB storage device, the steps to access it on your MacBook are straightforward.
Using Finder
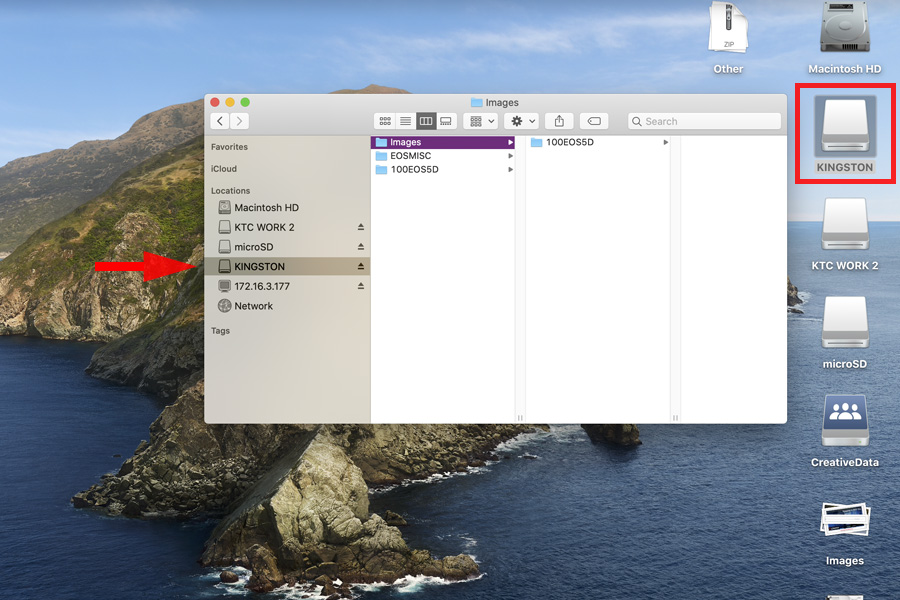
To access the files on your USB drive, you can use the Finder application on your MacBook. Follow these steps to locate and open your USB drive:
- Connect the USB drive to your MacBook using an available USB port.
- Launch Finder by clicking on the blue and white face icon usually located in the dock.
- On the left-hand side of the Finder window, you should see your USB drive listed under the Devices section. Click on the USB drive’s name to open it.
Viewing Usb Drive Contents
After opening your USB drive using Finder, you’ll be able to view and access its contents. Here’s how you can view the contents of your USB drive:
- Once your USB drive is opened in Finder, you can browse through its folders and files by clicking on them.
- To open a file, simply double-click on it, and it will open using the default application associated with its file type.
- You can also drag and drop files from the USB drive to your MacBook or vice versa, enabling easy file transfer.
Copying Files To The Usb Drive
When it comes to managing files on your Macbook, knowing how to copy files to a USB drive can be useful. Whether you want to back up important documents or transfer files to another device, learning the different methods can save you time and effort. In this article, we will explore two simple and convenient ways to copy files to a USB drive on your Macbook: the drag and drop method and the copy and paste method.
Selecting Files To Copy
Before you begin copying files to your USB drive, you need to select the specific files you want to transfer. To do this, follow these steps:
- Locate the files you wish to copy on your Macbook.
- To select multiple files, hold down the “Command” key on your keyboard and click on each file you want to copy.
- If you want to select a range of contiguous files, click on the first file, hold down the “Shift” key, and click on the last file in the range.
Drag And Drop Method
The drag and drop method is a quick and straightforward way to copy files to your USB drive. Follow these steps:
- Connect your USB drive to your Macbook.
- On your desktop or in the Finder, open the folder containing the files you want to copy.
- Select the files you wish to copy using the method described above.
- Drag the selected files to the USB drive icon on your desktop or in the Finder sidebar.
- The files will start copying to the USB drive. A progress bar or indicator will let you know when the transfer is complete.
Using The Copy And Paste Method
If you prefer a more traditional file management method, you can use the copy and paste method to transfer files to your USB drive. Follow these steps:
- Connect your USB drive to your Macbook.
- Open the folder containing the files you want to copy.
- Select the files you wish to copy using the method described above.
- Right-click on the selected files and choose “Copy” from the context menu.
- Open the USB drive folder.
- Right-click inside the folder and select “Paste” from the context menu.
- The files will begin copying to the USB drive, and a progress bar or indicator will show the transfer status.
Removing The Usb Drive Safely
Learn how to safely remove a USB drive from your MacBook with these easy steps. Avoid data loss and potential damage to your device by following these guidelines closely.
Ejecting The Usb Drive
Using the Menu Bar Option
Removing a USB drive safely is a crucial step to prevent data corruption and file loss. It’s easy to get caught up in the rush and simply pull out the USB drive from your MacBook, but this can lead to serious consequences. Ejecting the USB drive is the proper way to ensure that your data remains intact and the device is ready to be safely removed.
Thankfully, macOS provides a convenient way to eject your USB drive through the menu bar option. To do this, simply locate the small white triangle icon at the top-right corner of your MacBook’s screen. This icon represents the Finder and is your gateway to managing files and devices. Click on this icon to open the Finder dropdown menu.
Once the dropdown menu appears, look for your USB drive name under the “Devices” section. It may be labeled with the brand or model of your USB drive. When you find it, hover your mouse over the drive name. You will see a submenu with various options, including “Eject”.
Click on the “Eject” option, and macOS will perform the necessary steps to safely disconnect your USB drive from your MacBook. You will then see a notification on the screen, indicating that it is now safe to remove the device physically. Remember to wait for this notification before removing the USB drive to avoid any potential data loss or damage.
Using Keyboard Shortcut
Another quick and efficient way to eject your USB drive is by using a convenient keyboard shortcut. Pressing the following keys simultaneously will trigger the eject process: Command + E. By using this keyboard shortcut, you can save time and eject your USB drive swiftly without having to navigate through menus.
After pressing the command and E keys, macOS will instantly perform the necessary steps to safely eject your USB drive. You can then proceed to remove it from your MacBook without worrying about any data corruption or file loss.
Troubleshooting
If you encounter issues when trying to open a USB drive on your Macbook, troubleshooting the problem can help you resolve the issues. Here are some common problems you might encounter and how to address them:
Usb Not Recognized
If your Macbook is not recognizing the USB drive when you plug it in, there are a few steps you can take to troubleshoot the issue:
- Check the USB connections: Make sure the USB drive is properly plugged into the USB port on your Macbook.
- Try a different USB port: Sometimes, the issue may be with a specific USB port. Trying a different port can help determine if the problem is port-specific.
- Restart your Macbook: Occasionally, a simple restart can resolve recognition issues with USB drives.
Usb Drive Not Mounting
If the USB drive is not mounting on your Macbook, follow these troubleshooting steps to address the problem:
- Check Disk Utility: Open Disk Utility and see if the USB drive is listed. From there, you can attempt to mount the drive manually.
- Verify USB compatibility: Ensure that the USB drive is compatible with your Macbook. Some older drives may not work with newer Macbook models.
- Reset the SMC: Resetting the System Management Controller (SMC) on your Macbook can sometimes resolve issues with USB drive mounting.
Protecting Usb Drive Data
USB drives are essential tools for storing and transferring data, but they can also pose a security risk if not properly protected. Safeguarding the data on your USB drive is crucial to prevent unauthorized access and keep your information secure. In this post, we will explore some simple yet effective ways to protect your USB drive data.
Using Disk Encryption
Disk encryption is a powerful security measure that encodes the data on your USB drive, making it unreadable without the decryption key. Encrypting your USB drive adds an extra layer of protection, ensuring that even if your drive falls into the wrong hands, the data remains safe. MacBooks offer built-in encryption tools like FileVault, which you can use to secure your USB drive easily.
Keeping Usb Drive In A Safe Place
Storing your USB drive in a safe place when not in use is crucial for preventing loss or theft. Avoid leaving your drive in plain sight or in easily accessible areas. Consider investing in a protective case or a secure storage location to keep your USB drive safe from damage or unauthorized access.
Additional Tips And Tricks
Here are some additional tips and tricks to enhance your experience with opening USB drives on your MacBook:
Usb Drive Maintenance
Regularly clean your USB drives to avoid dust accumulation and keep them functioning optimally.
- Use a soft microfiber cloth to gently wipe the USB connector.
- Avoid bending or dropping the USB drive to prevent damage.
- Consider formatting the drive occasionally to remove any corrupted files.
Managing Multiple Usb Drives
If you use multiple USB drives, label them for easy identification and organization.
- Create specific folders on each USB drive to categorize files efficiently.
- Backup important data from your USB drives to prevent loss.
- Invest in a USB hub to connect multiple drives simultaneously.
Credit: edu.gcfglobal.org
Frequently Asked Questions Of How To Open A Usb On Macbook
What Are The Steps To Open A Usb On Macbook?
To open a USB on a MacBook, first, plug in the USB drive to the USB port. Then, open Finder and locate the USB drive in the sidebar. Click on it to open and access the files stored on the USB.
Can I Directly Access Files On A Usb Without Any Additional Software?
Yes, you can directly access the files on a USB on a MacBook without any additional software. Simply plug in the USB drive, open Finder, and click on the USB drive in the sidebar to access and manage the files stored on it.
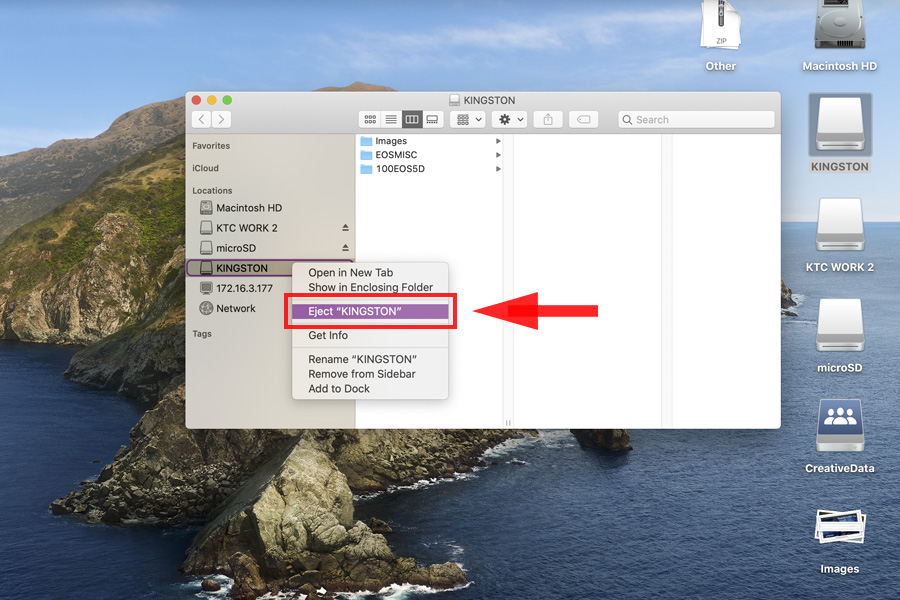
How Do I Eject A Usb Safely From My Macbook?
To safely eject a USB from your MacBook, first, make sure that you are not actively using any file from the USB drive. Then, locate the USB drive in Finder’s sidebar, right-click on it, and select “Eject. ” Wait for the USB drive to be ejected, and then you can safely remove it from your MacBook.
Conclusion
Opening a USB on a MacBook is an easy and essential task that can enhance your productivity. By following the simple steps outlined in this guide, you can quickly access and manage files from your USB drive with ease. Don’t let technical barriers hold you back from leveraging the full potential of your device.
With this knowledge, you can confidently make the most out of your MacBook and USB connections.
0 comments