
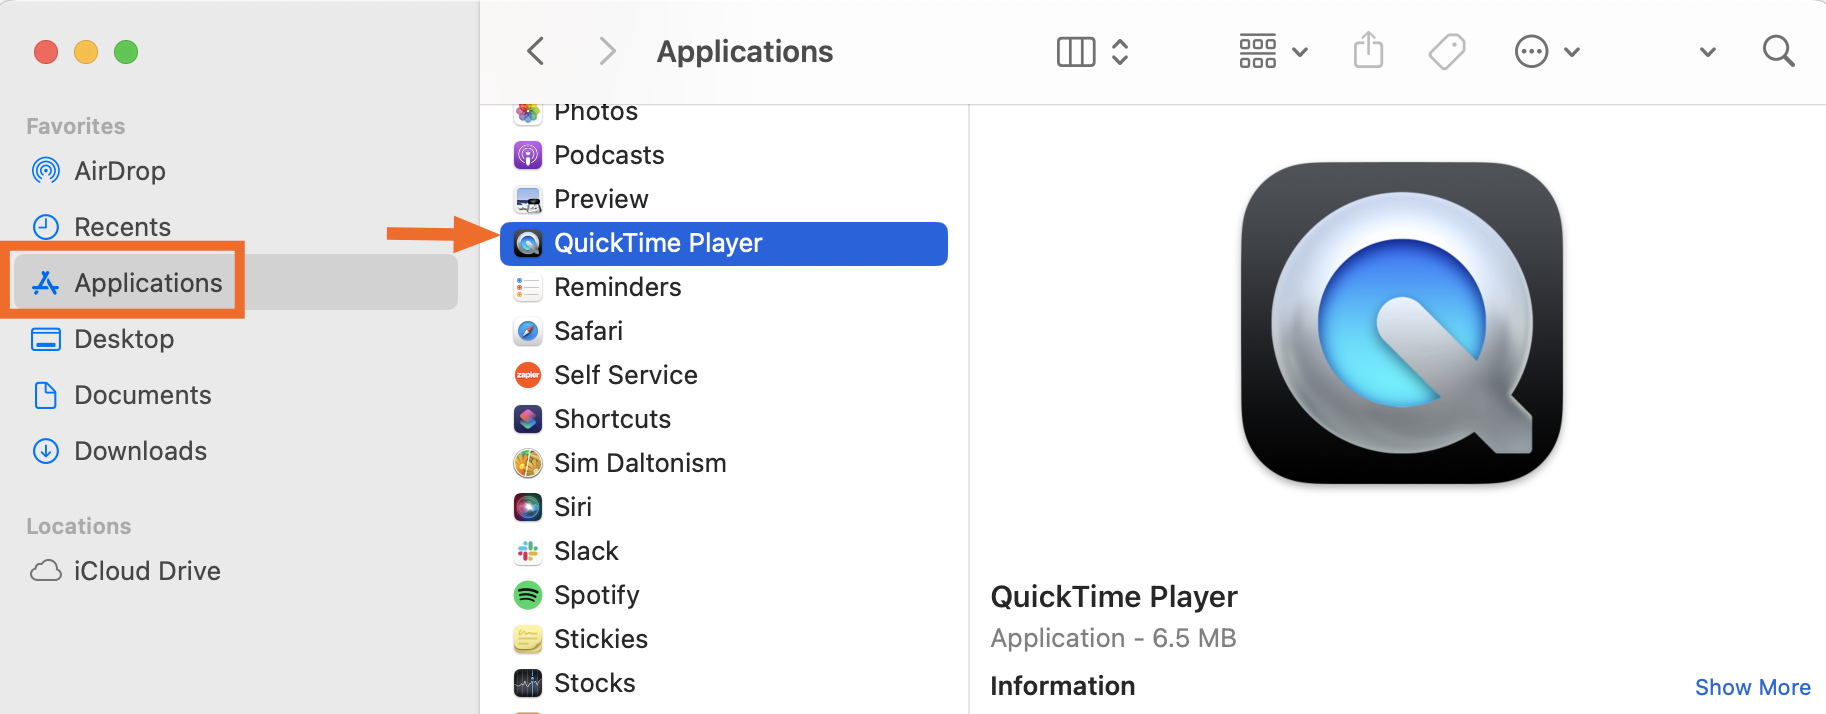
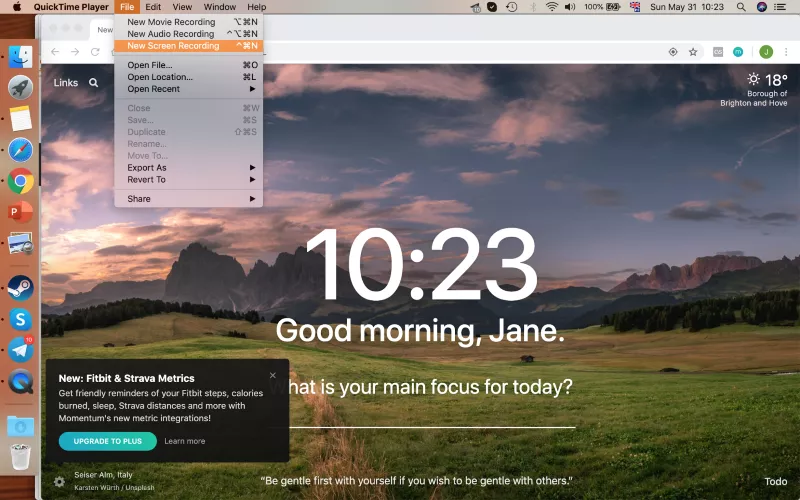
To record yourself on a MacBook, use the built-in QuickTime Player app. Open the app, select “New Movie Recording,” then hit the record button.
Recording yourself on a MacBook is a simple task that can be done effortlessly using the QuickTime Player app. Whether you need to create video content for work, record a tutorial, or send a personal message, the QuickTime Player app makes it easy to capture high-quality videos with just a few clicks.
In this guide, we will walk you through the steps to record yourself on a MacBook using the built-in QuickTime Player app. By following these simple instructions, you will be able to create professional-looking recordings in no time. Let’s dive in and learn how to record yourself on a MacBook!
Choosing The Right Software
When it comes to recording yourself on your MacBook, choosing the right software is crucial to ensure a smooth and high-quality recording process. Whether you’re a content creator, a musician, or a podcaster, having the right recording software can make a significant difference in the outcome of your recordings. Here’s a guide to help you choose the right software for your recording needs.
Free Recording Software
For those looking for budget-friendly options, there are several free recording software available for MacBook users. These options provide basic recording capabilities and are suitable for beginners or those with simple recording needs. Some popular free recording software for MacBook include:
- Audacity
- Ocenaudio
- Ardour
Paid Recording Software
If you’re looking for more advanced features and professional-grade quality, investing in paid recording software is worth considering. Paid software often offers a wider range of tools and functionalities, allowing for more sophisticated recordings. Here are some reputable paid recording software options for MacBook:
- Pro Tools
- Logic Pro X
- GarageBand
Credit: mackeeper.com
Setting Up Your Audio Equipment
Setting up your audio equipment is crucial for a successful recording session on your MacBook.
Microphone Selection
- Choose a high-quality microphone that suits your recording needs.
- Consider USB microphones for simplicity and ease of use.
Audio Interface Setup
- Connect your audio interface to your MacBook using the provided USB cable.
- Install the necessary drivers for your audio interface to ensure compatibility.
Follow these steps diligently and ensure that your audio equipment is properly configured to achieve optimal recording results on your MacBook!
Configuring Audio Settings
Setting up your audio correctly on your MacBook is essential to ensure high-quality recordings. By configuring the audio settings properly, you can achieve crystal-clear sound and produce professional recordings.
Setting Input And Output Devices
- Click on the Apple logo on the top left corner of your screen.
- Select “System Preferences” from the dropdown menu.
- Choose “Sound” and navigate to the “Input” tab.
- Select the appropriate input device from the list (e.g., built-in microphone or external microphone).
- Go to the “Output” tab and select your preferred output device (e.g., built-in speakers or headphones).
Adjusting Volume Levels
- Click on the Volume control icon in the menu bar.
- Adjust the volume slider to set the desired volume level.
- For more precise control, go to “Sound” in System Preferences and fine-tune the volume settings.
Credit: m.youtube.com
Preparing Your Recording Environment
To record yourself on a Macbook, it’s essential to prepare your recording environment. Find a quiet space with minimal background noise and good lighting. Consider using a microphone and headphones for better sound quality. Adjust the settings on your Macbook to optimize the recording process, and ensure the area is clutter-free to minimize distractions.
Finding A Quiet Space
Choosing a quiet space for your recording is essential to minimize background noise. Look for a room or area away from loud appliances and street noise. If possible, use a room with thick walls and carpet to further reduce sound interference.
Soundproofing Tips
Implementing soundproofing measures can significantly improve the quality of your recordings. Consider adding acoustic panels or foam to the walls to absorb sound waves. Invest in a good quality microphone with noise-canceling features to reduce external disturbances.
Positioning Your Macbook And Microphone
When it comes to recording yourself on your Macbook, the positioning of your laptop and microphone plays a crucial role in the overall audio quality of your recordings. In this section, we will discuss the ideal placement for audio quality and how to avoid unwanted noise during the recording process.
Ideal Placement For Audio Quality
To achieve the best possible audio quality, it is important to position both your Macbook and microphone optimally. Consider the following guidelines:
- Place your Macbook on a stable surface such as a desk or table. This will help minimize vibrations and ensure a clear recording.
- Position your Macbook at a comfortable height and angle. Make sure the screen is at eye level and the keyboard is easily accessible.
- Keep a distance between your microphone and the Macbook to avoid any interference or feedback. A recommended distance is about 6-12 inches.
Avoiding Unwanted Noise
Unwanted noise can significantly degrade the quality of your recordings. Follow these tips to minimize background noise:
- Choose a quiet room or location for recording. Avoid areas with loud appliances, traffic noise, or other sources of disturbances.
- Close windows and doors to minimize external noise. Consider using soundproofing materials if necessary.
- Use a microphone with good noise-cancelling capabilities or use a pop filter to reduce plosive sounds.
- Ensure that your Macbook and microphone cables are properly connected and not loosely hanging, as this can create unwanted noise.
- Avoid touching or moving your Macbook or microphone during recording. These movements can cause unwanted vibrations and interference.
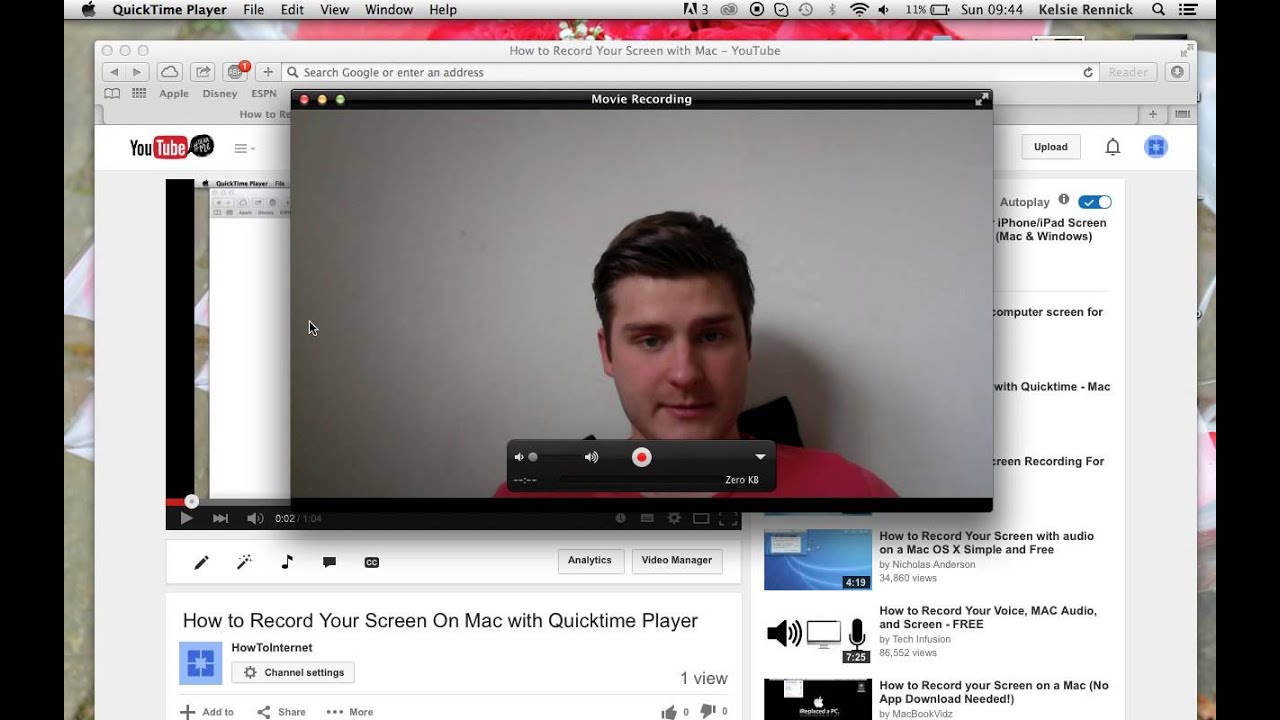
Recording Your Voice
When it comes to recording your voice on a Macbook, one of the most important aspects is using the right software. Fortunately, Macbooks come with the built-in software, GarageBand, which is a versatile and user-friendly option for recording audio. To get started, follow these steps:
- Open the GarageBand application on your Macbook.
- Select “New Project” and choose “Voice” as the template.
- Click on the red record button to start recording your voice.
- Adjust the input levels by moving the slider to ensure your voice is clear and adequately captured.
- When you are finished recording, click on the stop button.
- Review and edit your recording by selecting the track and using the various editing tools available in GarageBand.
- Finally, export your recording in a suitable format, such as MP3 or WAV, for further use or sharing.
Recording your voice requires attention to detail to ensure a clear and professional sound. By following these simple tips, you can enhance the quality of your recordings:
- Find a quiet environment – Choose a location with minimal background noise to prevent distractions in your recording.
- Use a good microphone – Invest in a decent microphone or headset to capture your voice accurately and minimize any unwanted noise.
- Speak clearly and at a moderate pace – Enunciate your words and avoid speaking too fast or too slow, maintaining a consistent and engaging tone throughout your recording.
- Practice proper posture – Sit up straight to allow for optimal breath support, resulting in a more resonant and confident voice.
- Warm-up exercises – Perform vocal warm-up exercises, such as breathing exercises and tongue twisters, to loosen up your vocal cords and improve your voice’s clarity.
- Review and re-record if needed – Take the time to listen to your recordings, identify any areas that need improvement, and don’t hesitate to redo parts if necessary.
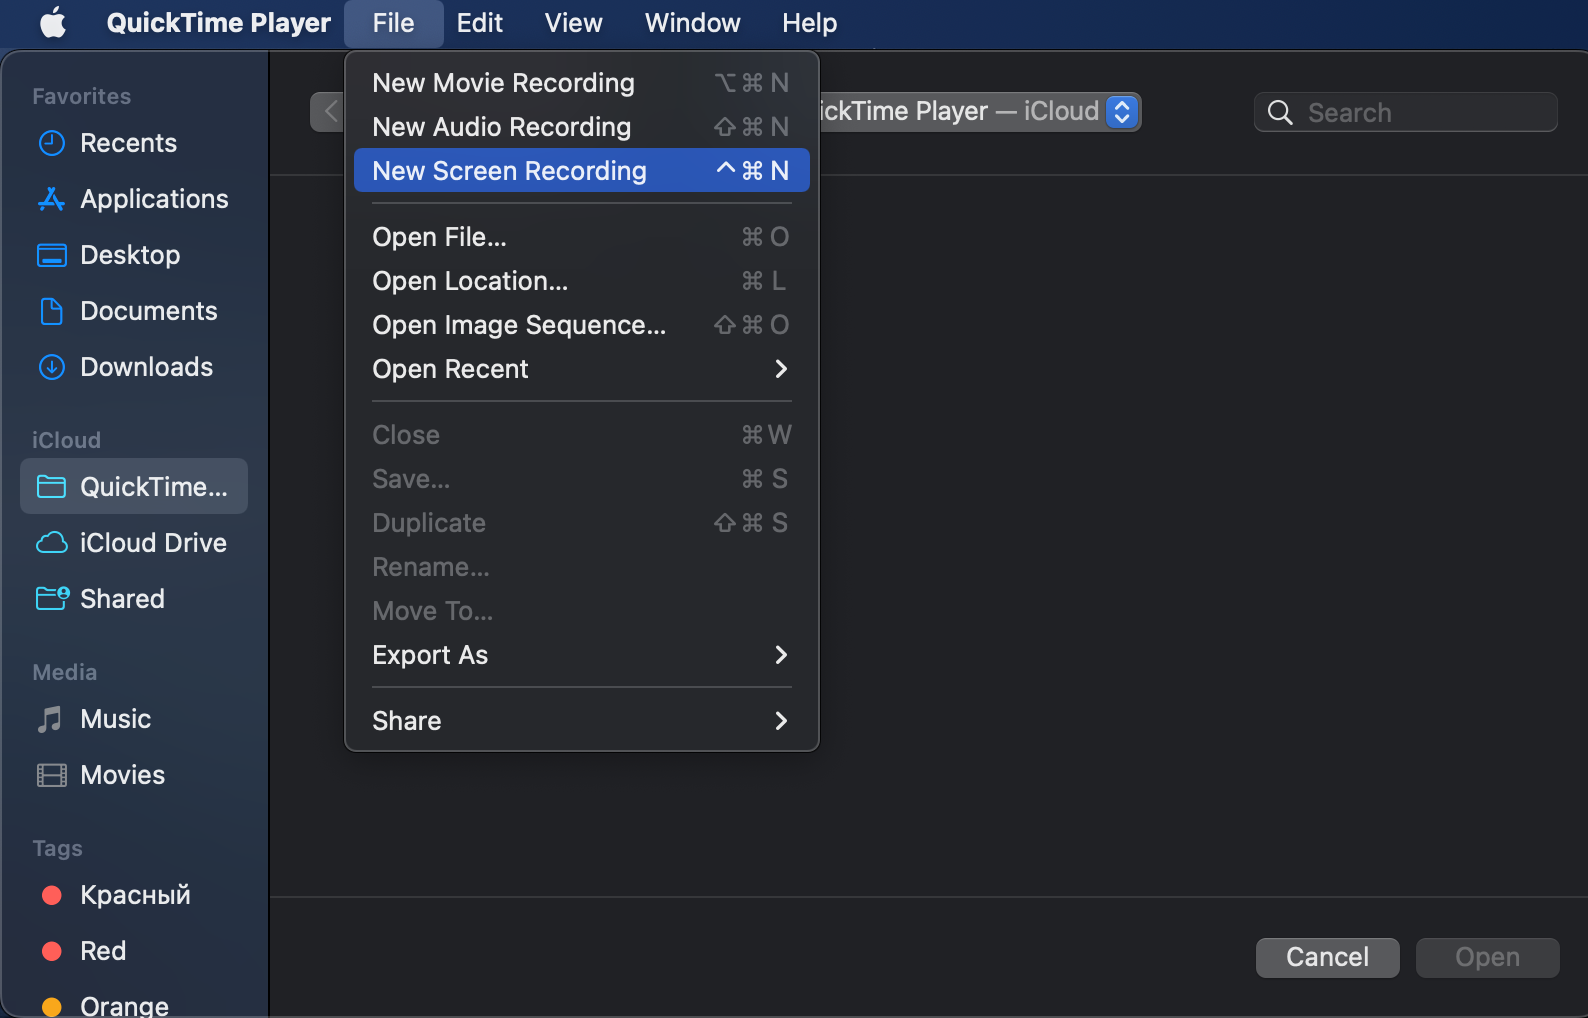
Recording Your Screen
When it comes to capturing your screen on a MacBook, there are various options available that can help you easily record your activities. One of the most common and convenient methods is to use screen capture software, which allows you to capture both video and audio from your screen. Whether you want to record a tutorial, demonstrate a project, or simply document your activity, knowing how to utilize screen capture software effectively is crucial.
Screen Capture Software
There are a variety of screen capture software options available for MacBooks, each offering different features and capabilities. Some popular choices include:
- QuickTime Player: Offers basic screen recording functionality and is pre-installed on most MacBooks
- Camtasia: A more robust option with advanced editing features
- ScreenFlow: Ideal for creating professional-looking videos with its powerful editing capabilities
Choosing The Right Screen Size
When recording your screen, it’s important to consider the size of the area you want to capture. Ensure that the screen size is appropriate for the content you want to record. For example, if you’re showcasing a specific application or website, it’s essential to capture the entire interface without any elements being cut off.
Credit: podcastle.ai
Editing And Enhancing Your Recording
After capturing your content on your Macbook, it’s time to enhance it to make it more polished and professional.
Trimming And Cutting
Use your preferred software to trim any unnecessary parts of the recording for a crisp final product.
Adding Background Music
Elevate your recording by adding appropriate background music that complements the content.
Exporting And Sharing Your Recording
Choosing The Right File Format
When saving your recording, select a format compatible with various devices and platforms.
- Consider using MP4 for versatility and widespread support.
- For higher quality, opt for MOV or AVI formats.
Uploading To Online Platforms
Sharing your recordings online is a breeze with these steps:
- Log in to your preferred platform like YouTube or Vimeo.
- Locate the upload button and select your file.
Want to embed your recording on a website? Use the provided code snippet for seamless integration.
Frequently Asked Questions Of How To Record Yourself On Macbook
How Do I Record Myself On Macbook Using Quicktime Player?
To record yourself on a MacBook using QuickTime Player, open the application, go to “File” and select “New Movie Recording. ” Click on the drop-down menu next to the record button and select your MacBook’s built-in camera for recording. Press the record button to start, and when finished, click on the stop button.
Can I Record My Screen And Webcam Simultaneously On A Macbook?
Yes, you can record your screen and webcam simultaneously on a MacBook using third-party applications like OBS Studio or Camtasia. These applications allow you to capture your screen activity and webcam feed at the same time, giving you the ability to create engaging tutorial or presentation videos.
Are There Any Built-in Options To Edit My Recorded Video On Macbook?
Yes, MacBook comes with iMovie, a built-in video editing software that allows you to edit your recorded videos. You can trim, cut, add transitions, apply effects, and much more using iMovie. It’s a user-friendly tool for basic video editing needs, making it convenient to polish your recorded footage.
What External Microphones Can I Use To Improve Audio Quality When Recording On A Macbook?
To improve audio quality when recording on a MacBook, you can use external microphones like the Audio-Technica ATR2100x-USB, Blue Yeti, or Rode NT-USB. These microphones provide better sound capture and offer adjustable settings for optimal recording conditions, allowing you to achieve professional-grade audio for your recordings.
Conclusion
Recording yourself on a MacBook is easy and convenient. With the right tools and software, you can create high-quality videos and audio recordings. Whether you’re a content creator, educator, or professional, the built-in features of your MacBook can help you share your message with the world.
So, go ahead and start capturing your creativity today!
0 comments