

To remove a Dell laptop hard drive, power off the laptop and disconnect all cables. Locate the hard drive compartment under the laptop.
Unscrew the retaining screws and gently slide out the hard drive. When you need to upgrade or replace the hard drive in your Dell laptop, it’s important to follow the correct steps to avoid damaging any components. In this guide, we will walk you through the process of removing a Dell laptop hard drive safely and efficiently.
By carefully following these steps, you can successfully remove the hard drive from your Dell laptop and proceed with your desired upgrades or maintenance tasks. Let’s dive into the detailed instructions for removing a Dell laptop hard drive.
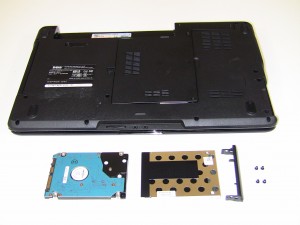
Credit: www.parts-people.com
Preparing For The Removal
Before you start removing the hard drive from your Dell laptop, it’s essential to take a few preparatory steps to ensure a smooth and safe process. By properly shutting down the laptop and disconnecting external devices and power sources, you can minimize the risk of damage to the hard drive and other components.
Shut Down The Laptop
To begin the process, ensure that the laptop is powered off completely. Click on the “Start” menu, and then select “Shut Down” from the options. Wait for the laptop to power down completely before continuing with the removal process.
Remove External Devices
Disconnect any external devices connected to your laptop, such as USB drives, external hard drives, or peripherals like mice and keyboards. This will prevent any interference or potential damage to these devices during the hard drive removal process.
Disconnect Power Source
Unplug the power adapter from your laptop and remove the battery if it’s accessible. This step is crucial to ensure that there is no electrical current running through the laptop, which could pose a safety hazard during the hard drive removal process.
Accessing The Hard Drive Bay
Accessing the Hard Drive Bay on your Dell laptop is a straightforward process that allows you to easily remove and replace the hard drive. Follow these simple steps to access the hard drive bay of your Dell laptop.
Locate The Hard Drive Bay
Begin by flipping your Dell laptop over to locate the hard drive bay on the underside of the device.
Remove Screws Holding The Bay Cover
Using a small Phillips head screwdriver, carefully remove the screws that secure the bay cover in place.
Slide Off The Bay Cover
With the screws removed, gently slide off the bay cover to reveal the hard drive nestled inside.
“` I hope this is helpful. Let me know if you need further assistance.Removing The Hard Drive
To remove the hard drive from your Dell laptop, first, shut down the computer and disconnect all cables. Turn the laptop over and locate the hard drive compartment. Remove the screws securing the compartment cover and carefully slide out the hard drive.
Make sure to handle it gently to avoid damage.
Disconnect The Sata Data Cable
First, locate the SATA data cable connected to the hard drive.
Unlock the clip, gently wiggle the cable, and pull it out.
Disconnect The Power Connector
Identify the power connector attached to the hard drive.
Slide it carefully to loosen it and disconnect it from the drive.
Detach The Hard Drive From The Bay
Find the screws securing the hard drive in the bay.
- Use a screwdriver to remove these screws.
- Slowly slide the hard drive out of the bay.
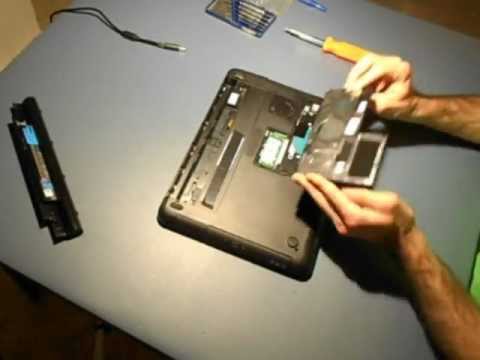
Credit: m.youtube.com
Installing The New Hard Drive (optional)
Now that you have successfully removed the old hard drive from your Dell laptop, you may want to consider installing a new hard drive to enhance your storage capacity or improve the overall performance of your device. Here is how you can install the new hard drive.
Prepare The New Hard Drive
Before you begin, ensure that you have purchased a compatible hard drive for your Dell laptop. Take the new hard drive out of its packaging and inspect it for any physical damage that may have occurred during shipping. Once confirmed, gather the necessary tools for installation, including a small Phillips head screwdriver and an anti-static wrist strap to prevent any damage from static electricity.
Connect The Sata Data Cable
Locate the SATA data port in your Dell laptop and carefully connect the SATA data cable to the appropriate port on the new hard drive. Ensure that the connection is secure and align the notches properly before gently pushing the cable into place. This cable is essential for transferring data between the hard drive and the laptop.
Connect The Power Connector
Next, locate the power connector on the new hard drive and carefully connect the power cable to the appropriate port. The power connector provides the necessary electrical power for the hard drive to function. Ensure that the connection is secure and align the pins properly before gently pushing the cable into place.
Replacing The Hard Drive Bay Cover
When it comes to replacing the hard drive bay cover on your Dell laptop, it’s important to follow the proper steps to ensure a secure and successful installation. The hard drive bay cover protects the internal components of your laptop and should be properly secured to avoid any damage or loss of data. In this guide, we will walk you through the process step-by-step, ensuring a smooth and worry-free replacement.
Slide The Bay Cover On
To begin replacing the hard drive bay cover, locate the cover on your laptop. It is usually situated on the bottom of your laptop, near the rear portion. Once located, follow these steps:
- Ensure your laptop is powered off and disconnected from any power sources.
- Position your laptop upside down, so the bottom is facing upwards.
- Align the hard drive bay cover with the corresponding slots on the bottom of your laptop.
- Gently slide the bay cover towards the proper direction until it fits snugly into place.
Secure The Screws
After sliding the bay cover onto your Dell laptop, the next step is to secure it with screws. These screws provide stability and prevent the cover from coming loose during use. Follow these simple instructions:
- Locate the screw holes on the bay cover and on your laptop.
- Insert the screws into the corresponding holes, ensuring they are aligned correctly.
- Using a screwdriver, tighten the screws until they are secure but be careful not to overtighten them.
- Double-check that all screws are tightened evenly to avoid any imbalance.
With the bay cover securely in place and the screws tightened, you have successfully replaced the hard drive bay cover on your Dell laptop. This protects your internal components and ensures the proper functioning of your device. Remember to handle your laptop with care throughout the process to avoid any accidental damage. If you have any questions or concerns, it is always recommended to consult the official Dell support website or contact their customer support for assistance.
Testing The Replacement
Start the Laptop:
In order to test the replacement of the Dell laptop hard drive, the first step is to start your laptop. Press the power button and wait for the system to boot up. Make sure you do this in a stable and secure environment, such as a desk or table, to avoid any accidental damage.
Check for Hard Drive Recognition:
Once your laptop is up and running, it’s time to check if the replacement hard drive is recognized by the system. To do this, follow these steps:
- Open the File Explorer by clicking on the folder icon located on the taskbar or by pressing the Windows key +E.
- In the left-hand side panel, scroll down and find “This PC” or “My Computer” (depending on your operating system version) and click on it.
- Look for the new hard drive icon. It should be labeled with the appropriate storage capacity and drive letter.
If you see the new hard drive icon, congratulations! Your replacement hard drive is recognized by the system. You can now proceed with further testing to ensure everything is working correctly.
If you don’t see the new hard drive icon, don’t worry just yet. It could be a compatibility issue, loose connection, or a driver problem. Try the following troubleshooting steps:
- Double-check the connections: Ensure that the hard drive is properly connected to the laptop. Power off the device, unplug it from the power source, and gently re-insert the hard drive, ensuring a secure connection.
- Update drivers: Visit the Dell support website and download the latest drivers for your laptop model. Install the drivers and restart your laptop. Check again for the new hard drive icon.
- Seek professional help: If the troubleshooting steps don’t resolve the issue, it is recommended to contact Dell customer support or consult a professional technician for further assistance.
Properly Disposing Of The Old Hard Drive
When it comes to upgrading or replacing the hard drive in your Dell laptop, properly disposing of the old hard drive is a crucial step. It’s essential to ensure that any sensitive data is thoroughly deleted and that the physical drive is destroyed to prevent unauthorized access to your personal information. In this guide, we’ll walk you through the process of securely disposing of your old Dell laptop hard drive.
Delete Sensitive Data
Before disposing of the old hard drive, it’s imperative to delete any sensitive data that may be stored on it. This includes personal information, financial records, and any confidential documents. Use a reliable data wiping tool to completely erase all the data on the drive, ensuring that it cannot be recovered by unauthorized individuals.
Once the data has been securely wiped from the hard drive, the next step is to physically destroy the drive to ensure that it cannot be accessed or re-used. One effective method is to use a hammer or drill to physically damage the drive, making it impossible to retrieve any information from it.

Credit: www.ifixit.com
Tips And Precautions
When it comes to removing the hard drive from your Dell laptop, it’s essential to follow some crucial tips and precautions to avoid any damage or data loss. Here are some essential steps to ensure a smooth removal process:
Use An Esd Strap
Protect your hard drive from static electricity by wearing an ESD (Electrostatic Discharge) strap during the removal process.
Handle The Hard Drive With Care
Ensure you handle the hard drive delicately to avoid any physical damage. Hold it from the sides and avoid touching any electronic components.
Backup Data Before Removal
Prioritize backing up all your data before removing the hard drive to prevent any accidental loss. Use an external hard drive or cloud storage for a safe backup.
Seeking Professional Help
If Unsure, Consult a Technician.
Before attempting to remove your Dell laptop hard drive yourself, consider seeking professional help from a technician.
If Unsure, Consult A Technician
If you are uncertain about removing the hard drive or lack the necessary skills, it is best to consult a qualified technician.
Frequently Asked Questions On How To Remove Dell Laptop Hard Drive
How Can I Safely Remove The Hard Drive From My Dell Laptop?
To safely remove the hard drive from your Dell laptop, first, ensure the laptop is powered off and disconnected from any power source. Then, locate and remove the screws securing the hard drive cover. Gently slide the drive out of its slot and unplug any cables connected to it.
Finally, carefully lift the hard drive out of the laptop.
Is It Necessary To Back Up My Data Before Removing The Hard Drive?
Yes, it is highly recommended to back up your data before removing the hard drive. This ensures that you won’t lose any important files or documents. Backup options include using an external hard drive, cloud storage, or transferring files to another device.
Can I Replace The Hard Drive In My Dell Laptop With A Larger One?
Absolutely! You can replace the hard drive in your Dell laptop with a larger one, as long as it is compatible with the laptop model. Simply follow the same steps to remove the old drive and insert the new one.
Remember to reinstall the operating system and restore your backed-up data after the replacement.
Are There Any Precautions I Should Take While Handling The Hard Drive?
Yes, there are a few precautions to keep in mind while handling the hard drive. Avoid touching the connectors or circuit board, as static electricity can damage the drive. Handle the drive with care, avoiding any drops or impacts. Additionally, store the removed hard drive in an anti-static bag or a safe place to prevent any damage.
Conclusion
Removing a Dell laptop hard drive is a straightforward process that can be easily accomplished with the right tools and a little know-how. By following the step-by-step instructions provided in this guide, you can confidently and safely remove your hard drive without any issues.
This valuable skill can save you time and money, as well as empower you to upgrade or replace your hard drive as needed.
0 comments