
To reset a Nest camera, locate the reset button on the device and hold it down. Follow the manufacturer’s instructions for complete reset guidance.
Resetting a Nest camera can resolve various technical issues and restore optimal functionality to the device. Whether you are experiencing connectivity problems or simply want to start fresh, a reset can be a quick and effective solution. By following the straightforward process outlined by Nest, you can ensure that your camera is functioning properly and providing you with the desired level of security and peace of mind.
We will explore the importance of resetting your Nest camera and provide step-by-step instructions on how to do so effectively.
Credit: m.youtube.com
Why Resetting Nest Camera Is Important
Resetting your Nest Camera is crucial to ensure its optimal performance. Follow these simple steps to reset your Nest Camera and maintain its functionality. Keep your camera running smoothly with a quick and easy reset process.
Resetting your Nest Camera is a crucial step to maintaining its optimal performance and ensuring your privacy and security. Whether you are looking to protect your privacy or fix technical issues, resetting your Nest Camera can help achieve these goals.
Protecting Your Privacy
Protecting your privacy should be a top priority when it comes to using any smart home devices, including the Nest Camera. Resetting your Nest Camera to its factory settings can give you peace of mind by removing any potential stored data, such as video recordings or personal settings, that may be accessible to unauthorized individuals.
By resetting your Nest Camera, you can start with a clean slate, ensuring that any previous access to your camera is revoked, and your confidential moments remain private. It allows you to take control of your security by creating new login credentials, eliminating the risk of intruders gaining unauthorized access to your camera feed.
Fixing Technical Issues
If you are experiencing technical issues with your Nest Camera, a reset can be a simple yet effective solution. Technical glitches or errors can sometimes disrupt the normal functioning of the camera, leading to a degraded performance or even a complete loss of functionality.
By resetting your Nest Camera, you can resolve any software or firmware-related problems that may be causing these issues. It helps in restoring your camera to its original settings, clearing any temporary data or caches that could impact its performance. A reset acts as a troubleshooting measure, allowing you to start fresh and troubleshoot any persistent technical issues you may encounter.
Preparing For The Reset
Before resetting your Nest camera, it’s important to properly prepare to ensure a smooth and successful process. This involves gathering the required materials and checking the network connection to avoid any issues during the reset. By following these steps, you can reset your Nest camera with ease.
Gathering Required Materials
Before starting the reset process, gather the following materials:
- Nest camera
- Power cable
- Mobile device with the Nest app installed
- Stable internet connection
Checking Network Connection
It’s crucial to ensure that your Nest camera is connected to a stable network. Here’s how to check the network connection:
- Open the Nest app on your mobile device.
- Access the camera settings and navigate to the network status.
- Verify that the camera is connected to a strong Wi-Fi signal.
- If necessary, reboot your router or move the camera closer to the router to improve the signal strength.
Step-by-step Guide To Resetting Nest Camera
Learn the simple steps to reset your Nest camera without hassle. Ensure your camera is connected to the power source and follow the instructions in the Nest app. By following these steps, you can easily reset your Nest camera and resolve any issues you may be experiencing.
Powering Off The Camera
To power off the Nest camera, locate the power cord and remove it from the power source.
Wait for a few seconds to ensure the camera is completely powered off before proceeding.
Resetting The Camera
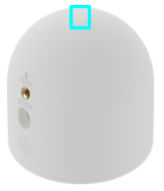
Locate the reset button on your Nest camera, usually found on the back or bottom of the device.
Press and hold the reset button for at least 10 seconds until you see the LED light flashing.
Reconnecting The Camera
After resetting, plug the power cord back into the camera and wait for it to boot up.
Follow the setup instructions on the Nest app to reconnect the camera to your Wi-Fi network.
By following these simple steps, you can easily reset your Nest camera and ensure it is functioning properly.

Credit: www.digitaltrends.com
Troubleshooting Common Issues
When encountering issues with your Nest camera, troubleshooting common problems can help resolve the situation efficiently.
Camera Not Powering Off
First, ensure the power source is connected properly and try using a different outlet or power cable.
If the issue persists, perform a hard reset by pressing and holding the reset button for 10 seconds.
Unable To Reset Camera
To reset the camera, press and hold the reset button until you hear a click sound.
If the camera still doesn’t reset, check for any obstructions or debris around the reset button.
Restoring Settings And Data
Restoring your Nest camera settings and data is a straightforward process that ensures you can customize the camera to your preferences and reconnect it to your Nest account. Follow the steps below to reconfigure the camera settings and reconnect to your Nest account.
Reconfiguring Camera Settings
To reconfigure your Nest camera settings, follow these steps:
- Locate the camera’s power cord and unplug it from the outlet.
- Wait for 10 seconds, and then plug the power cord back into the outlet.
- Your camera will go through a restart process, indicated by the LED light turning on and off.
- Once the LED light turns solid green, your camera has been successfully restarted, and your settings are now restored.
Reconnecting To The Nest Account
To reconnect your camera to the Nest account, follow these steps:
- Open the Nest app on your mobile device and log in to your account.
- Select the option to add a new camera to your account.
- Follow the on-screen instructions to scan the QR code on your camera or manually enter the set-up key.
- Once the camera has been successfully added to your account, you can customize the camera settings and access it from the Nest app.

Credit: www.alphr.com
Tips To Enhance Nest Camera Performance
Optimizing the performance of your Nest Camera ensures that you can enjoy its features and benefits to the fullest. In this section, we will explore some valuable tips that will help you get the most out of your Nest Camera. By following these guidelines, you can optimize your camera placement and keep it updated with the latest software improvements, ensuring a seamless and reliable experience.
Regular Software Updates
Regularly updating your Nest Camera’s software is essential to ensure optimal performance. These updates not only provide bug fixes and performance enhancements but also introduce new features and functionalities. To keep your camera up-to-date, follow these simple steps:
- Launch the Nest app on your smartphone or tablet.
- Select the camera you want to update.
- Tap on the settings icon.
- Scroll down and select “Software Updates”.
- If an update is available, click on “Update” to initiate the process.
Regularly installing software updates will keep your Nest Camera running smoothly and provide improved performance, enhanced video quality, and better security.
Optimizing Camera Placement
Proper camera placement is crucial to capture the best surveillance footage and maximize your camera’s effectiveness. Consider these factors when determining the optimal placement for your Nest Camera:
- Positioning: Place the camera at an optimal height, ensuring a clear view of the area you want to monitor. Avoid placing the camera too high or too low, as it may result in subpar footage quality.
- Eliminate obstructions: Avoid placing the camera behind objects, such as trees, curtains, or furniture, that may obstruct the view. Clear any obstacles that might hinder the camera’s line of sight.
- Lighting conditions: Consider the lighting conditions in the area where you intend to install the camera. Ensure that the camera is not positioned directly facing bright lights or direct sunlight, as it may affect the quality of the captured footage.
- Wi-Fi range: Place the camera within a suitable range of your Wi-Fi router to ensure a stable and reliable connection. Avoid obstructions, such as walls or large appliances, which may interfere with the signal strength.
By optimizing the placement of your Nest Camera, you can achieve better coverage, clearer footage, and enhanced overall performance.
Conclusion
Knowing how to reset your Nest camera is crucial for maintaining its functionality. By following the simple steps outlined in this blog post, you can troubleshoot any issues and ensure the security of your home. Take the time to familiarize yourself with the process, and you’ll be able to keep your Nest camera running smoothly.
0 comments