
To reset a Netgear Wifi Extender, press and hold the reset button for 10 seconds. Release the button once the LED lights start blinking.
Having a reliable Wi-Fi extender can greatly improve your internet connectivity and overall user experience. When it comes to troubleshooting issues or optimizing performance, knowing how to reset your Netgear Wifi Extender is essential. In this guide, we will walk you through the simple steps to reset your extender, ensuring smooth and uninterrupted internet access in your home or office.
Whether you are experiencing connectivity issues or just want to start fresh, performing a reset on your Netgear Wifi Extender can help resolve many common problems. Let’s dive in and get your extender back up and running in no time.
Why Resetting Netgear Wifi Extender Is Important
When it comes to optimizing the performance and connectivity of your Netgear WiFi Extender, resetting it plays a crucial role. Understanding why resetting your Netgear WiFi Extender is important can help you maintain a consistent and reliable wireless connection throughout your home or office. Let’s explore the significance of resetting your Netgear WiFi Extender.
Improves Performance
Resetting your Netgear WiFi Extender allows it to refresh and recalibrate, ultimately improving its performance. Over time, extender devices can experience a decrease in speed and range due to prolonged usage and network interferences. By resetting your Netgear WiFi Extender, you can ensure that it operates at its optimum capacity, providing faster and more stable internet connections.
Resolves Connectivity Issues
When your Netgear WiFi Extender encounters connectivity issues, it can significantly impact your internet experience. Resetting the extender can help in resolving various connectivity issues that may arise due to outdated network configurations or conflicting settings. With a quick reset, you can eliminate these obstacles and ensure seamless connectivity for all your devices.
Credit: www.netgear.com
Determining The Need To Reset Netgear Wifi Extender
If you are experiencing issues with your Netgear Wifi Extender, determining the need to reset it can help resolve common connectivity problems.
Slow Speeds Or Poor Connection
Slow speeds or poor connection are common signs that you may need to reset your Netgear Wifi Extender.
- Ensure all devices are connected to the extender network
- Check if there are any obstructions blocking the signal
- Resetting the extender can help refresh the connection
Frequent Disconnections
Frequent disconnections indicate a potential need to reset your Netgear Wifi Extender.
- Check if the extender is placed too far from the router
- Verify that the extender firmware is up to date
- A reset can often resolve connectivity issues
Methods To Reset Netgear Wifi Extender
Resetting your Netgear Wifi Extender can help resolve connectivity issues and improve performance. There are two main methods to reset your Netgear Wifi Extender: Soft Reset and Hard Reset.
Soft Reset
- Access the device settings
- Locate the reset button
- Press and hold the reset button for 5 seconds
- Wait for the extender to reboot
Hard Reset
- Locate the reset button on the extender
- Use a paperclip or pen to press and hold the reset button for 10 seconds
- Release the button when the power LED starts blinking
- Allow the extender to reset to factory settings
Soft Resetting Netgear Wifi Extender
If you are facing connectivity or performance issues with your Netgear Wifi Extender, performing a soft reset could help troubleshoot the problem. A soft reset restores the extender to its default settings, allowing you to start fresh. Follow these simple steps to perform a soft reset on your Netgear Wifi Extender.
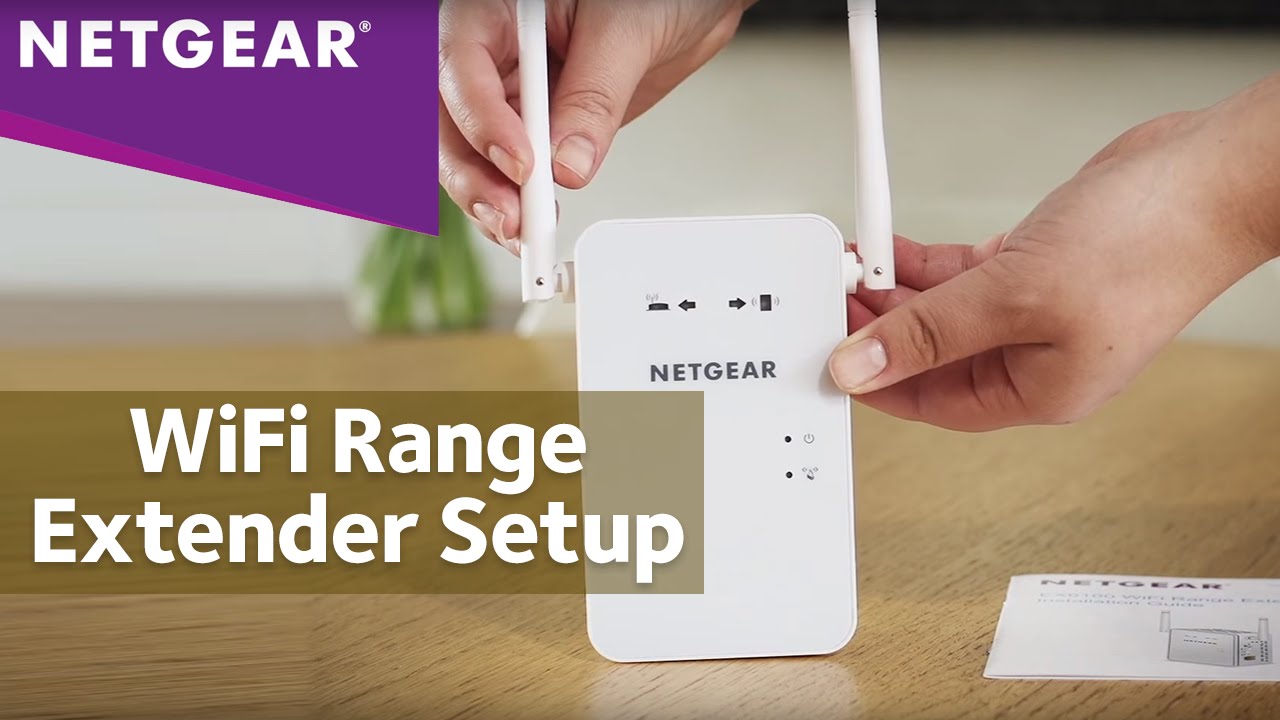
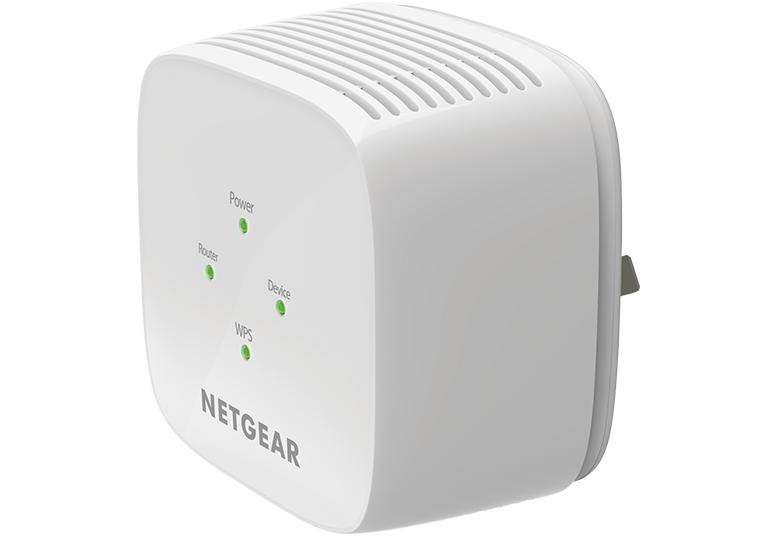
Step 1: Locate The Reset Button
Before you start the reset process, locate the reset button on your Netgear Wifi Extender. The reset button is typically a small, recessed button that can be found on the side or back of the device.
Step 2: Press And Hold The Reset Button
Using a pointed object such as a paperclip or a pen, press and hold the reset button for about 10-15 seconds. This will initiate the reset process, and you may notice the device’s lights blinking or turning off during this time.
Step 3: Release The Reset Button
After holding the reset button for the specified time, release it. Your Netgear Wifi Extender will now restart and reset to its default factory settings. This process may take a few minutes to complete.
Hard Resetting Netgear Wifi Extender
Hard resetting your Netgear Wifi Extender can be a useful troubleshooting technique when you encounter connectivity issues or need to restore the device to its default settings. This process helps to clear any configuration errors and ensures a fresh start for your extender.
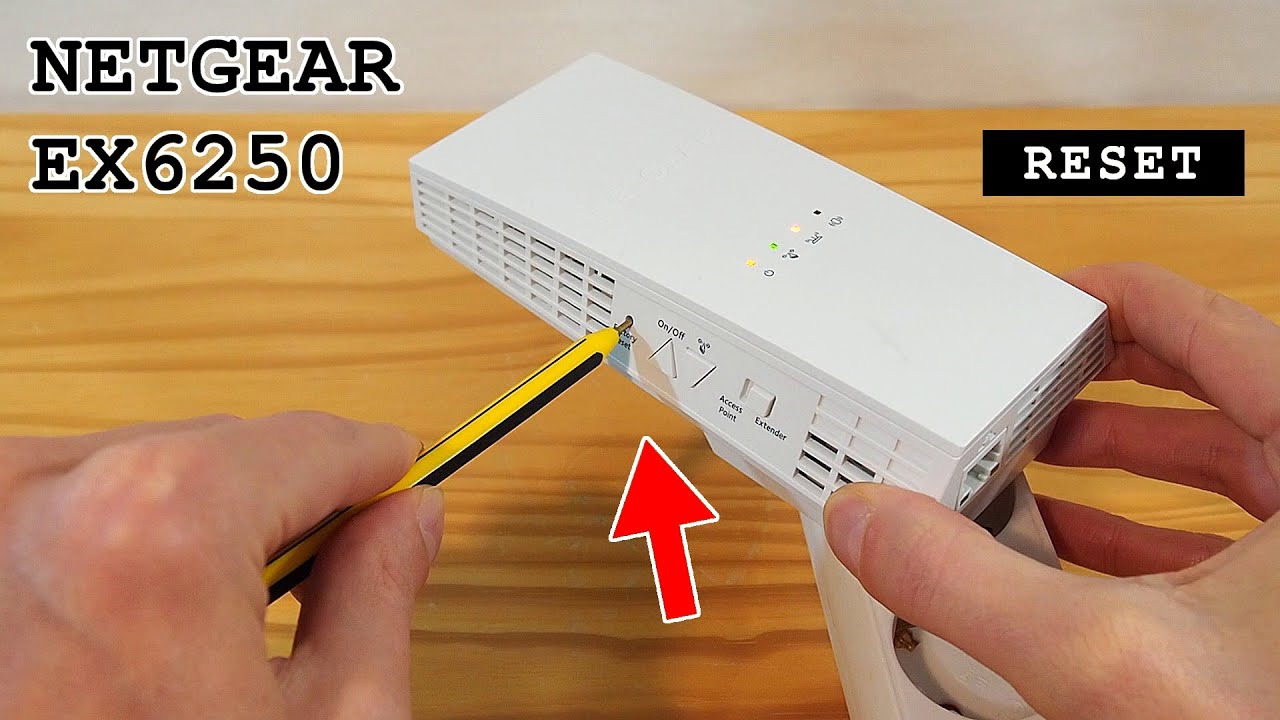
Step 1: Locate The Factory Reset Hole
To initiate the hard resetting process, you need to locate the factory reset hole on your Netgear Wifi Extender. This hole is usually found on the back or bottom of the device.
Step 2: Insert A Pin Or Paperclip
Once you have located the factory reset hole, grab a pin or paperclip to insert into the hole. This will serve as a tool to press the reset button inside.
Step 3: Hold For A Few Seconds
Now, press and hold the reset button inside the factory reset hole using the pin or paperclip. Make sure to hold it down for a few seconds, typically around 10 to 15 seconds. This is to ensure that the reset process is initiated successfully.
During the reset process, you may notice the LED lights on the extender blinking or turning off momentarily. This is normal and indicates that the device is being reset.
Once the hard reset is complete, the extender will reboot automatically. It will then revert to its default settings, erasing any customizations you may have made previously.
To set up your Netgear Wifi Extender again, follow the initial setup instructions provided by Netgear. This typically involves connecting the extender to your existing network and configuring its settings through a web-based setup wizard.
Remember, hard resetting your Netgear Wifi Extender should be done as a last resort when you have exhausted other troubleshooting options. It is a powerful method that can resolve various issues, but it also erases any personalized settings you have made.
Credit: www.netgear.com
Reconfiguring Netgear Wifi Extender After Reset
Resetting your Netgear WiFi extender can sometimes be necessary if you are experiencing connectivity issues or need to start fresh with your network settings. However, once the reset process is complete, you will need to reconfigure your Netgear WiFi extender to ensure it is properly connected to your network and providing an enhanced WiFi signal throughout your home. In this section, we will guide you through the steps of accessing the admin panel and setting up your WiFi extender again.
Accessing The Admin Panel
To begin reconfiguring your Netgear WiFi extender after the reset, you will first need to access the admin panel. This panel allows you to make changes to your extender’s settings and customize your network to suit your needs. Follow these simple steps to access the admin panel:
- Connect your computer or mobile device to the Netgear WiFi extender’s network.
- Open a web browser such as Chrome, Firefox, or Edge.
- In the address bar, type www.mywifiext.net and press Enter.
By following these steps, you will be directed to the Netgear extender login page where you can access the admin panel and continue with the reconfiguration process.
Setting Up Wifi Extender Again
Once you have successfully accessed the admin panel, you can begin setting up your Netgear WiFi extender again. This involves connecting your extender to your existing WiFi network and configuring a few basic settings. Follow these straightforward steps to complete the reconfiguration:
- In the admin panel, click on the Setup or Wireless Settings option.
- Select your existing WiFi network from the list of available networks.
- Enter your WiFi network password and click Next to proceed.
- Review the settings and click Apply to save the changes.
Congratulations! You have now successfully reconfigured your Netgear WiFi extender. It will take a few moments for your extender to apply the new settings and establish a stable connection with your WiFi network. Once the process is complete, you can enjoy faster, more reliable WiFi coverage in all areas of your home.
Reconfiguring your Netgear WiFi extender after a reset is a simple process that ensures your extender is optimized for your network. By following the steps outlined in this section, you can quickly get your extender up and running again, enhancing your WiFi experience and eliminating any connectivity issues you may have been facing. Remember, should you encounter any problems, referring to the Netgear user manual or contacting their customer support team will provide additional assistance and guidance.
Tips To Avoid Frequent Resets
When it comes to ensuring a stable and reliable Wi-Fi network, it’s important to minimize the need for frequent resets of your Netgear Wi-Fi extender. By following a few simple guidelines and best practices, you can optimize the performance of your extender and enjoy uninterrupted connectivity. Here are some valuable tips to help you avoid the hassle of frequent resets.
Regular Firmware Updates
Regular firmware updates are essential for maintaining the optimal performance of your Netgear Wi-Fi extender. By keeping your extender’s firmware up to date, you can ensure that it remains equipped with the latest bug fixes, security patches, and performance enhancements. Set a reminder to check for firmware updates at least once a month to ensure that your extender is running on the latest version.
Optimal Placement Of Wifi Extender
The placement of your Wi-Fi extender plays a crucial role in its performance. Ensure that the extender is positioned in a central location, away from obstructions and electronic devices that may cause interference. By placing the extender within the range of the primary router and avoiding areas with high signal interference, you can maximize its effectiveness.
Credit: m.youtube.com
Troubleshooting Common Issues After Reset
After resetting your Netgear WiFi extender, you may encounter some common issues that can easily be resolved. Below are steps to troubleshoot these problems:
Unable To Connect To The Network
Check if the extender is within the range of the router. Ensure the extender is properly powered on and the WiFi network name and password are entered correctly. Restart the extender and try connecting again.
Weak Signal Strength
If you experience a weak signal, relocate the extender closer to the router for better connectivity. Make sure there are no obstructions blocking the signal. Adjust the antennae of the extender for optimal signal strength.
When To Contact Netgear Support
If you’re having trouble with your Netgear WiFi extender and need to reset it, it’s best to contact Netgear support for assistance. Their team can guide you through the reset process and troubleshoot any issues you may encounter along the way.
When encountering persistent setup issues while resetting your Netgear WiFi extender:Persistent Setup Issues
If you face challenges with firmware updates or stumbling upon repetitive setup errors: – Contact Netgear Support immediately. – Seek assistance for a smooth reset process. In case of hardware malfunctions affecting the reset of your Netgear WiFi extender:Hardware Malfunctions
When hardware issues like power failures or connectivity problems persist: – Reach out to Netgear Support promptly. – Secure professional guidance for resolving the malfunctions.Frequently Asked Questions Of How To Reset Netgear Wifi Extender
How Do I Reset My Netgear Wifi Extender?
To reset your Netgear Wifi Extender, locate the reset button at the back of the device. Press and hold the reset button for about 10 seconds until the power LED blinks. Release the button and wait for the extender to restart.
Your Netgear Wifi Extender will be reset to its factory default settings.
What Should I Do If My Netgear Wifi Extender Is Not Working?
If your Netgear Wifi Extender is not working, try these troubleshooting steps:
1. Make sure the extender is properly plugged into a power outlet. 2. Check if the extender is in range of your router’s wifi signal. 3. Restart the extender and your router. 4. Reset the extender to its factory default settings and set it up again.
How Do I Set Up My Netgear Wifi Extender After Resetting?
After resetting your Netgear Wifi Extender, you need to set it up again. Follow these steps:
1. Connect your computer or mobile device to the extender’s wifi network (typically named “Netgear_Ext”). 2. Open a web browser and enter “http://mywifiext.net” in the address bar. 3. Follow the on-screen instructions to set up your extender and connect it to your home wifi network.
Why Is My Netgear Wifi Extender Not Connecting To My Router?
If your Netgear Wifi Extender is not connecting to your router, try these steps:
1. Make sure the extender is placed within range of your router’s wifi signal. 2. Check if the extender’s wifi network name and password are correct. 3. Restart the extender and your router. 4. Reset the extender to its factory default settings and set it up again.
Conclusion
Resetting your Netgear WiFi extender is a simple yet crucial task to ensure optimal performance. By following the step-by-step guide provided in this blog post, you can easily troubleshoot and resolve any connectivity issues. Remember, a properly reset WiFi extender can greatly enhance your internet experience.
Don’t hesitate to reach out for assistance with any additional queries.
0 comments