
To set up a TP-Link WiFi extender, plug it in, connect to its network, and follow the setup wizard. Setting up a TP-Link WiFi extender is easy and can greatly improve your wireless network coverage.
TP-Link extenders are user-friendly devices designed to boost your WiFi signal throughout your home or office. By following a few simple steps, you can enhance your internet connectivity and eliminate dead zones. This guide will walk you through the setup process to ensure a seamless and efficient experience.
Get ready to enjoy better WiFi coverage and connectivity with your TP-Link WiFi extender.

Credit: www.usatechblog.com
Step 2: Connecting Tp Link Wifi Extender To Power
Once you have chosen the optimal location for your TP-Link WiFi extender, the next step is to connect it to power. Follow the simple steps below to ensure a smooth setup process.
Choosing The Right Power Socket
Begin by selecting a power outlet in close proximity to the area where you intend to extend the WiFi coverage. Ensure that the socket is easily accessible and not obstructed by any obstacles that could impede the signal transmission.
Plugging In The Tp Link Wifi Extender
Get the TP-Link WiFi extender and plug it into the chosen power socket. Make sure the device is positioned in an upright manner for optimal signal reception. Avoid plugging the extender into a power strip or surge protector, as this may interfere with its functionality.
Credit: www.tp-link.com
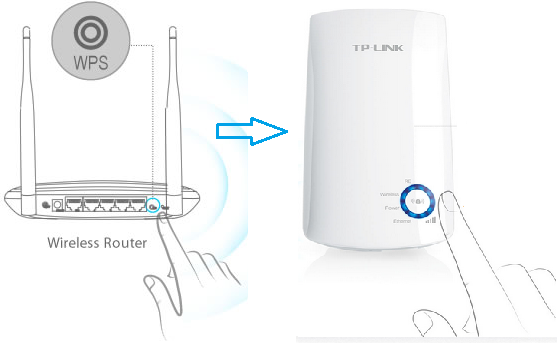
Step 3: Connecting The Tp Link Wifi Extender To Your Router
To connect your Tp Link Wifi Extender to your router, follow step 3 which involves a straightforward setup process. This ensures a seamless connection and enhanced wifi coverage throughout your home or office space.
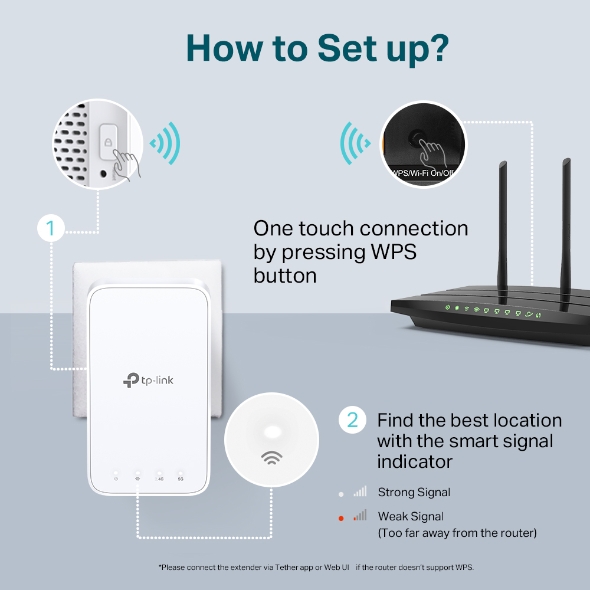
Finding The Wps Button On Your Router
Locate the WPS button on your router, usually found on the front or back panel.
Pressing The Wps Button On Your Router
Press and hold the WPS button on your router for about five seconds until the WPS LED starts blinking.
Pressing The Wps Button On The Tp Link Wifi Extender
Locate the WPS button on your Tp Link Wifi Extender and press it for about five seconds.
Waiting For The Connection To Be Established
Wait for a few minutes for the connection to be established between the extender and the router.
Step 4: Configuring The Tp Link Wifi Extender
In the fourth step of setting up the Tp Link Wifi Extender, you will need to configure the extender to your existing network. This involves connecting to the Tp Link Extender network and accessing its web interface through a web browser.
Follow the on-screen instructions to complete the configuration process.
Accessing The Tp Link Wifi Extender’s Settings Page
To begin configuring your Tp Link Wifi Extender, access the settings page by entering the default IP address in your web browser.
Once the login page appears, use the default username and password provided with the extender to log in.
Creating A New Password For The Extender
For security, it’s essential to create a new password. Navigate to the settings option and choose the change password feature.
Enter a strong, unique password, and save the changes to ensure your extender is protected from unauthorized access.
Selecting The Wifi Network To Extend
Go to the settings menu and select the option to extend the wifi network. A list of available networks will appear.
- Choose the network you want to extend by selecting it from the list.
- Enter the network password if required, and save the settings to complete the setup process.
Credit: m.youtube.com
Step 5: Testing The Tp Link Wifi Extender
Step 5: Testing the Tp Link Wifi Extender
Checking The Wifi Signal Strength In Different Areas
“` When setting up your TP-Link Wi-Fi Extender, it’s essential to check the signal strength in various locations around your home. A stronger signal means better connectivity, so testing different areas can help you optimize the placement of your extender. Using a smartphone or other device, check for the Wi-Fi signal strength in areas where you previously experienced weak connectivity. “`htmlVerifying The Connection Stability
“` Once the TP-Link Wi-Fi Extender is set up, it’s crucial to verify the stability of the connection. Ensure that your devices are seamlessly connected to the extended network without any interruptions or disconnections. Verify the stability of the connection by browsing the internet, streaming videos, or using any other online applications to check for any latency or drop in connectivity. By testing the signal strength and verifying connection stability, you can ensure that your TP-Link Wi-Fi Extender is providing optimal coverage and performance throughout your home.Common Troubleshooting Tips
In this section, we will go over some common troubleshooting tips to help you set up your Tp Link Wifi Extender successfully. If you encounter any difficulties during the setup process, these tips can help resolve the issues.
Resetting The Tp Link Wifi Extender
If you are experiencing connectivity issues or your Tp Link Wifi Extender is not working properly, resetting the device can often solve the problem. Here’s how to do it:
- Locate the Reset button on the side or back of the extender.
- Using a paperclip or small pin, press and hold the Reset button for about 10 seconds.
- Release the Reset button and wait for the extender to restart.
After resetting the Tp Link Wifi Extender, you will need to set it up again by following the initial setup process.
Checking For Firmware Updates
Outdated firmware can cause compatibility issues and impact the performance of your Tp Link Wifi Extender. It’s essential to regularly check for firmware updates and install them if available. Follow these steps to check for and install firmware updates:
- Launch a web browser on a device connected to your extender’s network.
- Type the IP address of the extender in the browser’s address bar and press Enter.
- Enter your login credentials and click Login.
- Go to the Firmware Upgrade section in the extender’s settings.
- If a new firmware version is available, click the Upgrade button to install it.
- Wait for the upgrade process to complete and do not turn off the extender during this time.
Regularly updating the firmware ensures that your Tp Link Wifi Extender remains secure and performs optimally.
Frequently Asked Questions Of How To Set Up Tp Link Wifi Extender
Q1: How To Set Up Tp Link Wifi Extender?
A: To set up your Tp Link Wifi Extender, plug it into a power outlet near your router. Press the WPS button on your router, then the WPS button on the extender. Wait until the LED light turns solid green, indicating a successful connection.
Finally, connect your devices to the extended network.
Q2: What Is A Tp Link Wifi Extender Used For?
A: Tp Link Wifi Extender is used to extend the range of your Wi-Fi network. It amplifies the existing Wi-Fi signal, allowing you to access the internet in areas where the signal was previously weak or non-existent. This device is especially useful in larger homes or offices with multiple floors or thick walls.
Q3: Can I Use Multiple Tp Link Wifi Extenders?
A: Yes, you can use multiple Tp Link Wifi Extenders to further extend the range of your Wi-Fi network. Simply set up each extender as instructed and place them strategically throughout your home or office. This will help ensure a strong and reliable Wi-Fi connection in all areas.
Conclusion
In just a few simple steps, you can set up your TP-Link Wi-Fi extender and enjoy enhanced internet coverage throughout your home. By following the instructions provided in this blog post, you can ensure a smooth and hassle-free installation process.
With your extender up and running, say goodbye to Wi-Fi dead zones and hello to seamless connectivity.
0 comments