
To transfer Windows 11 from one SSD to another, you can use disk cloning software. This process involves creating an exact copy of the original SSD onto the new SSD.
With disk cloning, you can seamlessly move all data, settings, and Windows installation from one drive to another without the need to reinstall the operating system. This method is efficient and ensures that your new SSD will have an exact replica of your old one, allowing you to continue using your system without any interruptions.
By following the steps carefully and using reliable software, you can successfully transfer Windows 11 to a new SSD with ease.
Preparing For The Transfer
When it comes to transferring Windows 11 from one SSD to another, preparation is key to a successful and smooth process. Before beginning the transfer, there are several crucial steps to take in order to ensure that everything goes according to plan. Preparing for the transfer involves checking system requirements and backing up your data to prevent any potential data loss during the process.
Check System Requirements
Before initiating the transfer of Windows 11 to a different SSD, it’s essential to ensure that the target SSD meets the system requirements for the new operating system. Check the capacity and compatibility of the new SSD with the Windows 11 system requirements as listed on the official Microsoft website. This step is crucial to guarantee that the new SSD can effectively support the operation of Windows 11 without any compatibility issues.
Backup Your Data
It is highly recommended to back up all the data present on the current SSD before initiating the transfer process. This can be done by utilizing a reliable backup solution to create a complete backup of all your files, folders, and important data. By creating a backup, you can safeguard your precious data against accidental loss or corruption during the transfer process. Ensure that the backup is stored in a safe and secure location to have peace of mind throughout the transfer.
Credit: www.ubackup.com
Cloning Windows 11 To New Ssd
Cloning Windows 11 to a new SSD is a simple process that can help you seamlessly transfer your operating system and data to a faster and more spacious storage device. Follow these steps to clone Windows 11 to a new SSD:
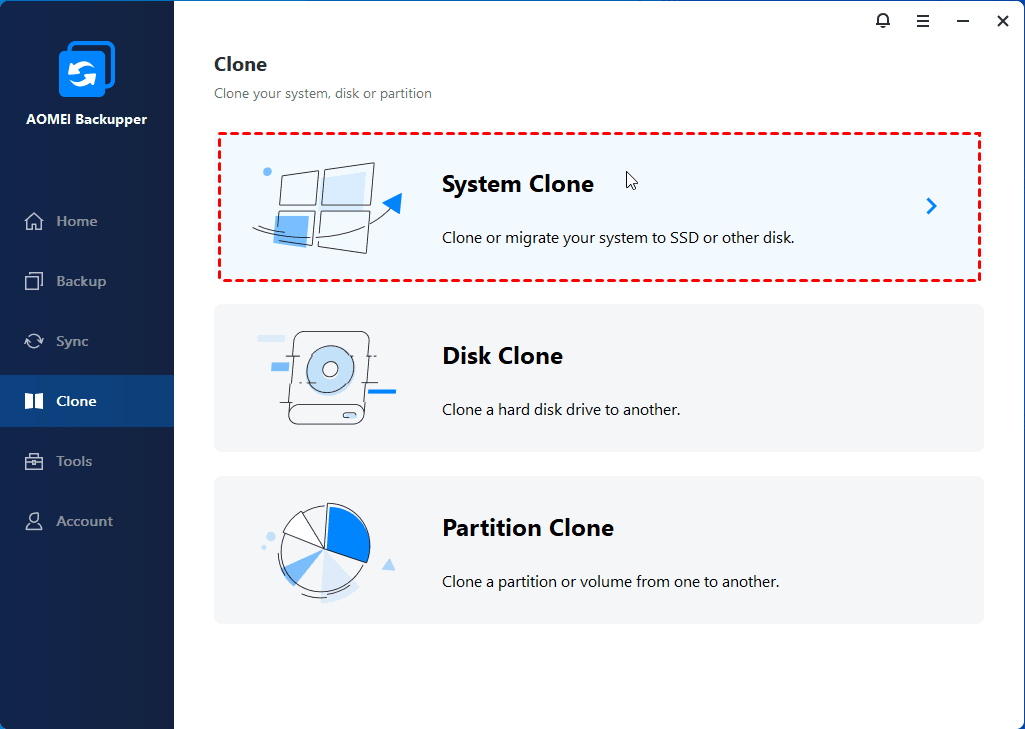
Choose A Cloning Software
Select a reliable cloning software like Macrium Reflect or Clonezilla for the cloning process.
Connect And Format New Ssd
Connect the new SSD to your computer using a compatible SATA cable. Format the new SSD to ensure compatibility with your system.
Clone Windows 11 To New Ssd
- Launch the cloning software and select the option to clone your current Windows 11 installation.
- Choose the source drive (existing SSD) and the destination drive (new SSD) for the cloning process.
- Start the cloning process and wait for it to complete, ensuring all data is successfully transferred.
- Once the cloning is done, shutdown your computer and replace the old SSD with the new one.
- Boot up your system and verify that Windows 11 is running smoothly on the new SSD.
Verifying The Transfer
After transferring Windows 11 from one SSD to another, it is crucial to verify the transfer to ensure it was successful. This step confirms that your new SSD is functioning properly and has correctly copied all the necessary files.
Disconnect Old Ssd
Disconnect the old SSD from your computer to avoid any conflicts during the boot-up process with the new SSD.
Boot From New Ssd
Boot your computer directly from the new SSD to confirm that Windows 11 loads correctly and all your files are accessible.
Troubleshooting
While transferring Windows 11 from one SSD to another, you may encounter some common troubleshooting scenarios. Let’s take a look at these and how to address them:
Errors During Cloning
When attempting to clone Windows 11 to a new SSD, you may encounter errors that disrupt the cloning process. These errors could be due to various factors such as disk errors, insufficient space, or software conflicts. It’s crucial to address these errors promptly to ensure a successful transfer.
Incompatibility Issues
Incompatibility issues may arise when transferring Windows 11 to a new SSD, especially if the destination SSD has different specifications or is not compatible with Windows 11. This can lead to boot failure or driver conflicts. Ensuring compatibility between the source and destination SSD is essential to avoid encountering such issues.
Updating Windows 11
Updating Windows 11 is an essential step when transferring the operating system from one SSD to another. Here, we will guide you through the process, starting with checking for updates, and then updating drivers to ensure your new SSD runs smoothly. Let’s get started!
Checking For Updates
Before transferring Windows 11 to a new SSD, it is crucial to ensure that your operating system is up to date with the latest updates and patches. To check for updates, follow these simple steps:
- Open the Start menu by clicking the Windows icon located on the bottom left corner of your screen.
- Click on the “Settings” icon, which resembles a gear.
- In the Settings window, click on “Update & Security”.
- Here, you will find the “Windows Update” tab. Click on it.
- Click on the “Check for updates” button to search for any available updates for your system.
Once the search is complete, Windows 11 will display any available updates. If there are updates available, click on the “Install” button to proceed with the update installation.
Updating Drivers
In addition to updating the Windows 11 operating system, it is essential to update your device drivers to ensure optimal performance on the new SSD. Follow these steps to update your drivers:
- Open the Start menu and click on “Device Manager”.
- In the Device Manager window, expand the different categories to locate the devices requiring driver updates.
- Right-click on the device that needs an update and select “Update driver”.
- You will be presented with two options: “Search automatically for updated driver software” and “Browse my computer for drivers”.
- If you have an internet connection, select the first option to allow Windows 11 to search and install the latest drivers automatically.
- If you have downloaded the updated drivers manually, select the second option and browse to the location where you saved the driver installation files.
- Follow the on-screen instructions to complete the driver update process.
Updating drivers on your Windows 11 system ensures that all hardware components are compatible with your new SSD and perform optimally. It is important to note that not all drivers require an update, so make sure to prioritize the critical ones.

Credit: m.youtube.com
Optimizing The New Ssd
Looking to optimize your new SSD? Learn how to seamlessly transfer Windows 11 from one SSD to another with these straightforward steps. Enhance your system’s performance and storage capacity with this easy and efficient process.
Enable Trim
When it comes to optimizing your newly transferred Windows 11 to a new SSD, one crucial step is to enable Trim. Trim is a command in Windows that allows the operating system to communicate with the SSD and optimize its performance. By enabling Trim, you ensure that the SSD can properly manage and organize the stored data, resulting in improved speed and longevity. To enable Trim, follow these simple steps:- Press the Windows key + R to open the Run dialog box.
- Type in “cmd” and press Enter to open the Command Prompt.
- Input the command “fsutil behavior set DisableDeleteNotify 0” and press Enter.
- Restart your computer to apply the changes.
Disable Superfetch
Another crucial step in optimizing your newly transferred Windows 11 to a new SSD is to disable Superfetch. Superfetch is a Windows service that preloads frequently used programs into memory to improve system responsiveness. However, on SSDs, Superfetch can cause unnecessary wear and tear as it constantly writes and reads data. To disable Superfetch, follow these steps:- Press the Windows key + R to open the Run dialog box.
- Type in “services.msc” and press Enter to open the Services window.
- Scroll down and locate the “Superfetch” service.
- Right-click on “Superfetch” and select “Properties”.
- In the “General” tab, select “Disabled” from the “Startup type” drop-down menu.
- Click on “Apply” and then “OK”.
- Restart your computer to apply the changes.

Credit: m.youtube.com
Frequently Asked Questions For How To Transfer Windows 11 From One Ssd To Another
Can I Transfer Windows 11 To A New Ssd?
Yes, you can transfer Windows 11 to a new SSD using disk cloning software or the Windows built-in feature called “System Image Backup”. Make sure to back up all your data before starting the transfer process.
How Do I Transfer Windows 11 From One Ssd To Another?
To transfer Windows 11 from one SSD to another, you need to create a system image backup of your current SSD. Then, connect the new SSD and restore the system image backup onto it. Finally, set the new SSD as the boot drive in the BIOS settings.
What Software Can I Use To Transfer Windows 11 To A New Ssd?
There are various software options available to transfer Windows 11 to a new SSD, such as EaseUS Todo Backup, Macrium Reflect, or Acronis True Image. These software tools offer disk cloning or system image backup and restore features to transfer the OS to a new SSD seamlessly.
Conclusion
Transferring Windows 11 to a new SSD is a straightforward process, but it requires careful planning and execution. By following the steps outlined in this blog post, you can ensure a seamless transition without losing any data or experiencing any technical glitches.
With the right tools and knowledge, transferring your operating system can be a hassle-free experience, allowing you to enjoy the benefits of a new SSD without any worries.
0 comments